
Let's build a PolyBriX tractor (with cooler wheels)
Obliczymy ostateczną cenę na podstawie wybranego pliku. Sprawdzisz ją i zaakceptujesz przed płatnością.
Zapisane na tym urządzeniu.

Building a tractor with the PolyBriX construction kit
- Ocena
- 0 / 5
- Polubienia
- 201
- Pobrania
- 460
- Wydruki
- 0
- Wyświetlenia
- 4942
- Oceny
- 0
Aktualizacja u źródła:
Informacje o modelu
- Źródło
- Printables
- Kategoria
- Building Toys
- Licencja
- Creative Commons — Attribution — Share Alike
This is the full documentation for building a tractor with the PolyBriX construction kit.
This project only provides the STLs with all the required parts and the detailed assembly instructions.
The individual parts can be downloaded form the PolyBriX project.
Printing instructions:
Walls count: 5
Infill pattern: Zig-Zag
Infill density: 10%
No supports.
I've used PETG, but PLA will probably work as well
Print the provided STLs in this project or download the individual parts from the PolyBriX project.
Assembly instructions
The parts should be assembled according to this picture
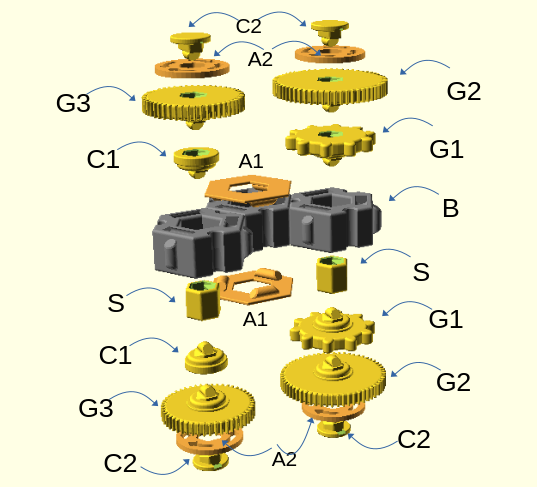
Parts list:
3xB - hex_brick_all_sockets
2xS - gear_connect_shaft
2xG1 - 10_teeth_counter_gear
2xC1 - gear_cap
2xA1 - hex_hollow_addon
4xA2 - arrows_cw_ccw_addon
4xC2 - addon_terminal_cap
What to print:
- tractor_small_parts.stl
- tractor_addons.stl
For the bricks
If using a Prusa printer, try first the tractor_bricks_tight_tolerance.stl
If using a different printer, try first the tractor_bricks.stl
For version 1, print the wheels from tractor_wheels_v1.stl
For version 2, print the wheels from tractor_wheels_v2.stl
Version 2 wheels are composed from two parts, an inner and an outer part, and are assembled as in the following picture:
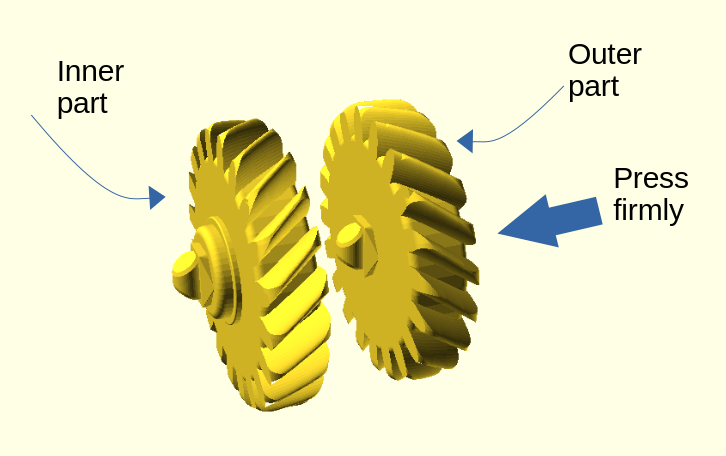
Tip: It's easier to assemble if you place the inner part, face down, into a hex brick and then press the outer part into it.
Assembly steps:
Note: If you're using version 2 wheels, please replace G2 and G3 wheels with their corresponding version 2 wheels, in the following steps.
- Clean all the contact areas of each part
- First, assemble the 3 hex bricks as shown in the picture
- Attach the A1 add-on, for the cabin
- Insert the S shafts in their corresponding holes, in the body, assembled at step 1
- Insert the C1 cap and the G1 gear into their corresponding shafts, by pressing them firmly
- Insert G3 into C1 and G2 into G1, also by pressing them firmly
- Turn the whole mechanism on the other side and proceed adding C1, G1, G3 and G2 as described before
- Attach the 4 A2-C2 pairs by first inserting A2 into C2's small shaft and the press the whole thing into each wheel's socket
Now you have a PolyBriX tractor to play with!