
*SALE*April Fools Massive Pencil PRO
Obliczymy ostateczną cenę na podstawie wybranego pliku. Sprawdzisz ją i zaakceptujesz przed płatnością.
Zapisane na tym urządzeniu.

Start writing with this fully functional comedically large pencil, act normal, and enjoy peoples reactions.
- Ocena
- 0 / 5
- Polubienia
- 4
- Wydruki
- 0
- Wyświetlenia
- 148
- Oceny
- 0
Aktualizacja u źródła:
Informacje o modelu
- Źródło
- Printables
- Kategoria
- Props
- Licencja
- Standard Digital File License
The April Fools Massive Pencil Pro features a fully functioning advancing graphite system and sharpener. Simply write, advance, sharpen, and repeat. All you need for this build is a this graphite stick* and your 3D printer!
*(Affiliate link) Thanks for the support!
Start writing like normal and enjoy peoples disbelief!
BOM:
| Qty. | Item. (Affiliate links) Thanks for the support! |
|---|---|
| 1x | CRETACOLOR Chunky Graphite Stick |
| 1x | Standard X-acto knife blade |
| 2x | optional 6x2mm Magnets (or use glue, E6000 works well) |
| 1x | optional m2x4 or longer machine screw (or use glue, E6000 works well) |
| 1x | optional massive Pentel® eraser (you need a big eraser for a big pencil) |
Printed Parts:
The shell should be printed in yellow, The wood section can be printed in wood or brown, the spacer should be printed in silver to emulate the graphite seen on the bottom of a pencil, and the ratchet should be printed in a somewhat bendy plastic like PETG, PLA+, or a forgiving PLA.
Assembly Instructions:
Core Assembly:
Printed Parts:
Pin, Ratchet, Core and Spacer
Materials:
1x Graphite stick, Glue (E6000 works very well), 2x 6x2mm magnets
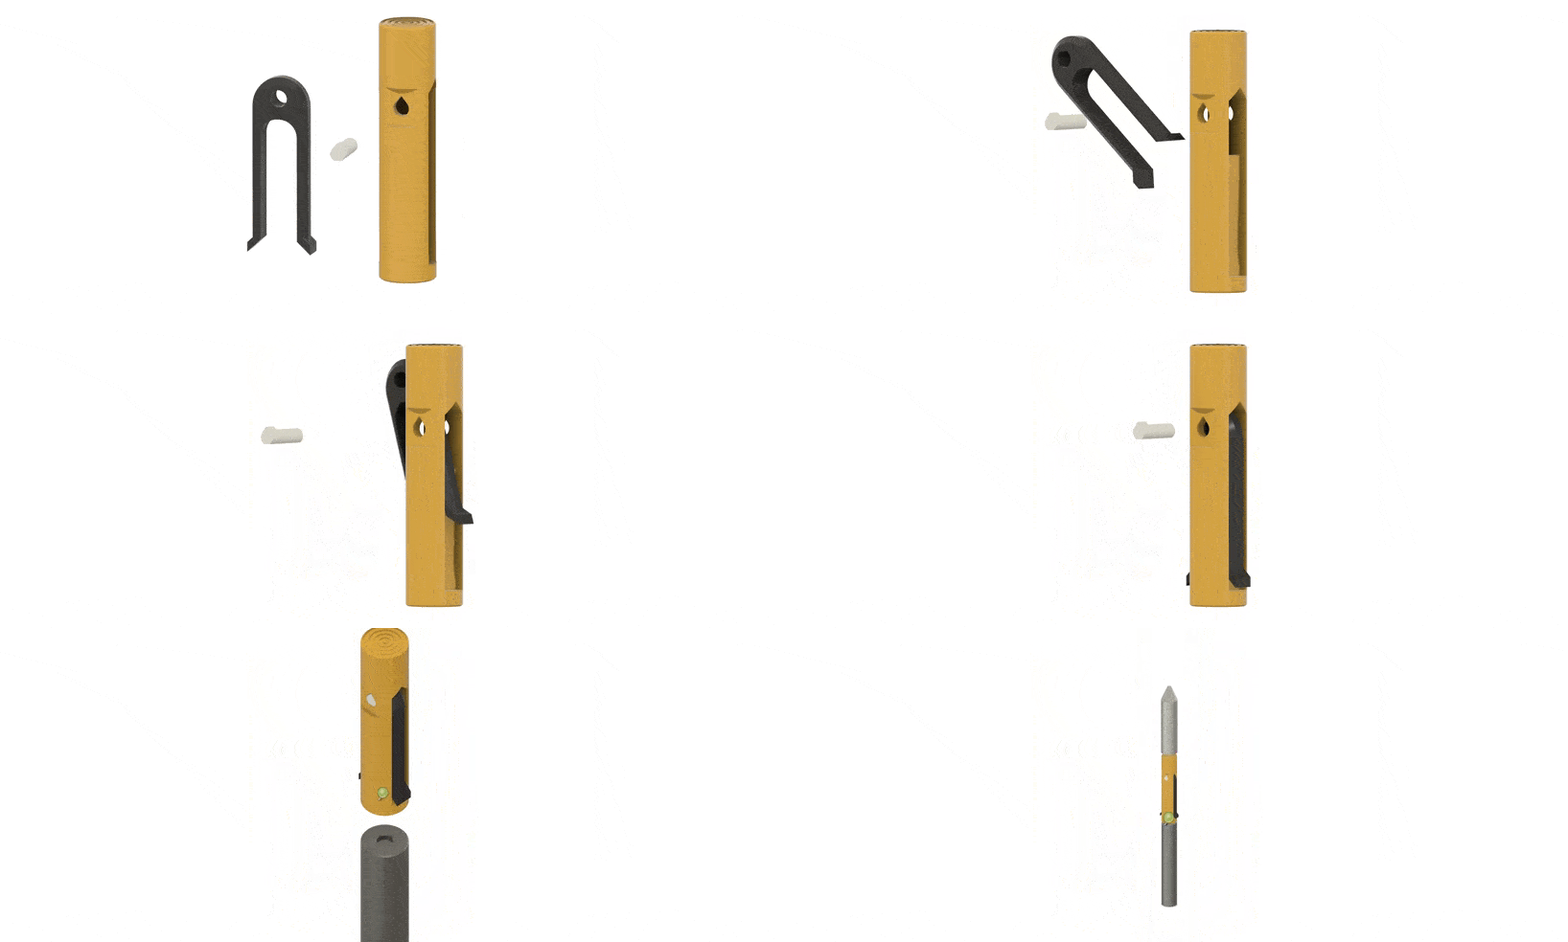
Pop the ratchet claw into the core, insert the pin skinny side first. It should sit flush with the outer surface.
As seen below insert magnets (🟢) in the corresponding holes in the core and spacer. Glue making sure they attract each other!
Roughen up the bottom of the graphite and glue it onto the bullseye surface on the core. Add a little masking tape around the joint while it cures so it stays concentric!
Body Assembly:
Printed Parts:
Shell, Wood, and the assembled core
Press the wooden pencil into the yellow shell making sure that the sharpened section is facing the same way. Depending on your printers tolerances and if you are using wood filament which usually expands a little, you may need to press firmly or add a little glue to secure it.

Insert the assembled core into the bottom of the pencil ensuring that the ratchet claws line up with the notches within the wooden pencil. When you push it all the way in, you will hear a clicking noise.

Sharpener Assembly:
Parts:
Sharpener, 1x X-acto knife blade, 1x m2 screw or glue
Simply secure the blade to the printed sharpener with the machine screw or glue.

You are now ready to fool people! When you need to sharpen your pencil, press on the silver spacer on the bottom of your pencil until you hear a click. Then sharpen away.
After a lot of use, the graphite may get everywhere so wipe it down with a damp paper towel.
Happy Fooling! (Recommended to use this massive Pentel® eraser to sell the joke even more!)