
Retro Fume Extractor / Roland Speaker Inspired
Obliczymy ostateczną cenę na podstawie wybranego pliku. Sprawdzisz ją i zaakceptujesz przed płatnością.
Zapisane na tym urządzeniu.

Roland speaker inspired fume extractor
- Ocena
- 0 / 5
- Polubienia
- 7
- Pobrania
- 21
- Wydruki
- 0
- Wyświetlenia
- 202
- Oceny
- 0
Aktualizacja u źródła:
Informacje o modelu
- Źródło
- Printables
- Kategoria
- Electronics
- Licencja
- Creative Commons — Attribution — Noncommercial — Share Alike
Hey everyone! It took a while but I finally finished these Roland speaker inspired fume extractor. I wanted to build an extractor that blends into my setup, like a sleeper fume extractor lol.
I created the model with the primary goal of easy printing so if you notice, the top front panel has texture. If you don't want the texture, use a smooth plate or experiment with fuzzy skin.
PETG Filament, 0.4 nozzle. Make sure your printer's calibrated so that everything fits.
Parts list:
- High CFM 120mm fan. (I used an Arctic P12 Max for this project, but I recommend the Noctua NF-A12x25 if you want a quieter fan and don't mind spending more)
- 2 pin round rocker switch
- Barrel jack & power supply
- 10x2mm magnets (8pc)
- 120x120mm charcoal filter (I recommend this one)
- Superglue
- Heat shrink tubing
Print list
- 1x Main shell
- There are two versions.
- “For pin” is for those who don't have/want to buy M3 heatset inserts & screws. This is what I prefer.
- “For M3” is if you have/will buy inserts. It's stronger but you'll have to make sure that the hole mounts are at a high % infill. Use 30mm M3 screws and washers.
- There are two versions.
- 4x Pin (if using “for pin” shell)
- 1x Everything else (You don't necessarily need the “Duct” if you want to save on filament. I printed it with the idea of forcing the air out the back.)
Note: I left a blank STEP file for the grill and logo if you want to personalize it :D
Assembly:
Wiring -
Be sure to test before assembling everything

Find which wire is negative and positive on your fan if you have a PWM fan. Here's a diagram for the Arctic P12 Max if you're using one.
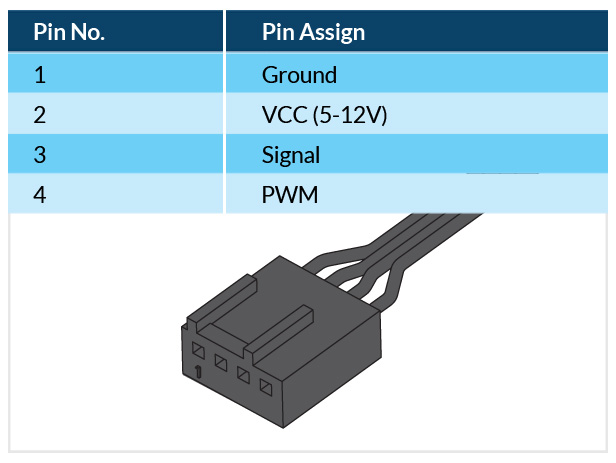
You could cut the positive wire of the fan in half OR use an extra wire if you already have it.
Be sure to glue the rocker switch to the “Front Panel Bottom” before attaching the positive wires. Use heat shrink tubing for the switches for safety.
Putting parts together -
Glue 8 magnets on the red circles and glue the "bottom front panel" where the magenta line is.
ALSO. Glue the outer ring and make sure it dries before attaching the grill.


And that's it! Enjoy the process and your new fume extractor! Post your makes here as well since I want to see what you guys come up with!
In the video I posted on YouTube, I noted that I have an air purifier in the room to make sure that the air is safe in the long term. I made this to make sure that the smoke doesn't go to my eyes and to lessen the odor.