
Fully Customizable Art Stamp Generator for Text & Graphics
Obliczymy ostateczną cenę na podstawie wybranego pliku. Sprawdzisz ją i zaakceptujesz przed płatnością.
Zapisane na tym urządzeniu.
This Blender add-on lets you generate dozens of customizable stamps of any size with text or artwork in just minutes!
- Ocena
- 0 / 5
- Polubienia
- 24
- Pobrania
- 184
- Wydruki
- 2
- Wyświetlenia
- 1503
- Oceny
- 0
Aktualizacja u źródła:
Informacje o modelu
- Źródło
- Printables
- Kategoria
- Other Art & Designs
- Licencja
- Creative Commons — Attribution — Noncommercial — Share Alike
Whether you require ink stamps for the classroom, the office, home, custom artwork or just for fun, I created this easy to use design tool to simplify your creative needs. Also use them to make t-shirt bleaching art! Your kids will love them! Learn how to make them: How-To: Stamp On Your Clothes with Bleach - Make:

The Rubber Stamp Generator lets you generate an infinite number of customizable rubber ink stamps ready for 3D printing using Blender. You can choose a circular or rectangular base, set to any size, add custom text or import any high-quality SVG artwork, engrave or emboss the details, view the model then export to an STL file. Note that text or SVG images are scaled automatically by the Python script to fit the stamp base dimensions you have chosen.
Follow these useful tips to make your stamps: How to 3D print stamps
Here are some examples of different stamps created with this handy generator tool:
- Aliens & UFO Series: Alien & UFO Series Ink & t-shirt Bleaching Art Stamps by 3DMason | Download free STL model | Printables.com
- Octopus Series: Octopus Series Ink & t-shirt Bleaching Art Stamps by 3DMason | Download free STL model | Printables.com
- Minecraft Series: Minecraft Series Ink & t-shirt Bleaching Art Stamps by 3DMason | Download free STL model | Printables.com
- Nikola Tesla: Nikola Tesla Ink & t-shirt Bleaching Art Stamp by 3DMason | Download free STL model | Printables.com
- Happy Mother's Day: Happy Mother's Day Ink & t-shirt Bleaching Art Stamp by 3DMason | Download free STL model | Printables.com
- Happy Father's Day: Happy Father's Day Ink & t-shirt Bleaching Art Stamp by 3DMason | Download free STL model | Printables.com
Main Features
- Choose from a circular or rectangular base;
- Set stamp diameter, or length & width, including height (in mm);
- Type in any text & provide a font path, or use the default font;
- Load an SVG file (instead of text) & the image will auto-resize;
- Toggle between 'Engrave' (sunken) and 'Emboss' (raised);
- Generate the model & view in Blender;
- Export model to STL.
Installation
The Blender Add-on consists of a Python script which utilizes certain Application Programming Interfaces (API's). These are:
- bpy: Core Blender API;
- math: Used for rotation, radians;
- os: File path checking for fonts;
- addon_utils: Enables STL exporter;
- from mathutils import Vector: Used for mesh bounds & knob placement;
- from bpy.props import StringProperty, FloatProperty, BoolProperty, EnumProperty: UI properties;
- from bpy_extras.io_utils import ImportHelper, ExportHelper: File dialogs (Import/Export).
All of the above listed API's are already bundled with Blender and available automatically when running scripts in Blender’s Text Editor, Python Console, or as an Add-on. Therefore, the provided Ink Stamp Generator Add-on works out of the box — no pip installs or manual preloading needed.
Here is how to include this Add-on within Blender:
- Open Blender & select General from the startup menu;
- Delete the default grey cube that shows up in the center of the 3D Viewport;
- Go to Edit > Preferences > Add-ons;
- Go to the top right pull-down menu in the Preferences window; i.e. Add-ons Settings & select Install from Disk… and choose the downloaded ZIP file: rubber_stamp_generator.zip. You can also install from the provided .py file if you prefer not using .zip files;
- Enable the checkbox to activate the add-on if it isn't already selected;
- In the 3D Viewport, enter 'n' on your keyboard to reveal the sidebar;
- In the sidebar, switch to the 'Stamp' tab at the bottom of the sidebar;
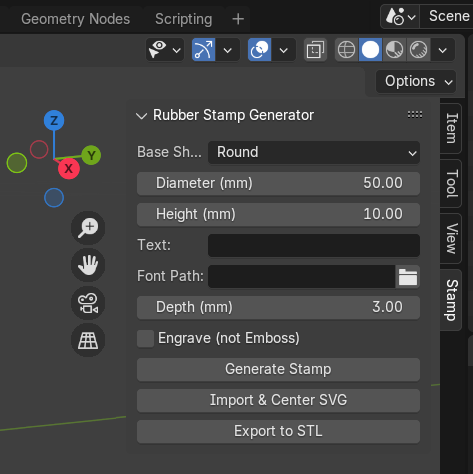
- If the procedure was successful, you should end up with with a Blender sidebar that looks like this & labeled Rubber Stamp Generator:
How to Use
- Select the stamp Base Shape. The options are Round or Rectangular;
- For Round Base: Select the Diameter (mm) & Height (mm) of the base;
- For Rectangular Base: Select the Length (mm), Width (mm) & Height (mm) of the base;
- Enter the Text you want on your stamp. Example: APPROVED. The text will automatically size itself to fit within the stamp base area. Note that this version of the generator doesn't support line feeds yet;
- Choose the Font you want to assign to your text & define its file Path, or use the default. Blender will load and apply the font at the specified path when generating the text. Make sure the path is absolute (e.g.,
C:/Windows/Fonts/Arial.ttf); - Choose the Depth (mm) of the text or artwork imprint;
- Choose whether your stamp feature will be Engrave or Emboss;
- Enter Generate Stamp to view the stamp design in Blender's 3D Viewport & Zoom in a lot because Blender's default view is in meters, not millimeters;
- Make sure to always enter Generate Stamp if you make any additional changes along the way in order to refresh & view the new updated model;
- If you want to use artwork instead of text on your stamp, select Import & Center SVG. The artwork must be in SVG format & will center & resize itself automatically to the dimension of the stamp base. IMPORTANT NOTE: Only B&W, flattened SVG's are supported with white or transparent backgrounds. Several examples of a compatible SVG files are provided in the file section;
- Save to an STL by selecting Export to STL, & provide a file name.
If you are getting any errors when trying to output STL's, make sure you have the STL extension installed; i.e. Edit → Preferences → Get Extensions & in the search box, type:
stl → enable: “Import-Export: STL format”
For rubber stamping, black & white (B&W) vector graphics are ideal
| Color Type | Result in Stamp | Why Use It? |
|---|---|---|
| Black fill | Raised or cut (depending on emboss or engrave) | The black shape defines the physical geometry to extrude or subtract |
| White / Transparent | No geometry | Keeps the background flat or untouched |
| Grayscale / Anti-aliased edges | ❌ Unpredictable | Results in fuzzy edges, uneven heights, or nothing usable at all |
Tips for Preparing SVGs for Stamps
- Use solid black fills for shapes you want engraved or embossed
- Avoid gradients or strokes unless you're intentionally designing outlines
- Convert strokes to paths if needed (
Path > Stroke to Pathin Inkscape) - Center and flatten groups for best import results
- There are a number of good sources available to download free SVG's:
Notes
- All measurements are in millimeters;
- Text or SVG images are scaled automatically to fit the stamp base.

Questions or improvement suggestions? I’d love to hear your feedback! & Please leave a like - it would mean a lot to me! Thanks for you support!