Sunchronizer D1 - Dual Axis solar tracker for 400W solar panels by Nerdiy.de
Obliczymy ostateczną cenę na podstawie wybranego pliku. Sprawdzisz ją i zaakceptujesz przed płatnością.
Zapisane na tym urządzeniu.
Informacje o modelu
- Źródło
- Printables
- Kategoria
- Electronics
- Licencja
- Standard Digital File License
Since I started working on small scale solar power plants, I continued to search for ways to increase the energy yield of the two to four solar modules.
The “Sunchronizer D1" Dual Axis Tracker is a solar module holder with which “standard” 400W solar modules can automatically track the sun on the elevation and azimuth axis. As with other projects on Nerdiy.de, the required components consist largely of 3D printed components and standard mechanical parts.
The Sunchronizer D1 is the successor of the Sunchronizer S1.
With the parts included in this offer ultimately, everyone should be able to build their own solar tracker for their solar modules.
Please Note!
Meanwhile I released the second version of the Sunchronizer the Sunchronizer S2 and the Sunchronizer D2.
Advantages of the Sunchronizer S2/D2 compared to the Sunchronizer S1/D1
Smaller form factor
Requires less material
Simpler electronics
Actuators are better protected and more powerful
I highly recommend to use the new design!
Electronics
To read and control the different sensors and actuators I designed a PCB that contains the needed electronic-modules. The heart of the electronics is based on an ESP32.
The firmware of the ESP32 is based on ESPHome and can therefore be easily integrated into HomeAssistant or many other SmartHome systems.
The Sunchronizer can also be used independently of a connection to other systems. For example, the position can be obtained automatically via a GPS receiver, which means that the current time is also known.
Based on this data (and the permanently measured orientation (compass direction) of the Sunchronizer), the optimal elevation and azimuth angle is then calculated and set. So that this can be set correctly, the elevation angle of the solar module is measured using an acceleration sensor and adjusted accordingly if necessary. The azimuth angle is measured using an integrated three-axis magnetometer-/compass-module
Elevation axis tracking
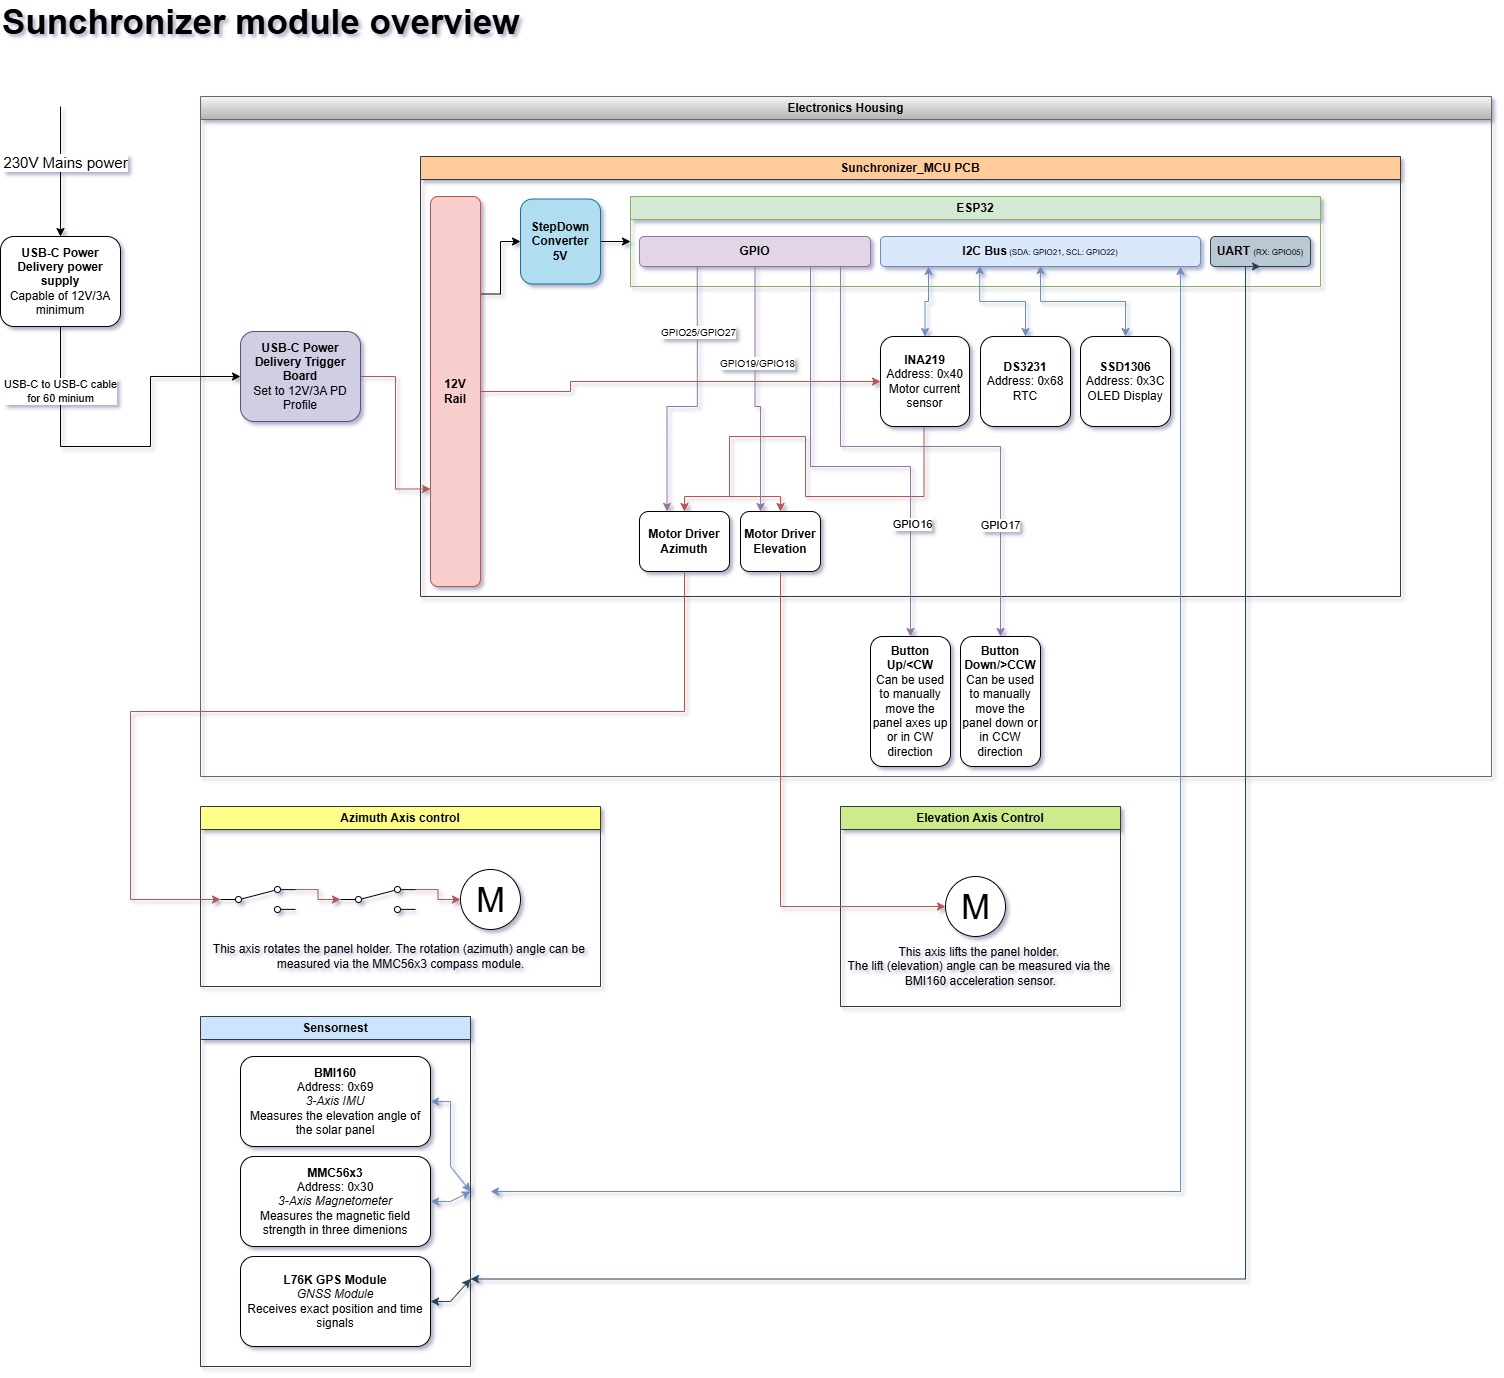
The elevation axis is controlled using a 6000N linear actuator. The absolute elevation angle is measured using an BMI160 three-axis IMU.
Azimuth axis tracking
The azimuth axis is controlled using a 3D printable snail gear and a geared motor. The absolute azimuth axis is measured using a MMC56x3 three-axis magnetometer.
Control modules overview
The following module overview shows the interaction of the different sensors and actuators.
Modular desgin
The Sunchronizer D1 is the dual-axis version of the Sunchronizer S1. Both versions are seperate modules. The Sunchronizer S1 offers only elevation axis tracking. With the extension of the azimuth tracking it becomes the Sunchronizer D1. This means you can update an existing Sunchronizer S1 to a Sunchronizer D1.
3D printing information
Filament type: Weather and UV-resistant, e.g. PETG, ABS, etc.
Layer thickness: 0.2mm
Infill: 25%
Wall lines: 6
I highly recommend to print the parts in the already defined orientation. The defined orientation is intended to maximize the structural integrity of the part.
ESPHome example configuration and more
You can find additional info at the following GitHub repo:
Needed Tools
(Affiliate-links)
Count | Item/Link |
|---|---|
1x | |
1x | |
1x | 3D Printer |
1x | |
1x | |
1x |
Needed Material
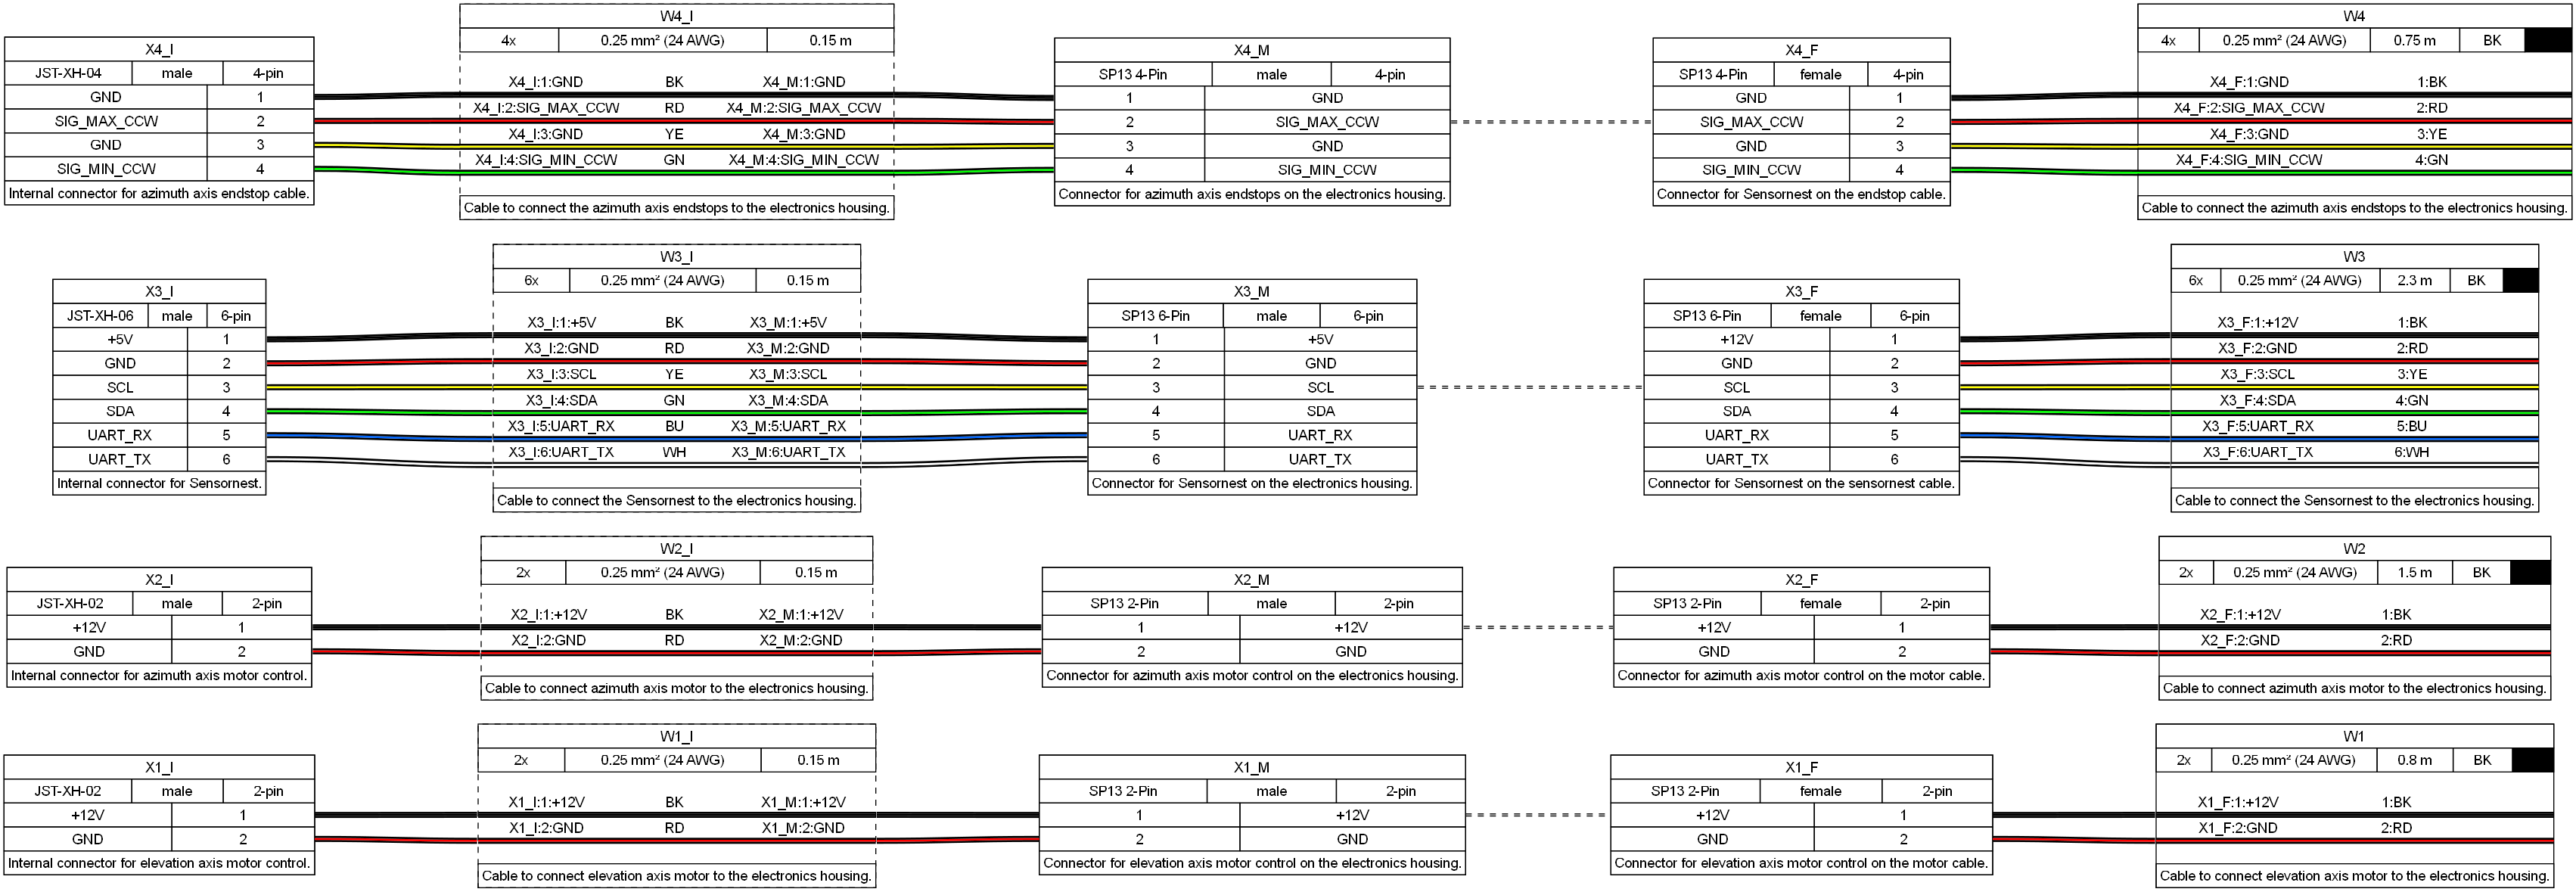
Please also look at the cable plan for the needed cable lengths.
For the Sunchronizer S1 parts:
Count | Item/Link |
|---|---|
4x | Concrete slab 40x40x5cm |
14x | |
18x | |
4x | |
4x | |
1x | |
12x | |
20x | |
87x | |
8x | |
4x | |
4x | |
8x | |
114x | |
5x | |
4x | |
3x | |
1x | |
2x | |
1x | |
10x | |
1x | |
5-6x | |
2x | |
1x | |
1x | |
1x | |
1-2x | |
1x | |
1x | |
1x |
For the Addon Parts to create a Sunchronizer D1:
Count | Item/Link |
|---|---|
10x | |
14x |
|
13x | |
2x | |
2x | |
40x | |
2x | |
1x | |
1x | |
6x | |
1x | |
2x | |
3x | |
2x | |
5x | |
4x | |
3x | |
2x | |
2x | |
6x |
For the Sensornest:
Count | Item/Link |
|---|---|
1x | |
1x | |
1x | |
1x | |
6x | |
10x | |
2m |
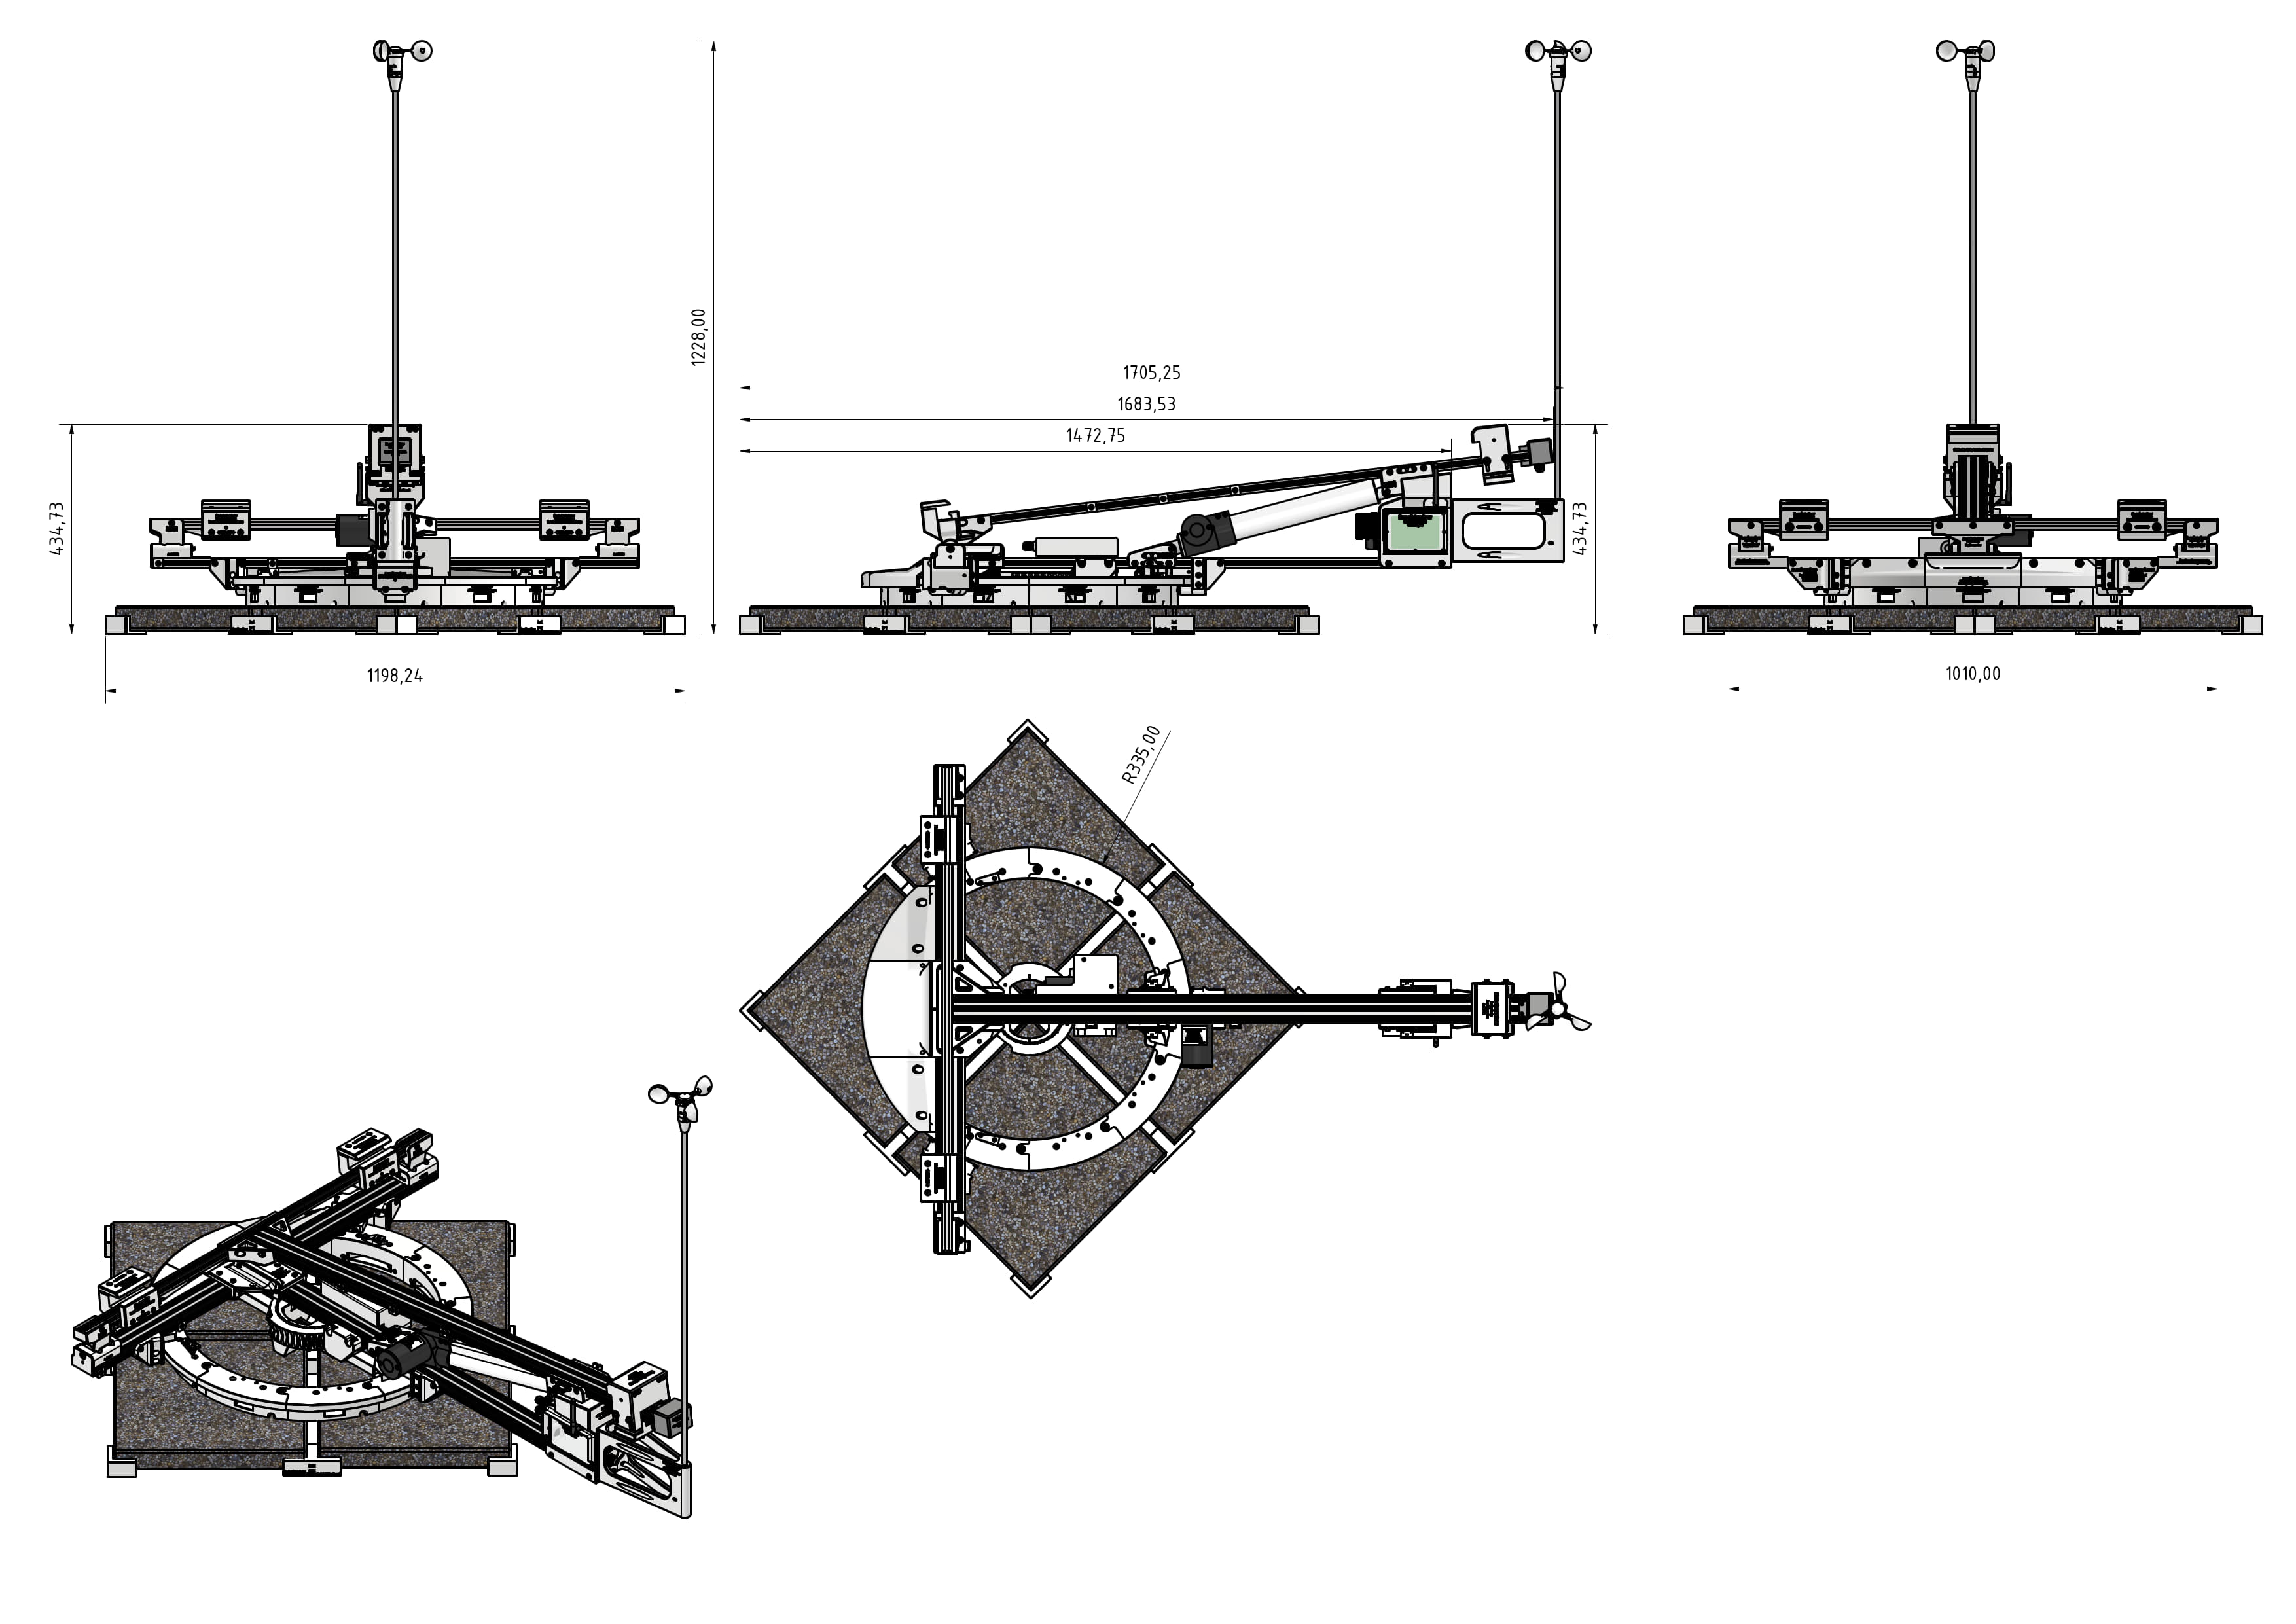
Dimensions & Technical data
Following you see the dimensions of the design (without solar panel) while the elevation axis is at it's max angle.

Following you see the dimensions of the design (without solar panel) while the elevation axis is at it's min angle.
Cable plan
The following cable plan contains information (length/gauge) about the needed cables between the electronics housing and the sensors/actuators.