
Aligned Front and Rear Tool Header Carrier Plates for Qidi Plus 4
Obliczymy ostateczną cenę na podstawie wybranego pliku. Sprawdzisz ją i zaakceptujesz przed płatnością.
Zapisane na tym urządzeniu.

Aligned Front and Rear Tool Header Carrier Plates for Qidi Plus 4
- Ocena
- 5 / 5
- Polubienia
- 45
- Pobrania
- 246
- Wydruki
- 3
- Wyświetlenia
- 1375
- Oceny
- 3
Aktualizacja u źródła:
Informacje o modelu
- Źródło
- Printables
- Kategoria
- Other Printer Parts & Upgrades
- Licencja
- Creative Commons — Attribution — Noncommercial — NoDerivatives
Aligned Carrier Plate Pairing for Qidi Plus 4
The Qidi Plus 4's stock carrier plates have bearing mounts that are misaligned from the factory. See the cutaway photo provided. This cutaway is taken directly from the STEP files provides by Qidi, and has been measured and verified to be present in all currently shipping Plus 4 printers as of the time of writing this.

Provided here are a matching set of front and rear carrier plates for the Plus 4 that replaces both the stock front and rear plates.
While these models are derived from my original front-carrier plate model, I feel that this particular variation is significant enough that it warrants its own fresh new model page to disambiguate itself from the older models that still carry the misalignment flaw due to them needed to be paired with the stock rear carrier plate.
Also included are newer model variants of the parts from my 5015 front-blower mod. These are optional, but if you wish to do the front-blower mod conversion, then these are the latest versions of those parts.
Updates
6th Aug 2025 - Uploaded a STEP file for a variant of the Beacon Mount that works for the Cartographer Right-Angled variant. Many thanks to user c10l on the Qidi Discord server for providing this model variant
11th Aug 2025 - Upload STLs and STEPs for both CF and GF filled filaments. These replace the single models that existed before. The older model has been renamed as the GF variant. The newer CF variant is meant for use with CF or unfilled filaments, and has 0.1mm tighter clearances on the bearing cavities. GF filaments typically have a rougher surface texture and require a little more clearance.
Printing
Highly recommended to use the print profile here.
I personally printed my parts out of 3DXTech PC-CF, although 3DXTech's PA12-GF30 is another excellent material choice.
Parts should be printed in the following orientations:
Rear Carrier Plate Print Orientation

Front-Carrier Plate Print Orientation

Beacon Mount Print Orientation
Note that no supports are needed for the Beacon Mount

Hot-end cooling duct print Orientation

Part-Cooling Duct Orientation

Installation of Square Nuts, Washers, and Heat Set Inserts
Rear Carrier Plate
The rear carrier plate requires the following parts:
- 4 of M3 square nuts of no larger than 5.6mm width and 2.5mm depth
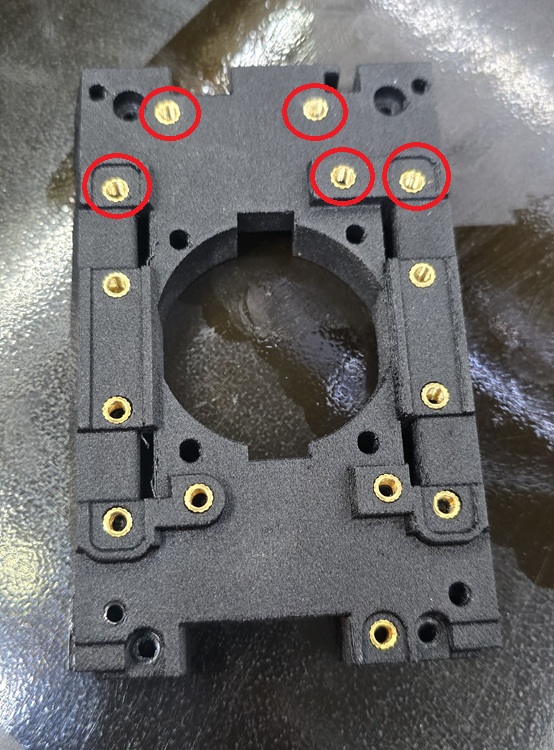
- 7 of M3 x 4.2mmOD x 4mm length heatset inserts
- 9 of M3 x 4.2mmOD x 6mm length heatset inserts
Some people have reached out to me, asking where to find inserts of this size. Here is a couple of links for Amazon USA
The 4 mm long M3 inserts should be placed in the locations circled in red in the following photographs. The 6mm long M3 inserts are used for the rest of the positions.


M3 Square Nuts are placed in the rear plate in the following locations. These are used for mounting the rear tool-head cover:

Front Carrier Plate
The front carrier plate makes use of a total of 18 of M3 square nuts of no larger than 5.6mm width and 2.5mm depth
These are placed in the locations indicated by the following photos


Beacon Mount
The Beacon Mount uses 2 of M3 square nuts of no larger than 5.6mm width and 2.5mm depth, and 1 of M4 square nut no larger than 7.2mm width, and 3.3mm depth
These are placed in the locations shown:

Hotend Cooling Fan Mount
The Hotend Cooling Fan Mount uses 4 of M3 square nuts of no larger than 5.6mm width and 2.5mm depth, and 1 of M4 square nut no larger than 7.2mm width, and 3.3mm depth. It also uses an M3 washer.
These are placed in the locations shown:

Installation
The assembly, as you can guess, mostly makes use of M3 bolts of various lengths, and 2 of M4 bolts for holding the part-cooling fan on if that is also used.
The belt clamps, and drag chain carrier structure are normally sized for M2..5 bolts, but this mod makes use of M3 bolts. Simply drilling out the holes with an M3 sized drill bit (or 1/8") is sufficient to allow for M3 bolts to be used.
When installing the back plate and attaching the belts, I highly recommend undoing the belt tensioning bolts, as well as removing the spring tensioning mechanisms. This will allow you the greatest range to re-attach the belts. The tensioners can be put back in place after the belts are clamped to the rear tool-head.
I'm not going to provide a detailed guide on how to attach the CoreXY belts to the rear plate. There are plenty of instructional videos on Youtube for how to perform this step.
The final assembled part should look like the following:


Support the creator
Enjoying my work? Maybe buy me a coffee! https://ko-fi.com/stew675