
Creality K1C - PSU cooling fan mod.
Obliczymy ostateczną cenę na podstawie wybranego pliku. Sprawdzisz ją i zaakceptujesz przed płatnością.
Zapisane na tym urządzeniu.

Installation 92x92x15 fan for cooling the power supply unit.
- Ocena
- 5 / 5
- Polubienia
- 83
- Pobrania
- 307
- Wydruki
- 2
- Wyświetlenia
- 2017
- Oceny
- 2
Aktualizacja u źródła:
Informacje o modelu
- Źródło
- Printables
- Kategoria
- Creality Parts & Upgrades
- Licencja
- Creative Commons — Attribution — Noncommercial
One of the noisy fans in the Crealuty K1C - is a PSU (Power Supplay Unit) cooling fan. It is implied in downtime, for example, after printing. It was very upset and I decided to modernize the power cooling system. To begin with, the idea was a simple fan replacement. However, it turned out that the fan there has a size of 60x60x15 mm. The quiet 60mm fans - one: NF -A6X15 FLX NOCTUA, which is expensive.
Unfortunately, there are no more quiet fans of 60x60 mm. Therefore, it was decided to translate the cooling of 92x92x15 mm fan (Termalright TL-9015), the same as I put on the cooling of the motherboard (the presence of a standard lower cover was not provided). The interior of the PSU is very limited, decided to make its lid and remove the fan out.

First, I completely copied the original cover, adding only a hole for the 92mm fan. Tests have shown that the original cover is not effective for heat removal!

The most “hot” points in the PSU are transistors located on the back and side walls through cooling pades. And the fan simply blews air through the grill and gap in the area of the contact group, practically without affecting transistors.

Therefore, I made the first modification of the lid - cut a hole for air output so that it is a transistory blowing on the back wall.

Then he added a neckline for blowing transistors on the side wall. Thus, the air pumped by the fan leaves the gap at the posterior wall and goes to the neckline in the side wall and the remnants of the air flow go through the gap at the terminal block.
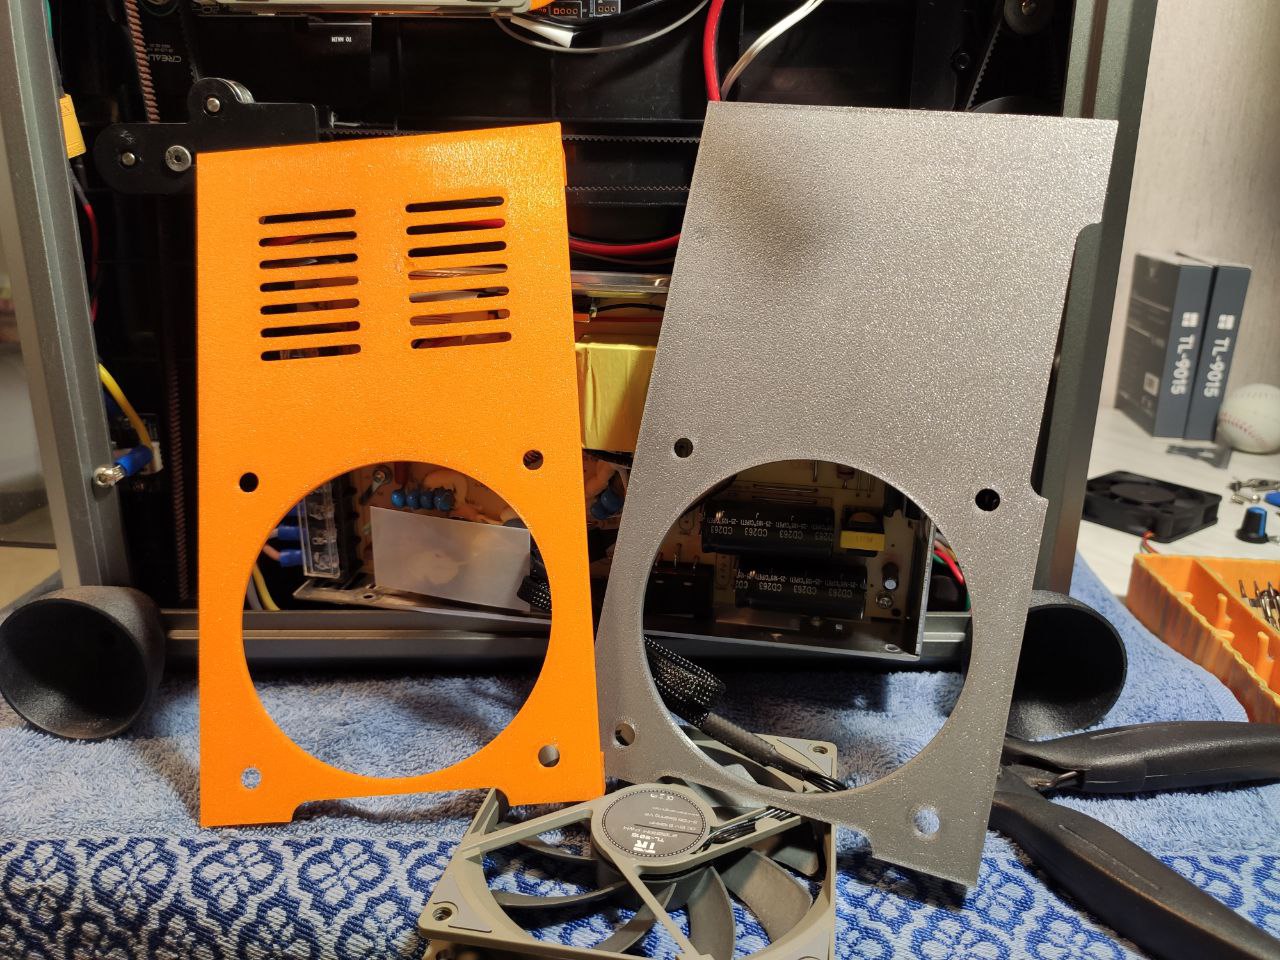
In this picture you can compare two lids.

Now the cooling system is much more effective than stock! I recommend printing from PETG or ABS plastic.
**************************************************************************************
Один из самых шумных вентиляторов в принтере Creality K1C является вентилятор охлаждения блока питания. Подразумевается в режиме простоя, например, после печати. Меня это очень сильно расстраивало и я принял решение модернизировать систему охлаждения блока питания. Для начала идея состояла в простой замене вентилятора. Однако выяснилось, что вентилятор там имеет размер 60х60х15 мм. Тихих 60мм вентиляторов… один: Ноктуа NF-A6x15 FLX, который стоит неприлично дорого.
К сожалению, более тихих вентиляторов 60х60 мм не существует. Поэтому было принято решение перевести охлаждение на 92х92х15 мм вентилятор (Termalright TL-9015), такой же, какой я поставил на охлаждение материнской платы (наличие стандартной нижней крышки не предусматривалось). Внутреннее пространство БП очень ограничено, решел делать свою крышку и выводить вентилятор наружу.
Сначала я полностью скопировал оригинальную крышку, добавив только отверстие для 92мм вентилятора. Испытания показали, что оригинальная крышка НЕ ЭФФЕКТИВНАЯ для отвода тепла!
Самые «горячие» точки в БП – транзисторы, расположенные на задней и боковой стенках через охлаждающие пэды. А вентилятор просто выдувает воздух через решётку и щель в районе контактной группы, практически не затрагивая транзисторы.
Поэтому я сделал первую модификацию крышки – вырезал отверстие для выхода воздуха, чтобы он обдува транзисторый на задней стенке. Затем добавил вырез для обдува транзисторов на боковой стенке. Таким образом, закачиваемый вентилятором воздух выходит через щель у задней стенки и идёт к вырезу в боковой стенке и остатки воздушного потока выходят через щель у клеммной колодки.
После модернизации воздушная система охлаждения гораздо эффективней стоковой! Рекомендую печатать из ПЭТГ или АБС пластика.