
KRB - Kraken rockets blocks - Planet pack
Obliczymy ostateczną cenę na podstawie wybranego pliku. Sprawdzisz ją i zaakceptujesz przed płatnością.
Zapisane na tym urządzeniu.

Planet set of KRB block. Magnetic play set inspired by KSP pc game.
- Ocena
- 0 / 5
- Polubienia
- 5
- Pobrania
- 11
- Wydruki
- 1
- Wyświetlenia
- 175
- Oceny
- 0
Aktualizacja u źródła:
Informacje o modelu
- Źródło
- Printables
- Kategoria
- Building Toys
- Licencja
- Creative Commons — Attribution — Noncommercial — NoDerivatives
KRB was originally created as a toy for my children, so I could share something I loved with them – a passion for rockets, space.
This is the second set, designed with a focus on building planetary bases. Since, just like my kids, I love wooden train tracks, I came up with the idea to combine them with a construction set. The package includes parts for both bases and train tracks. All components are compatible with original pieces, and I highly recommend mixing them together.This is the second set, designed with a focus on building planetary bases. Since, just like my kids, I love wooden train tracks, I came up with the idea to combine them with a construction set. The package includes parts for both bases and train tracks. All components are compatible with original pieces, and I highly recommend mixing them together.
As a parent, I recommend that children play with the kit under supervision, and that all pieces be checked for damage after each play session.
Magnets must definitely be glued in if you plan to use the kit with children.
3D model how to assemble magnets and push fit tool is in Tool pack:
https://www.printables.com/model/1337222-krb-kraken-rockets-blocks-tools

For this purpose, the magnet socket is designed to secure the magnet in place using side wedges after glue is applied. It also ensures the correct depth and prevents air pockets from pushing the magnet out.
Any excess glue or print inaccuracies – I recommend sanding with sandpaper – this greatly improves the fit and durability of the connections.
Recommended print settings:
Nozzle: 0,4mm
Layer height: 0,16mm
Resolutions: 0,012mm
Material: PLA, or PLAplus is OK
Wall generator: Classic
Important print settings:
Infill: 10%, Cross hatch
Supports: None
Necessary print settings:
Walls: 2
Magnets:
Axially magnetized neodine magnets Ø 3 mm, height 3 mm. Magnetic force around 290g.
(Czech shop I used)
https://www.unimagnet.cz/neodymovy-magnet-kotouc-3-mm-v-3-mm-sila-290-g_z487/
For more information and updates on future sets, there will be Discord server soon.
Trains!
Well, Train part is little bit more complicated.
You will need M6 hex cap nut for sweet connection between trains supported by magnet behind it. From my testing you need at last magnet capable holding of 1kg. For that there is space ⌀10mm X 7mm that could be filled by magnet and fixation slot, or just glue. For fixation slot you could use simple cylinder shape in slicer.
Hex cap nut should not move back more than 1mm while unsupported, but if you crash your trains to much and you use smaller magnet than 10mm, you could detach from each other and it could flip inside.
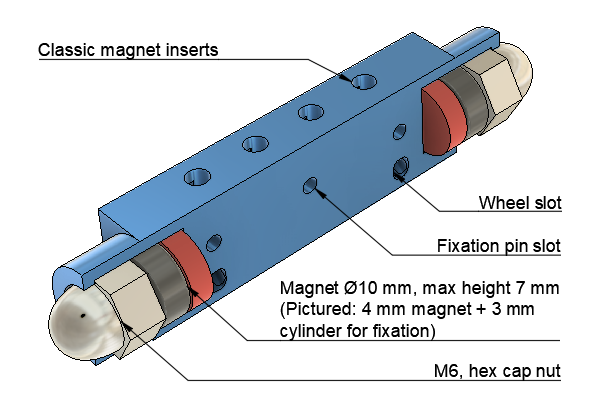
The wheel axles are made from 30 mm rods (⌀2 mm, same as the fixation pins). To be honest, I used 2 mm bamboo toothpicks — they’re strong enough to hold and easy to replace.
The wheel slots are designed to let the wheels rotate freely, but during movement they naturally self-center. It was my daughter who inspired the idea of using a self-centering principle, and it works like a charm.

UPDATES: