
Calidris Keyboard
Obliczymy ostateczną cenę na podstawie wybranego pliku. Sprawdzisz ją i zaakceptujesz przed płatnością.
Zapisane na tym urządzeniu.
Informacje o modelu
- Źródło
- Printables
- Kategoria
- Electronics
- Licencja
- Creative Commons — Attribution — Noncommercial
I'll update this section later with a proper build guide.
Essentially it uses the same parts and construction as my older keyboard Cygnus https://github.com/juhakaup/keyboards/tree/main/Cygnus%20v1.0
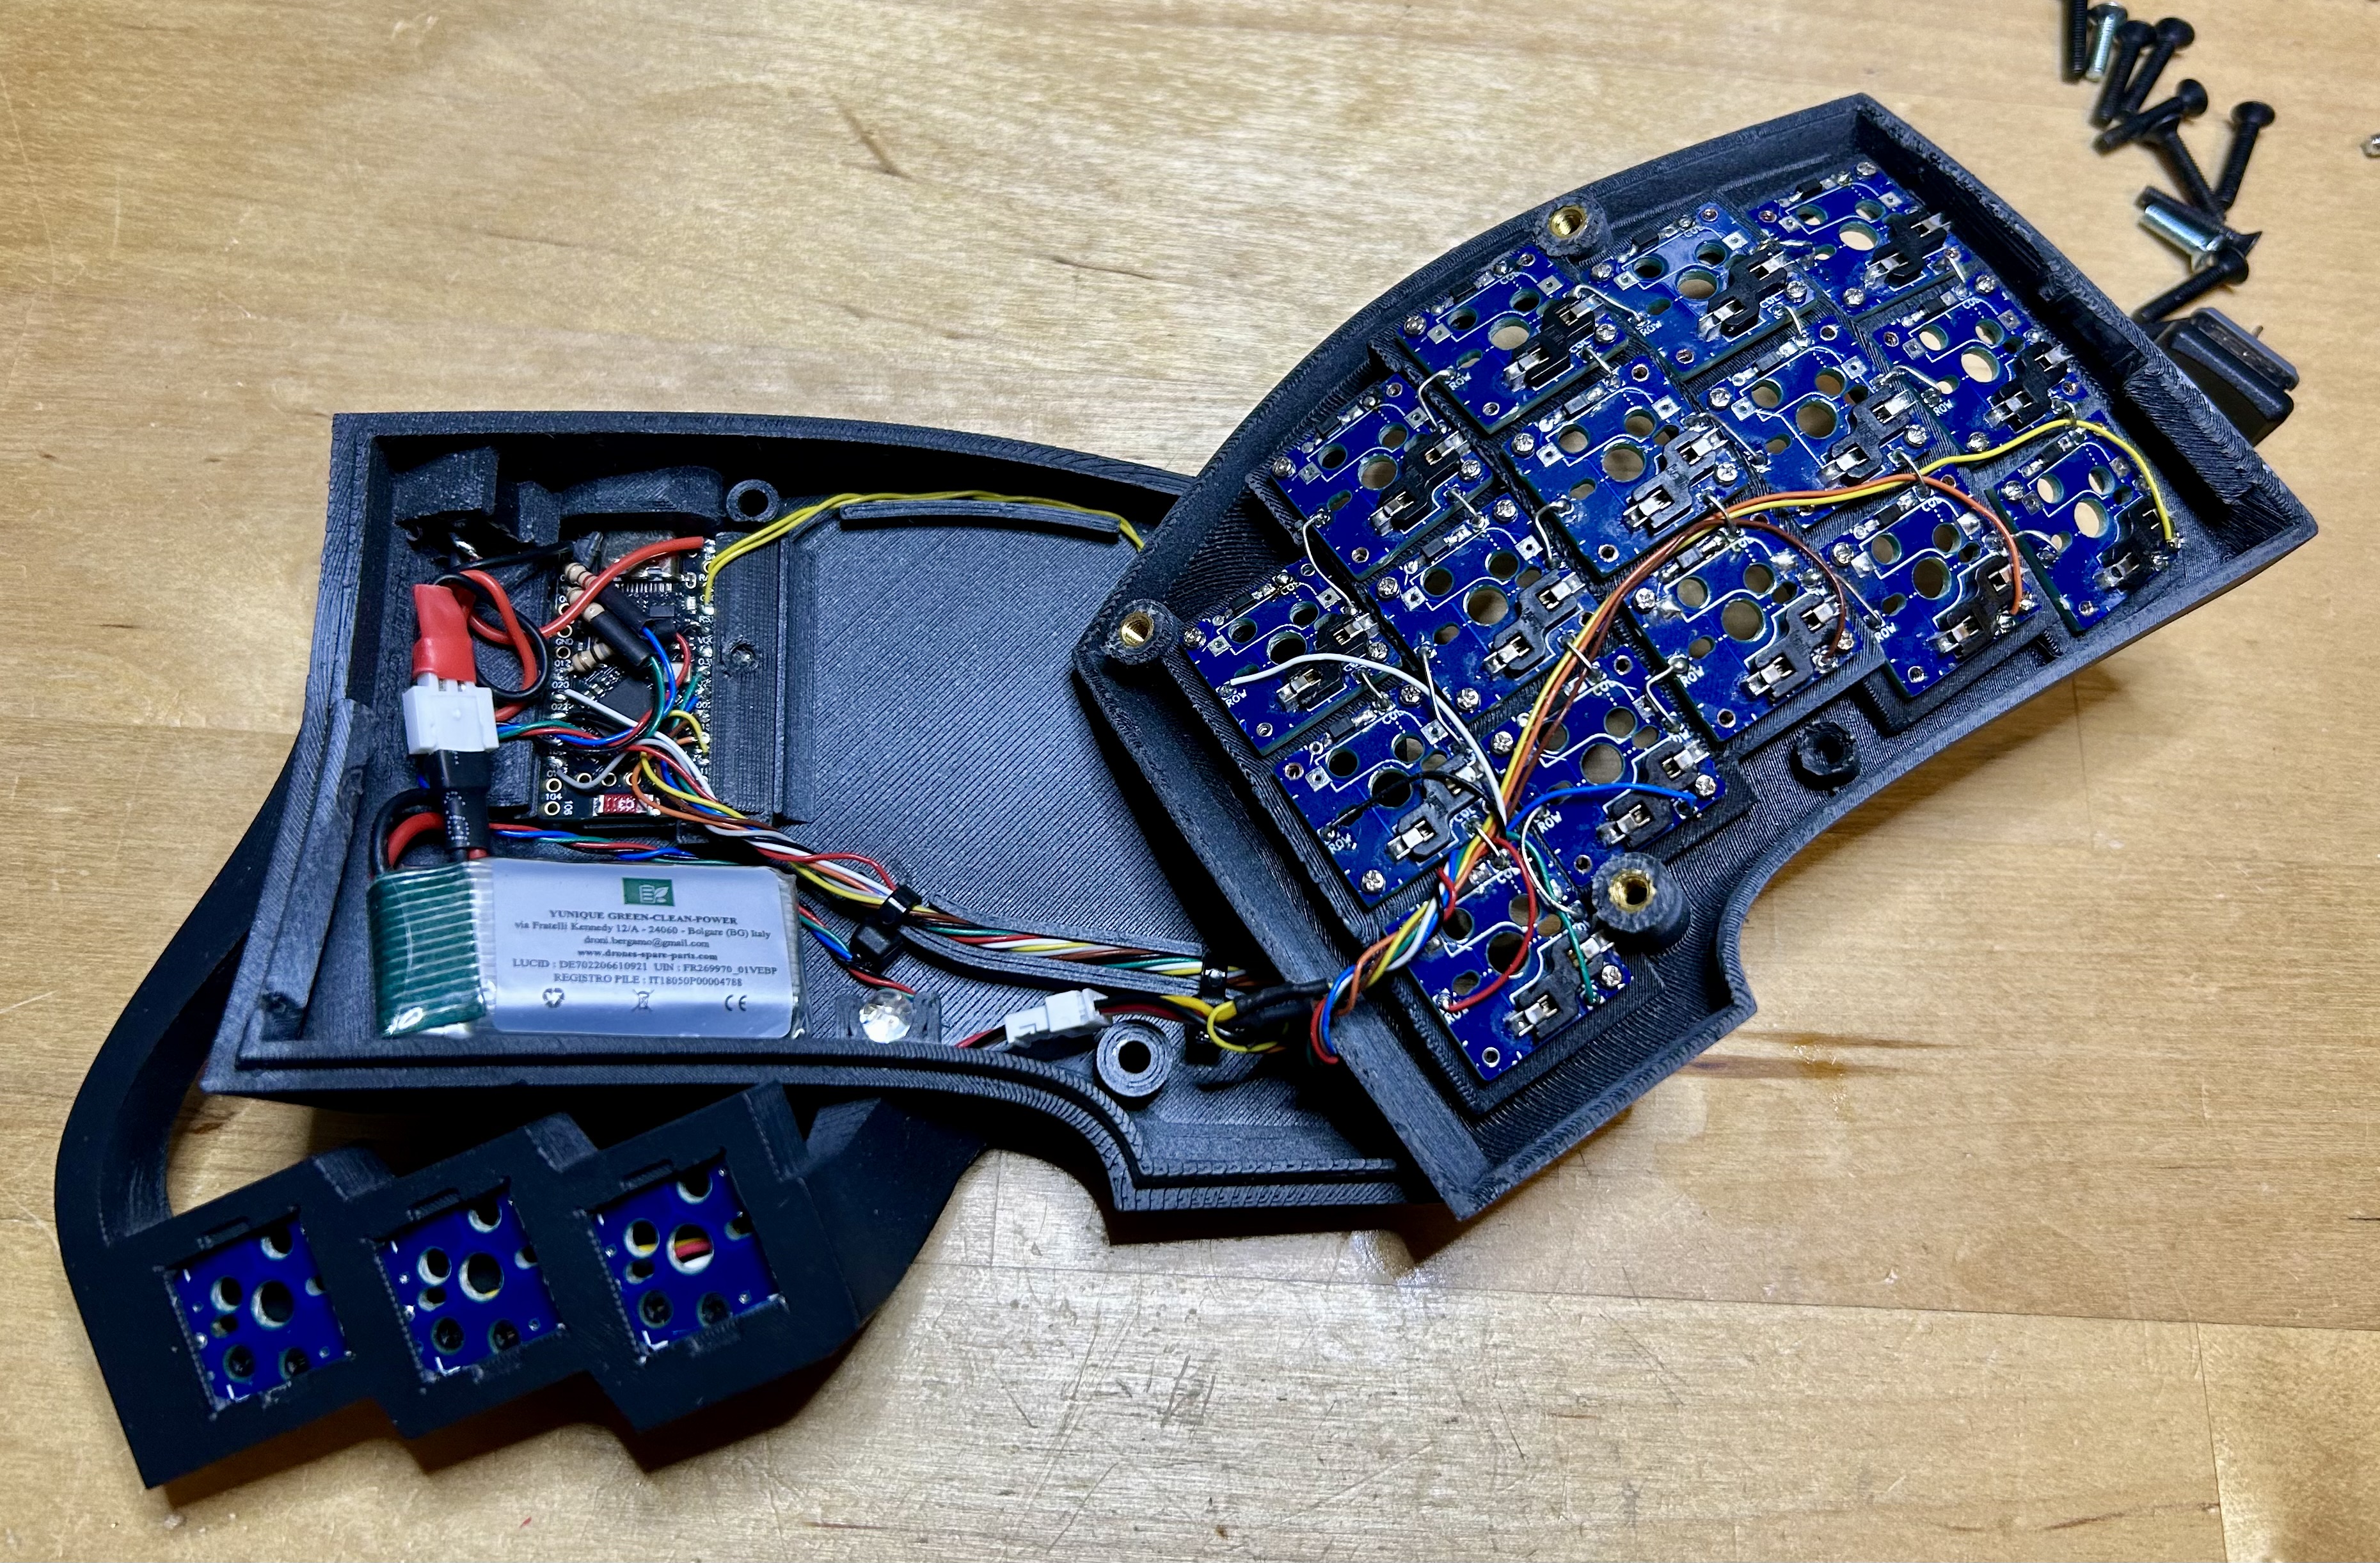
Wiring needs to be quite tidy in order to get the case halves to close. I added a guide rail that the wires can be tied to. This is an image of the internals of an older proto, but it's the same idea.
Parts
parts for single side
Case top |
Case bottom |
Thumb cover |
Controller holders |
Power switch shim |
Battery spacer |
For the case top you can choose between choc and mx spacing depending on your liking and what keycaps you are planning to use.
There are two variations of the bottom halve with different thumb clusters. The original straight staggered variant and a new curved version. The curved thumb cluster is placed a bit further for a bit wider thumb position, the original version is a bit more compact.
Print a thumb cover depending on your case bottom selection.
Controller holders consist of two brackets that hold the controller in place. Currently there are holders for supermini, which is a nice:nano clone and for seeed studio xiao.
Power switch shim is a small part that is used for holding the power switch in place.
Battery spacer is optional, I used it to position the battery at an angle to fit a bigger battery.
For most of the parts you need to mirror the part in slicer to make the left half. The bottom parts have left and right sides provided to keep the text in the bottom going the right way. Power switch shim is symmetrical, so no need for mirroring.
Here is the parts I've used for my build.
Fasteners | ||
Flathead, counter sunk | M3 14mm | 4 pcs |
Flathead, counter sunk | M3 10mm | 6 pcs |
Round headed, self tapping | M1.4 x 4mm | ~80 pcs |
Threaded inserts | M3 x D4.6 x L3.8 | 6 pcs |
Wires | |
Thin electric wire | 28AWG, different colours |
Solid wire | 22AWG |
Controllers | |
Seeed Studio Xiao or supermini | 2 pcs |
Power | ||
Battery | 752035 380mAh 3.7v lipo | 2 pcs |
Switch | SS-12D00G 6mm lever | 2 pcs |
Battery connectors | Micro Losi, 2mm pin pitch | 2 pcs |
Single switch PCBs | |||
Hotswap sockets | Kailh choc low-profile | 36 pcs | |
Diodes | 1n4148w SOD-123 | 36 pcs | |
PCBs | su120 | 36 pcs | Link to choc v2 compatible PCBs: |
Misc | ||
Reset switch | 6x6x4.3 push button switch | 2 pcs |
Silicone rubber, self adhesive | 0.5mm-1mm thickness |
Printing orientation
The print orientation of the smaller parts doesn’t matter that much. Case bottom should be printed flat.
I’ve experimented with the case top the most. The ‘plate’ for the chock switches is quite thin and this should be taken into consideration when printing parts. To get the strongest plate, you should print the top in horizontal orientation. This however leads to poor appearance. Printing the part in vertical orientation result in smooth top surface, but may lead to weaker plate, depending on material. I’ve found s suitable compromise by printing the top at a slight angle, resulting in good surface finish while maintaining the strength. I’ve noticed quite a bit of variation between filaments, so I encourage you to experiment with this to get the results that suite you.
Wiring
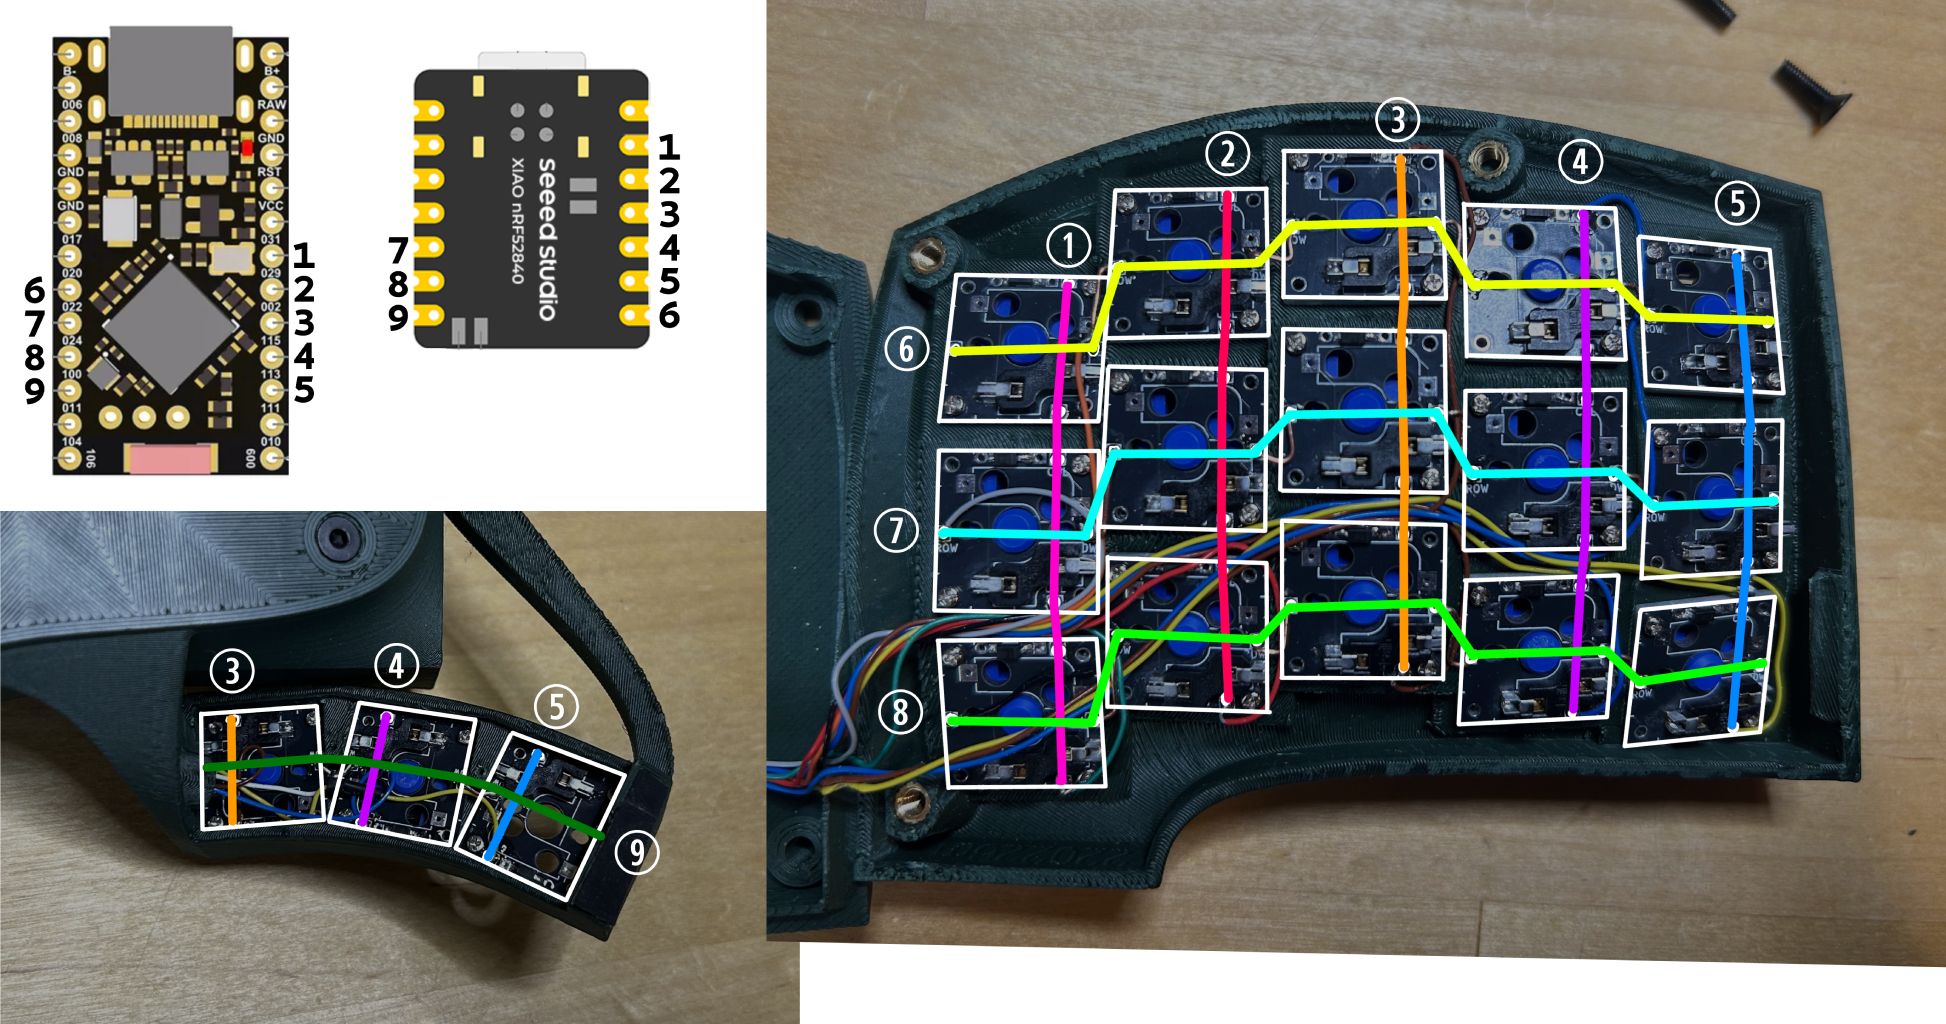
You can of course wire this as you like, but if you want to use my firmware as a starting point, here is a wiring diagram to follow. I also added the firmware files for xiao. It's a good practice to test things out as you're building. I for example test the controller before wiring. You can do this simply by connecting one of the columns to one of the rows. You don't have to pair it to your computer, just use a usb cable an connect it to the left controller.
Here is a repo for the xiao firmware.
Requests and special versions
I made a separate model for publishing variations of this keyboard. It's a paid model, but I thought it would be a simple way for people to support my work and get to something in return.
Change-log
dd.mm.yyyy | change |
|---|---|
16.3.2026 | Replaced xiao holder, repositioned upside down for better access to battery pads. |
27.3.2026 | Added base variant with curved thumb cluster. |
10.4.2026 | Add missing curved thumb cover, update description |
30.4.2026 | Added link to choc v2 compatible pcbs |
10.5.2026 | Added wiring diagram |