
Super Quiet Workshop Air Cleaner
Obliczymy ostateczną cenę na podstawie wybranego pliku. Sprawdzisz ją i zaakceptujesz przed płatnością.
Zapisane na tym urządzeniu.
Informacje o modelu
- Źródło
- Printables
- Kategoria
- Tools
- Licencja
- Creative Commons — Attribution
This quiet, efficient, and inexpensive air cleaner uses four 20x20x1 hvac air filters and is powered by a standard box fan motor. It moves TONS of air and is much, much quieter than a typical box fan or corsi-rosenthal box. In my testing, it clocks in about 15dB quieter than the original box fan at all speeds -- that's over 96% less noise energy!
Bill of Materials:
Non-printed:
1x standard 20" box fan, from any hardware or home goods store
Wood, for the frame (see below for the cut list)
1" Wood screws - a lot, buy a box of 100 if you don't have them.
4x 20"x20"x1" furnace filters
Flexfix UL-listed ducting tape - you can use other wide tapes, but this stuff sticks really well to printed parts
1x sheet of poster-board (cardstock) paper (for covering the opening at the bottom of the box)
7x M3x10mm socket-cap machine screws
Printed:
1x Hub (print in PETG or ABS)
The hub is designed for an 8mm motor shaft, with a 7.25mm thickness at the flat.
PLA is fine for the rest
7x Blade
4x Shroud (2x normal, 2x 'mirrored' in your slicer)
8x Bottom Brace
8x Side Brace
4x Foot (Upgrade: print in TPU)
Construction info:
Frame:
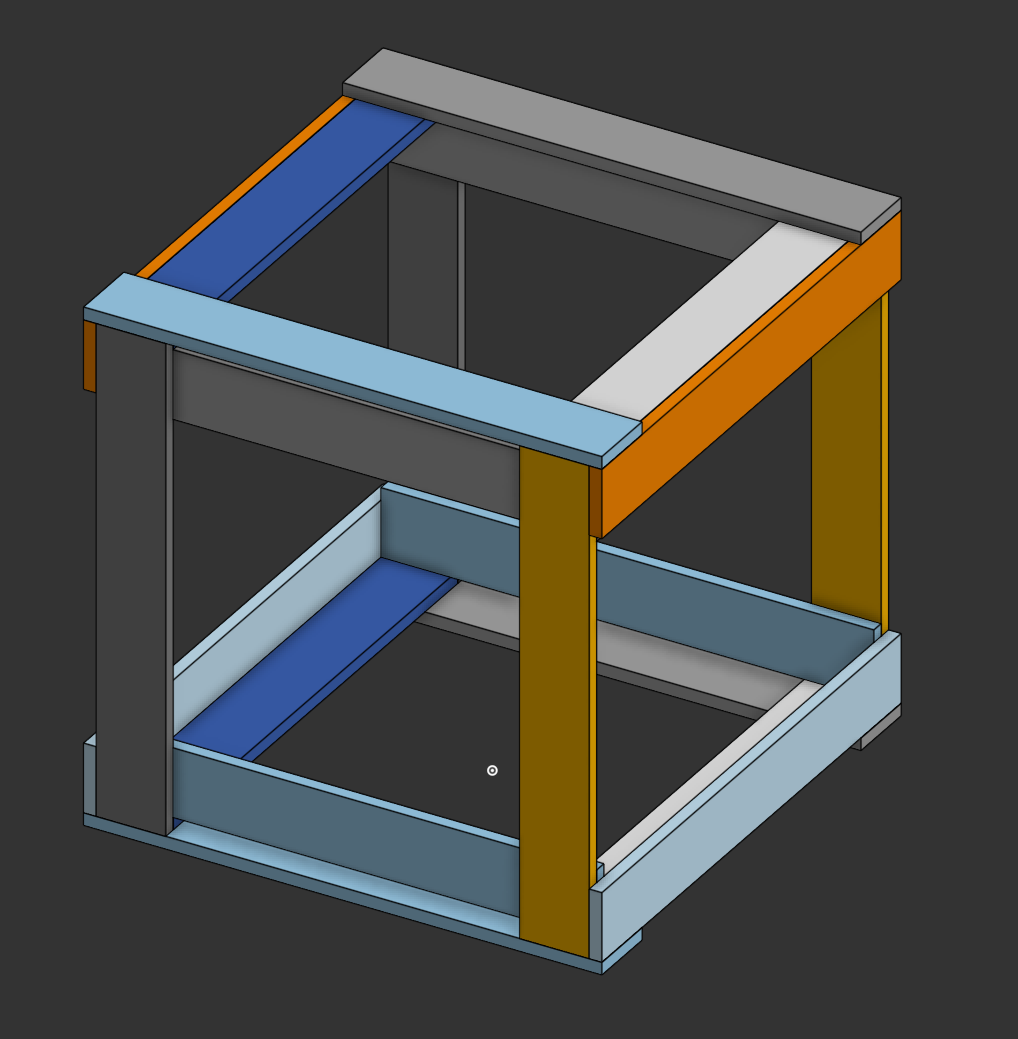
I used 2.75"x0.5" scrap wood to build the frame - depending on the thickness of the stock you use, your cut lengths may vary slightly. For a 20.5" cube, you should cut:
- 8x 20.5" (full length)
- 12x (20.5" - 2*(thickness)) => 12x 19.5" with the stock I used
Assemble as shown here using screws or nails. Note which boards are full-length and which are shortened:
Fan:
Assemble as shown, with the rounded side of the hub and the thick side of the fan blades on the same side:
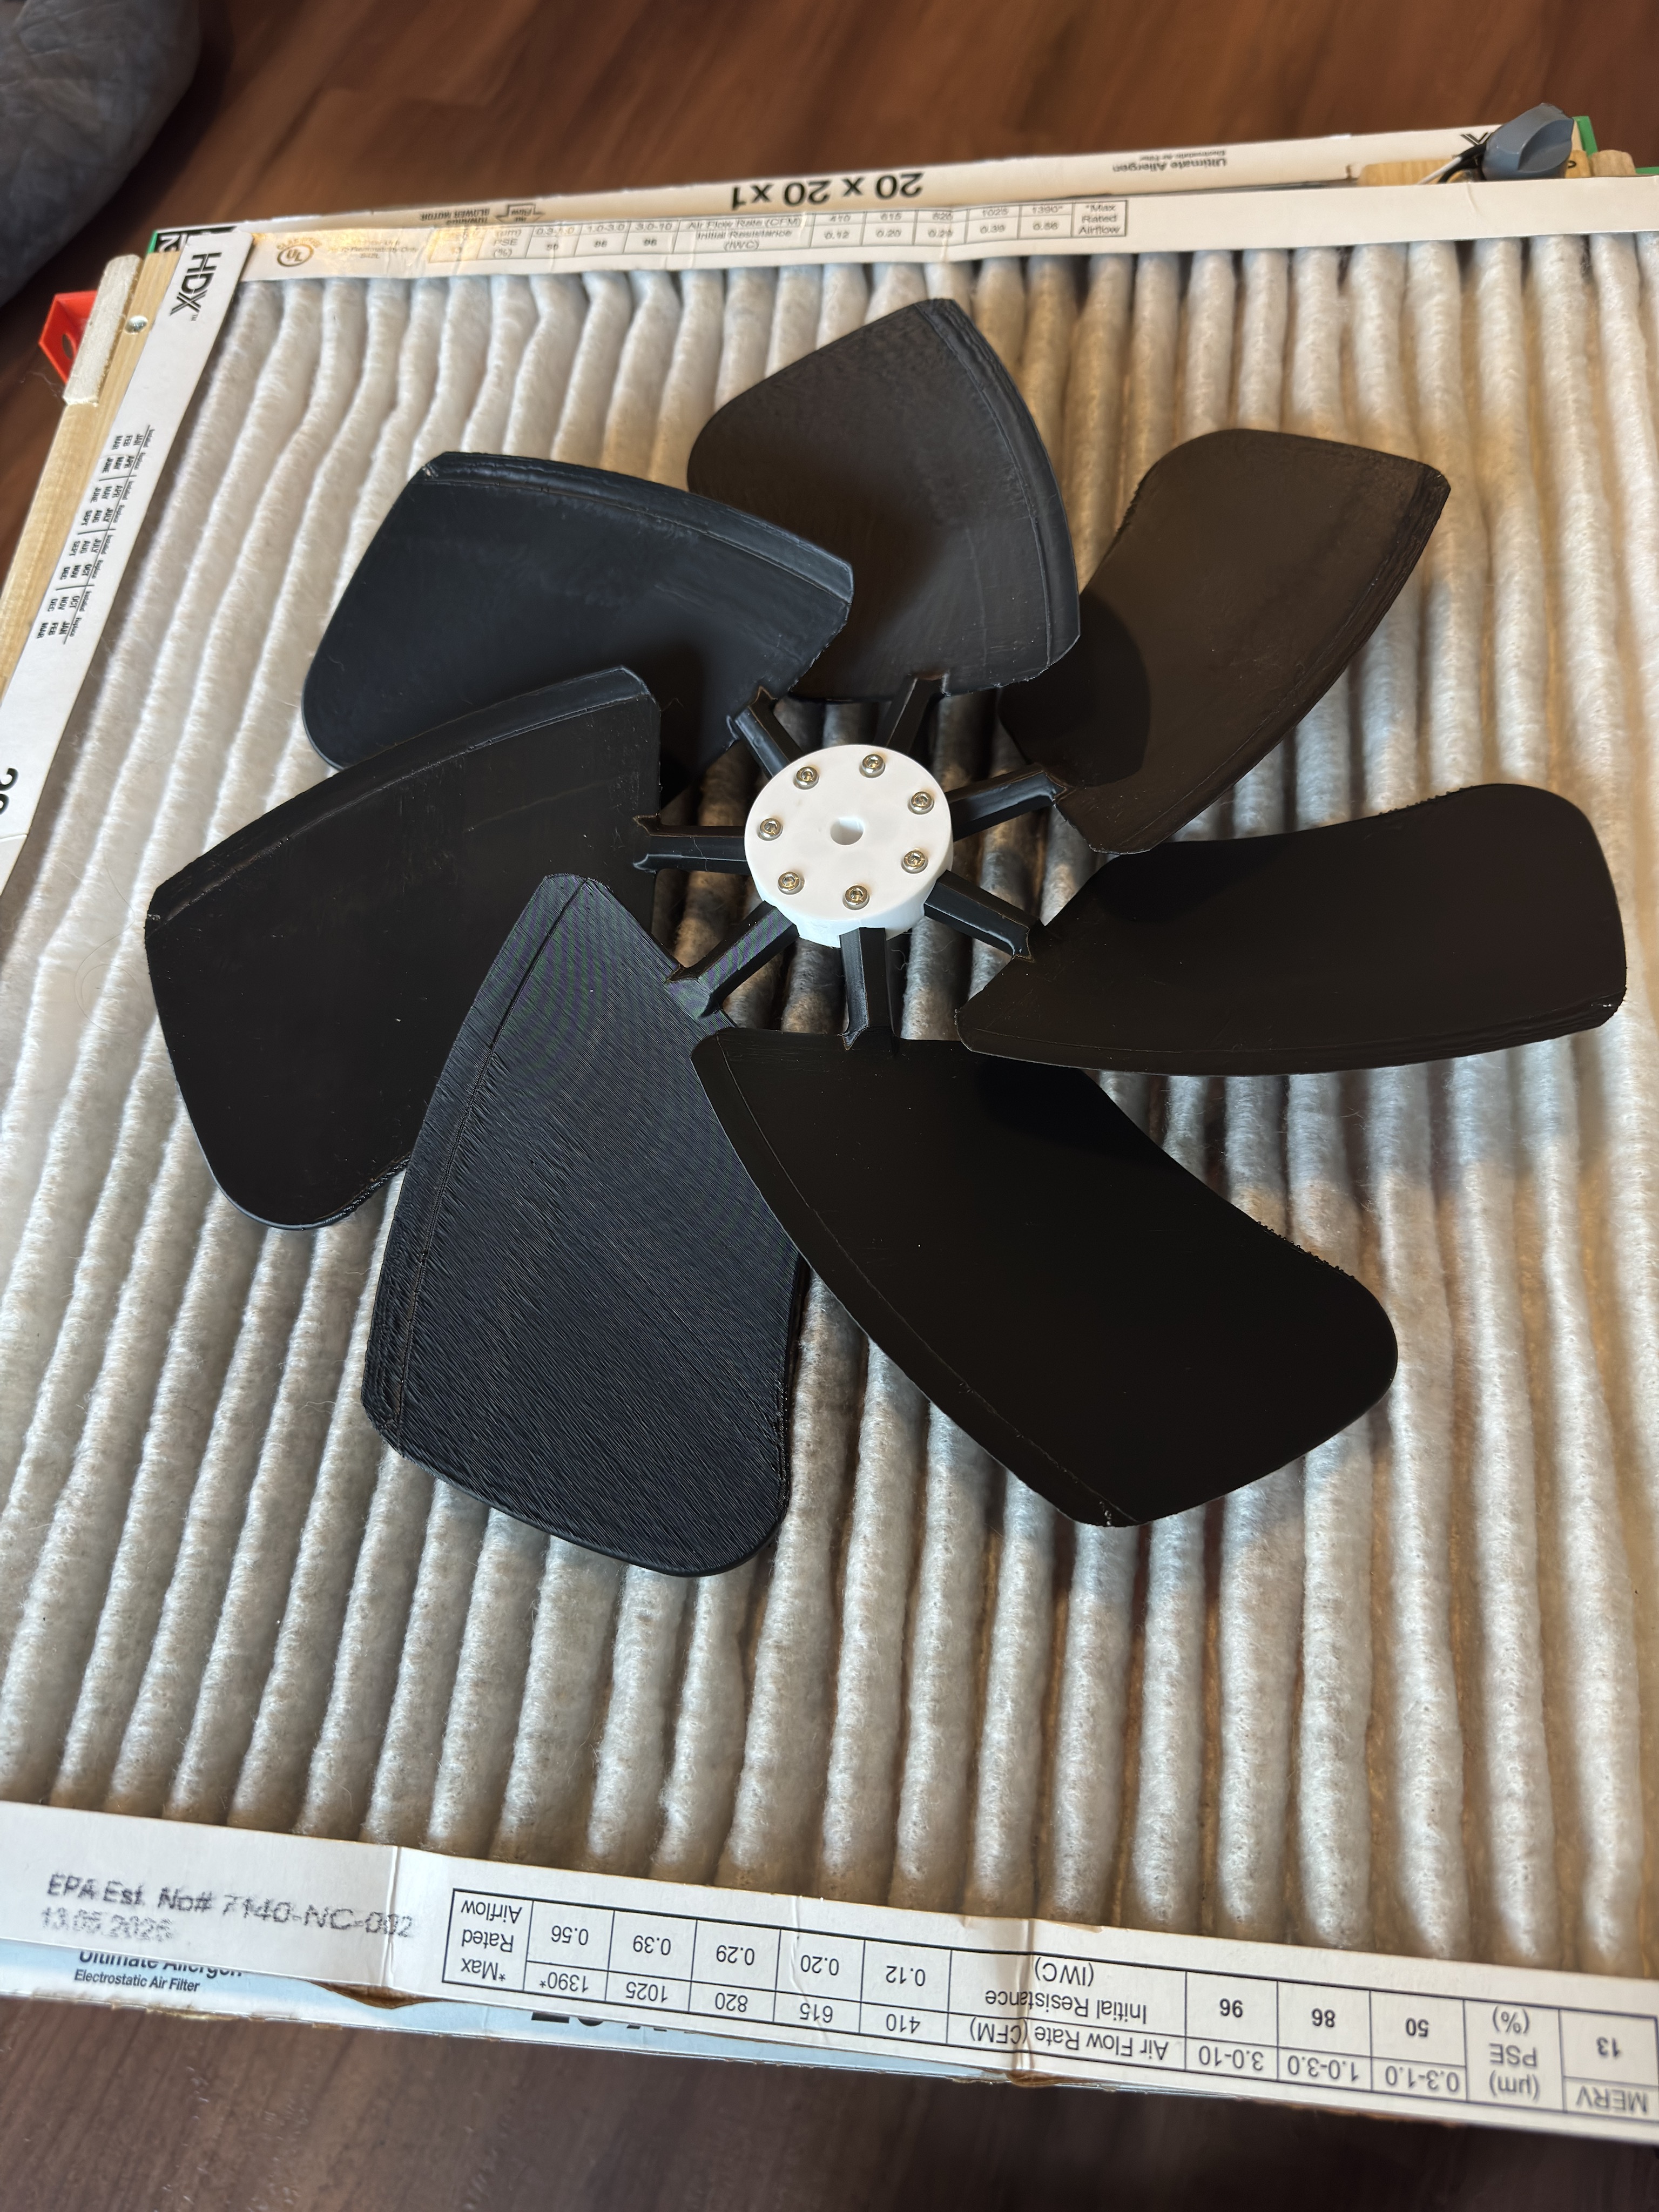
The screw holes are not threaded, and are designed to be a relatively close fit - this isn't super critical, these just keep the blades from flinging off the hub, while being removable so you can replace a blade if it breaks.
General Assembly:
Disassemble your box fan and remove the motor and its mounting arms from the "box". This may require drilling through a couple of spot welds.
We will not reuse the box, you can discard it.
Keep a grille - depending on your model of fan you may choose to keep the side with cutouts for the power socket and knob
Assemble the frame as detailed above
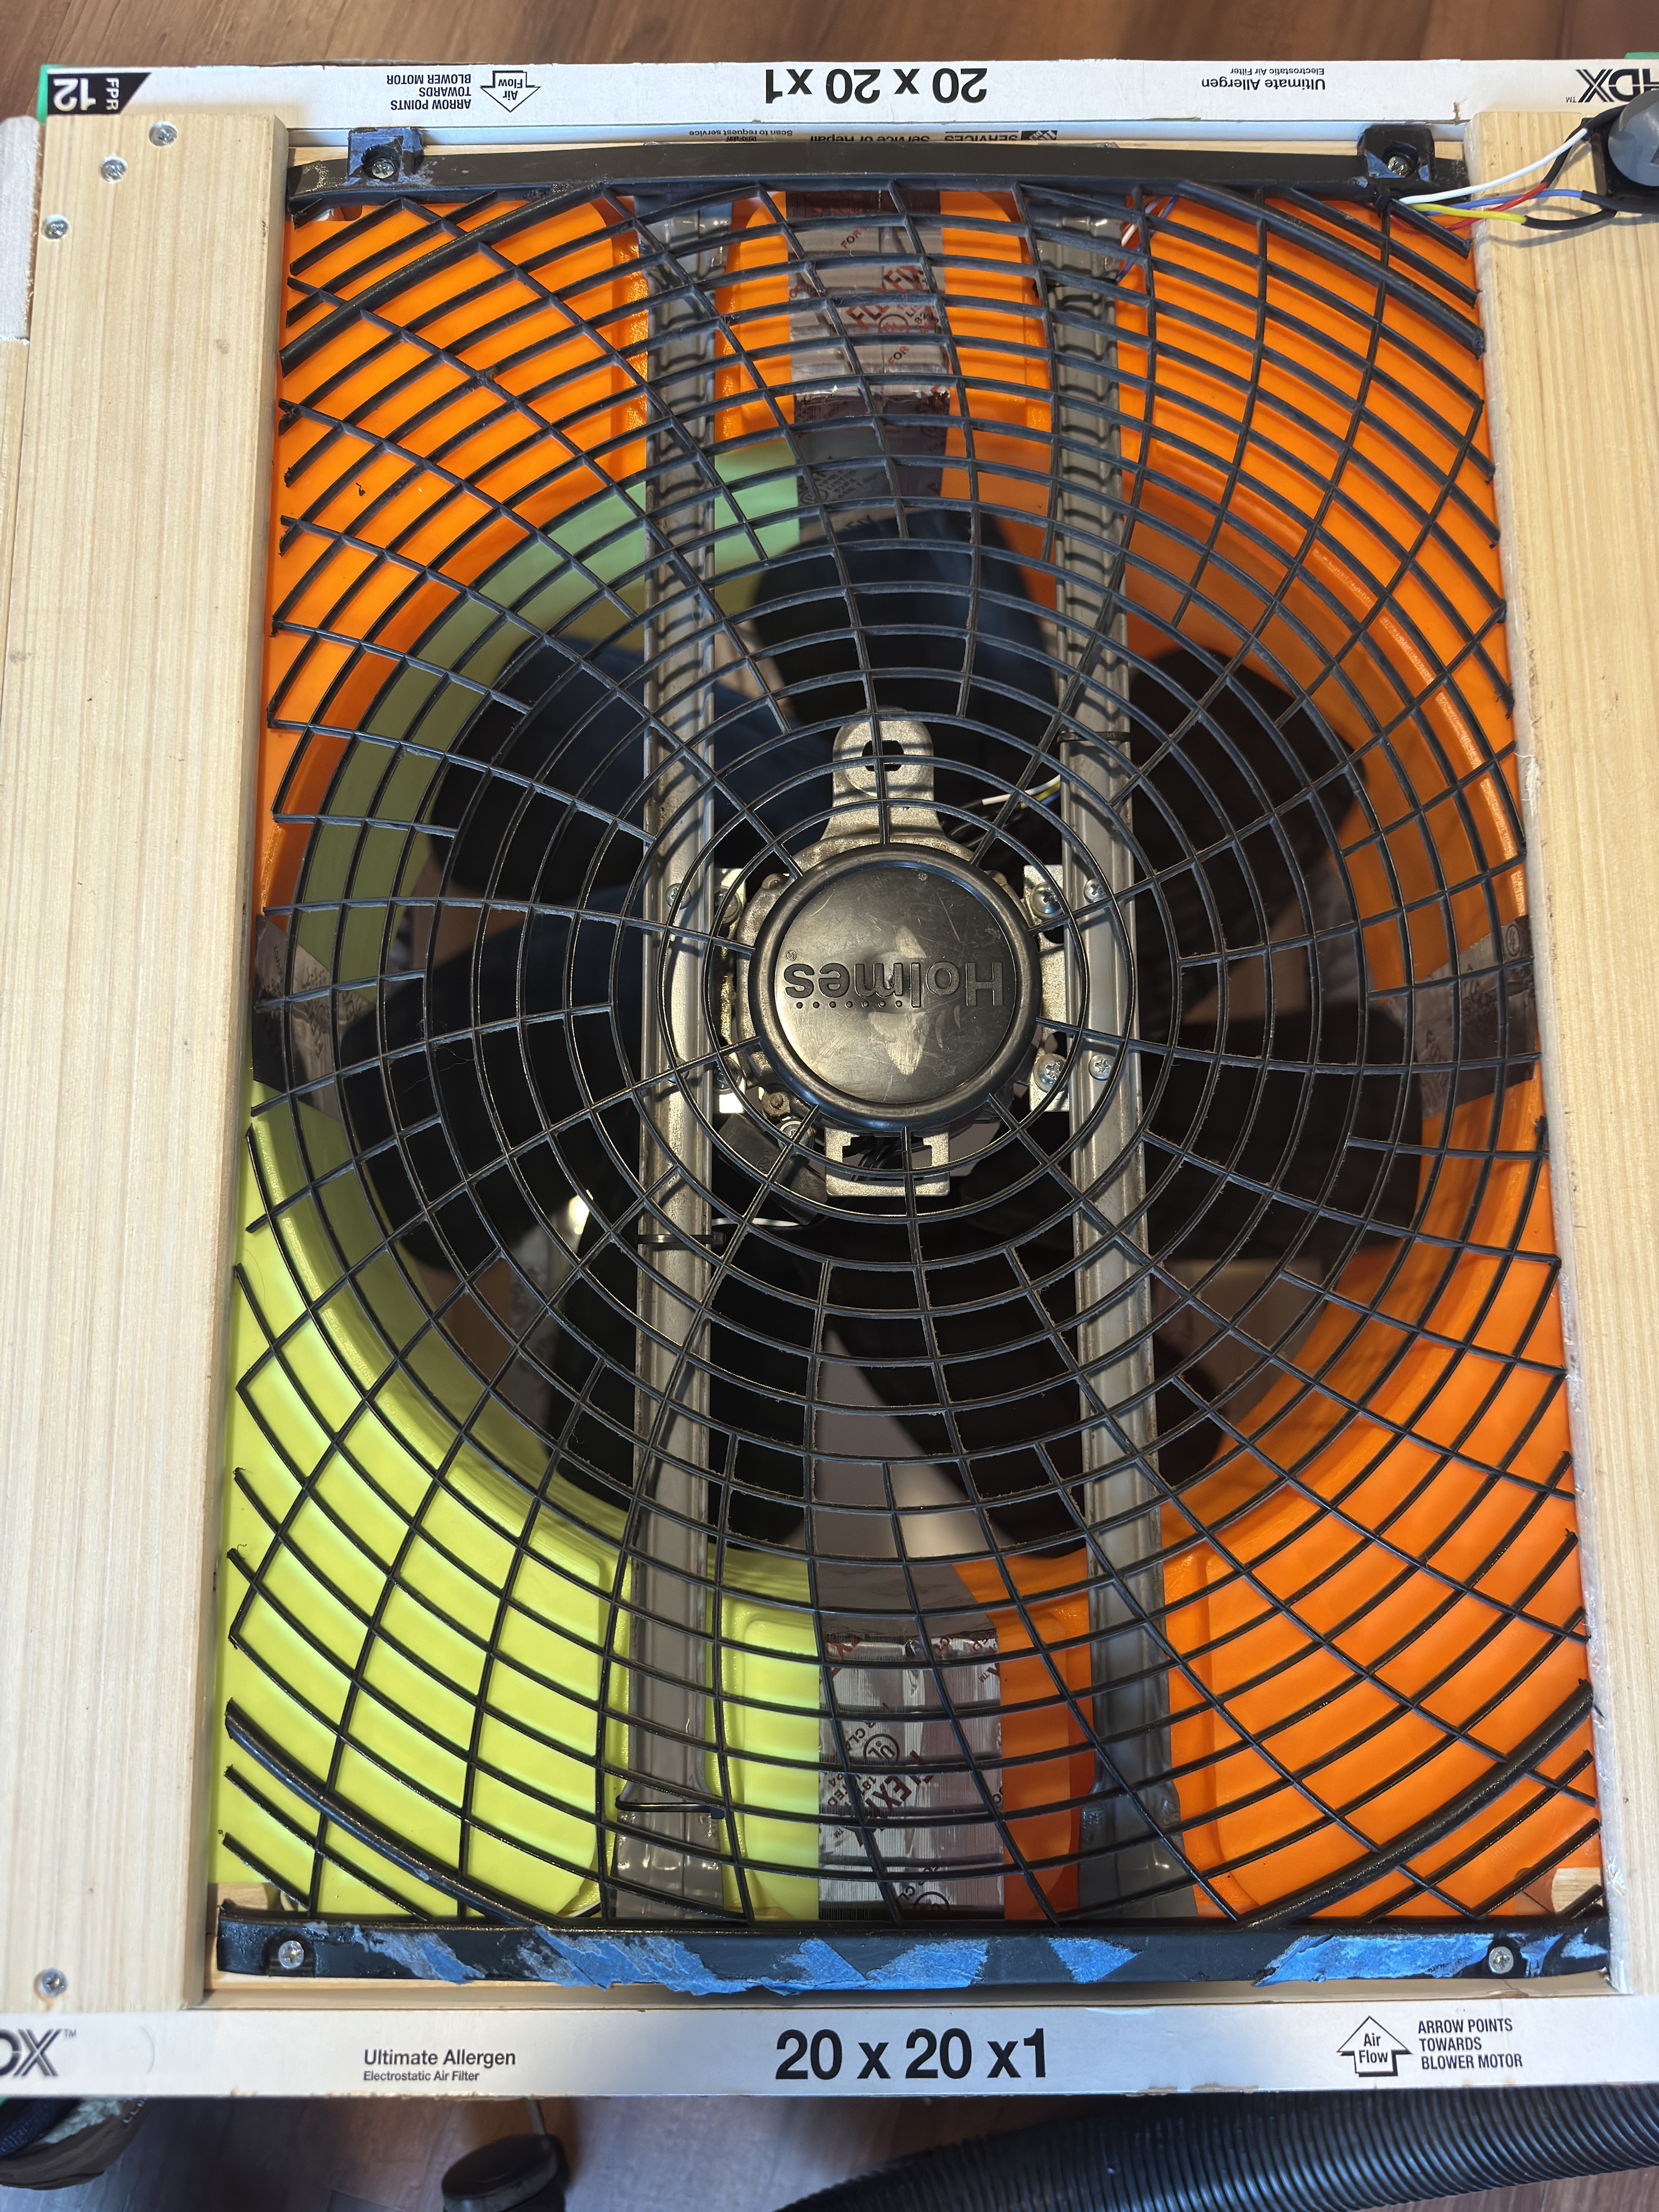
Center the box fan arms and motor in the frame as shown (using a side with two wide edges and two narrow edges as the top), and screw the arms down to the frame (if you didn't drill any spot welds removing it from the box, you may need to drill holes for this now):
Optional: relocate the power socket and knob to a more convenient location on the frame. If you do this, make sure to use wire rated to carry mains voltage.
Flip the frame upside-down and install the four shroud quarters inside the frame with screws. Make sure to align the cutouts in the shroud with the motor arms. There's a bit of play here to account for imperfect centering. Use some of your ducting tape to cover any gaps between the shroud corners (in theory they should fit perfectly, but in practice printed parts warp and shrink)
Use one of your filters to mark out locations for the side and bottom braces (two sides and two bottoms per side of the box), and then install the braces with screws. Locate the bottom braces towards the bottom of the frame so that you can slide the filters in from the top.
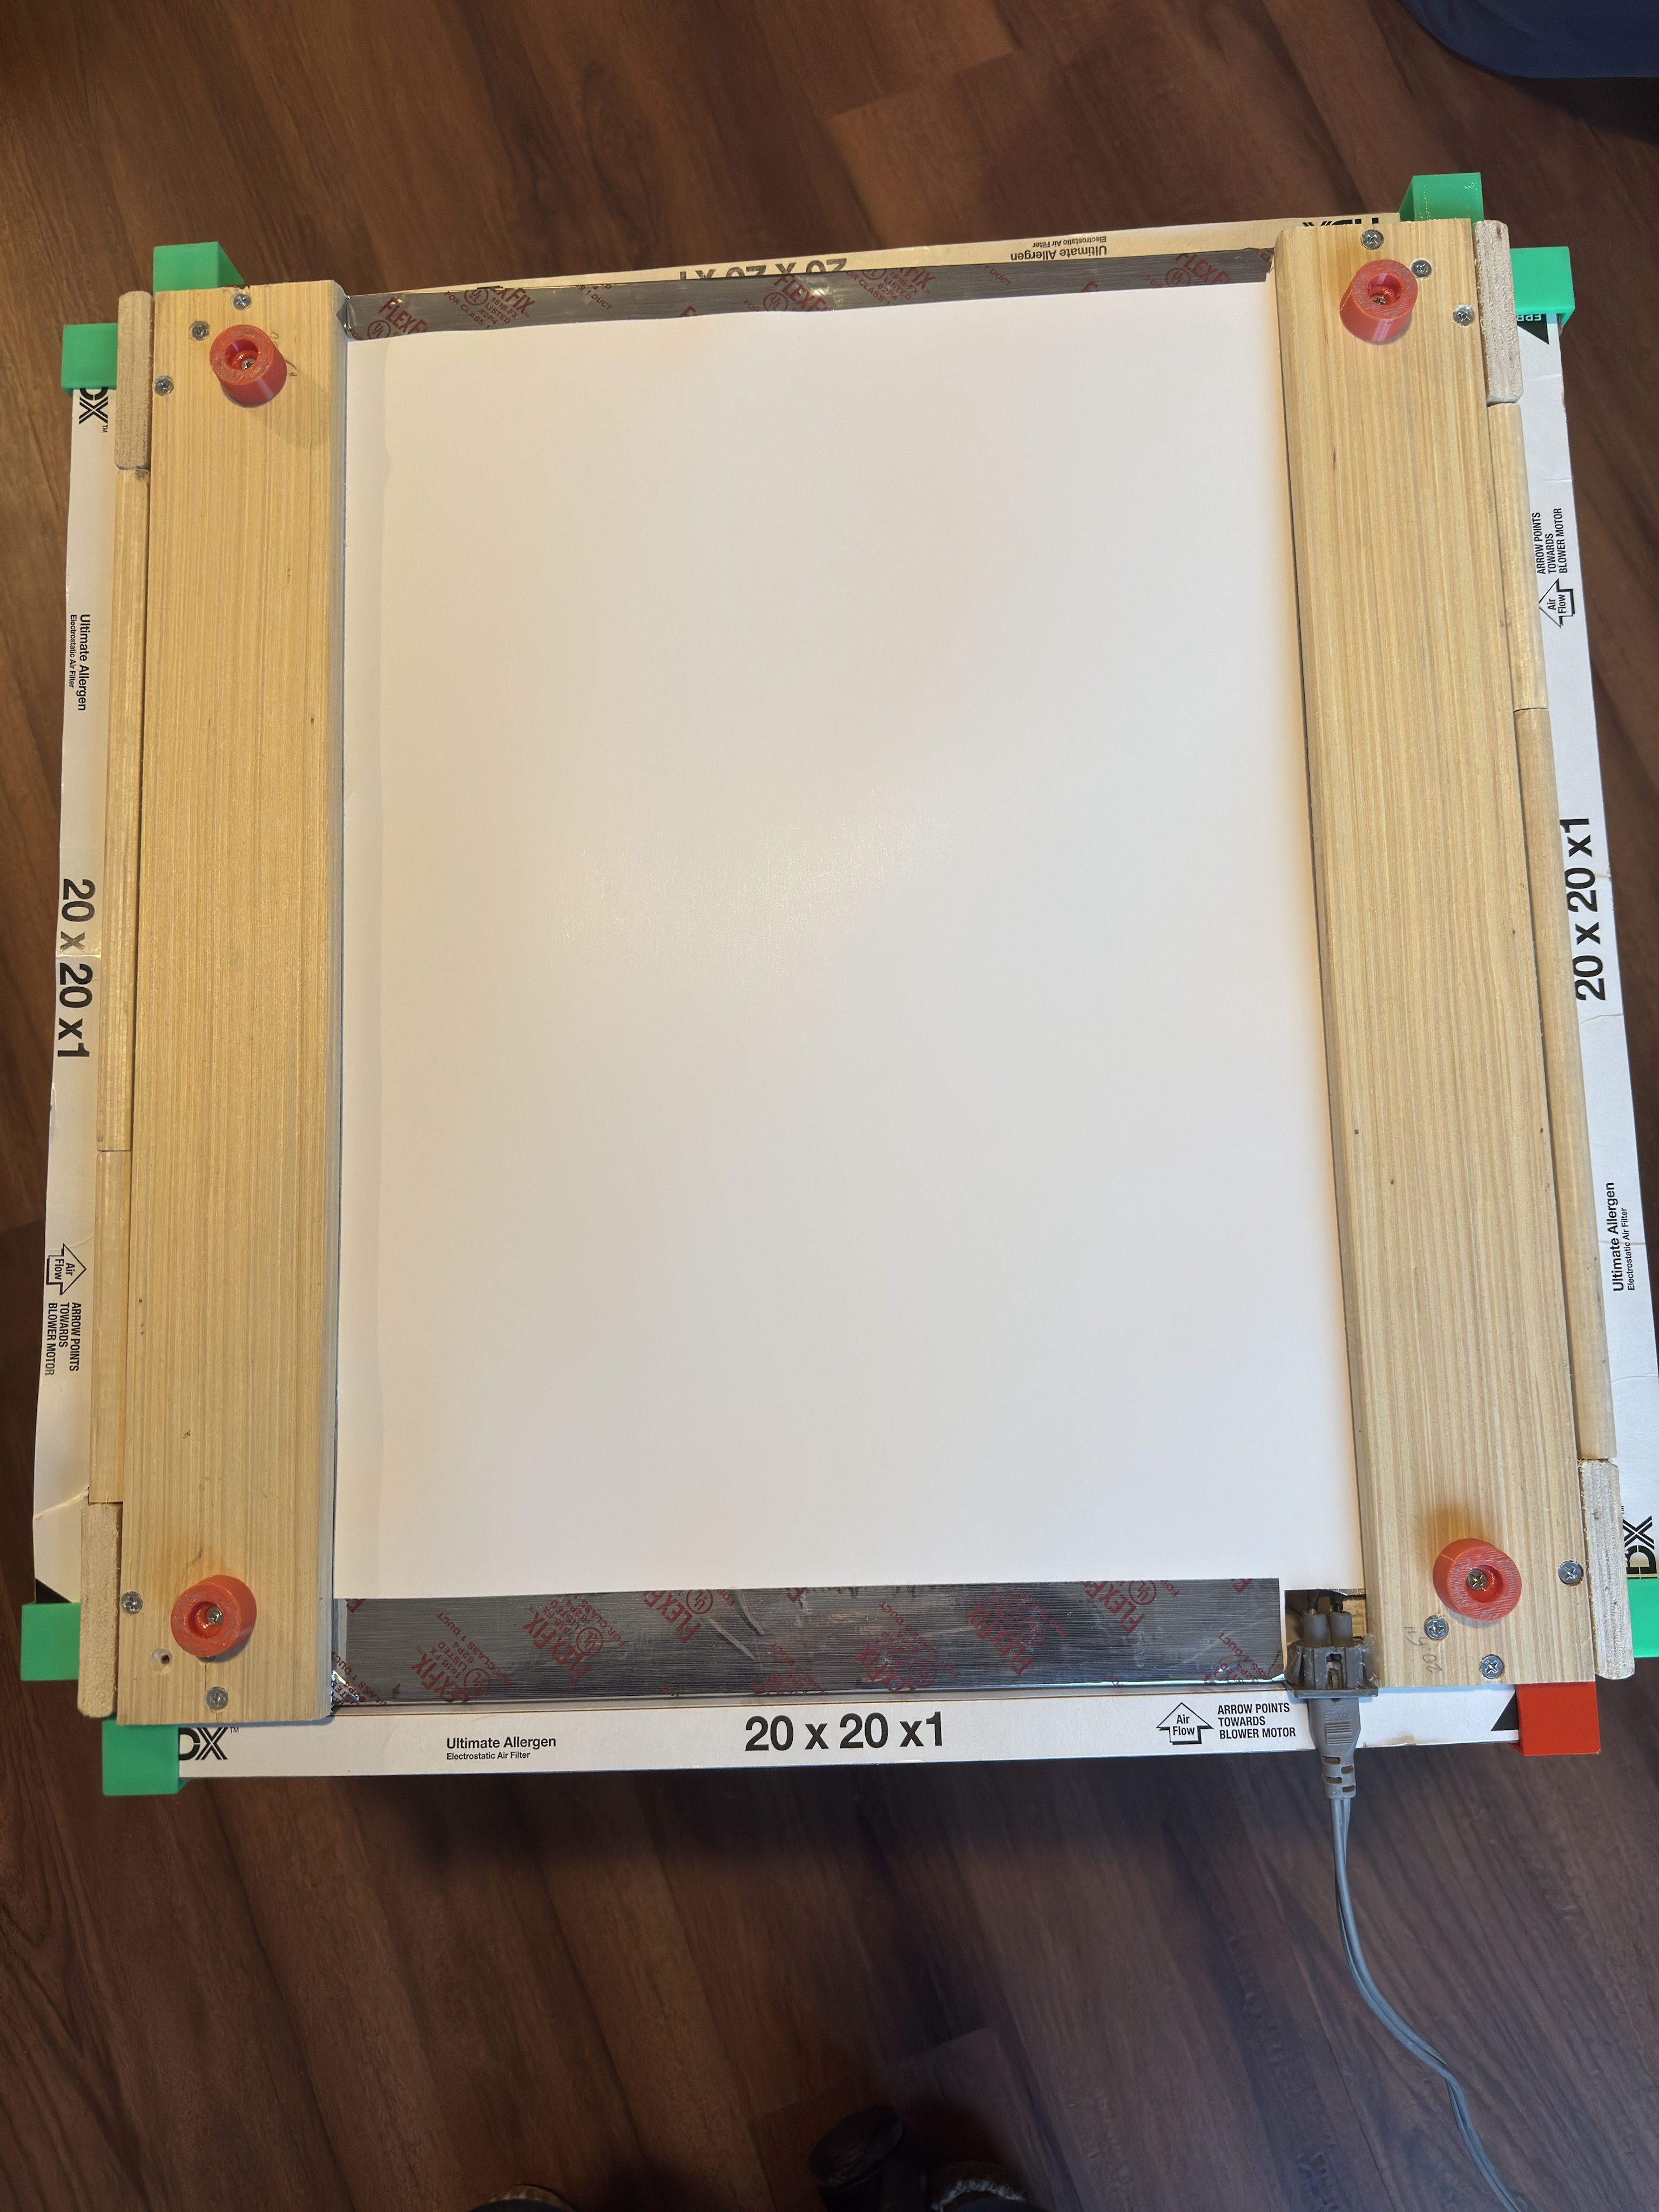
Cover up the open bottom of the frame with posterboard and trim to size. Tape the edges of the board to the frame. This requires two tape strips on the outside of the frame and two on the inside, see:
Install feet on the bottom of the frame with screws
Flip the frame right-side-up again, and trim the grille to fit between the two wide slats. I used an oscillating tool for this but you can use a dremel, hand saw, or just some side-cutters to cut through the soft plastic.
Optional but recommended: use some wood off-cuts to fill in the gaps between the filters and the frame on two sides
Press the impeller onto the motor shaft. It should be a somewhat tight friction fit. Remember that the rounded side of the impeller hub faces towards the inside of the frame.
Install filters and power it on!