
Top Fan Enclosure with HEPA & Carbon-Filter for PrusaBox by PrinterBox
Obliczymy ostateczną cenę na podstawie wybranego pliku. Sprawdzisz ją i zaakceptujesz przed płatnością.
Zapisane na tym urządzeniu.

This is an enclosure to mount a fan to the top of the PrinterBox and have a HEPA & Carbon-Filter
- Ocena
- 0 / 5
- Polubienia
- 26
- Pobrania
- 56
- Wydruki
- 0
- Wyświetlenia
- 1465
- Oceny
- 0
Aktualizacja u źródła:
Informacje o modelu
- Źródło
- Printables
- Kategoria
- Prusa Parts & Upgrades
- Licencja
- Creative Commons — Attribution — Noncommercial — Share Alike
It's a common recommendation leaving the top window (or all doors) open while printing PLA. I don't think that's a good idea. Because PLA also scatters microplastics. Even if it may not be bioreactive, I don't want to have it in my lungs. Period.
Watch this:
But what if your enclosure is getting too hot, the rear fan is not enough?
That's why I thought it would be a good idea to provide even more cooling and be able to use a HEPA and carbon filter at the same time.
This is the result:

The advantage of my solution is also that you don't have to let the rear fan running full blast. Just set both to 50% and it's quieter. In addition, the top fan generates much more airflow, than the one in the back, because the air can move upwards through the filters without beeing re-routed in a 90 degree angle.

All you have to do is move the top window to the side, put the top fan in, turn on power and you are good to go.
There's an upgraded version available, but way more expensive.
https://www.printables.com/de/model/234337-top-fan-for-prusabox-by-printerbox
Test results
Room temperature: 22.8 ° Celsius (Air conditioned)
Outside temperature: 37.8 ° (peak)
Material: PETG
Nozzle: 250 °
Print bed: 90 °
Intervall: 5 Minutes
Date: 2022/06/18
Rear fan: Sunon EEC0251B2-0000-A99, 2700 rpm, 3.6 W, 12 V, 120 mm
158.007 m³/h (metric), 93.066cu.ft/min (imperial)
Top fan: Noctua NF-F12 industrialPPC-3000 PWM, 3000 rpm, 3.6 W, 12 V, 120 mm
186,7 m³/h (metric), 109,9 cu.ft/min (imperial)
| Time | Temperature (Celsius) | Comment | |
| 1. | 3:30 p.m | 23.5 ° | Start heating up |
| 2. | 3:35 p.m | 25.9 ° | Print starts |
| 3. | 3:40 p.m | 28.3 ° | First layer done |
| 4. | 3:45 p.m | 31.7 ° | Temperature rising |
| 5. | 3:50 p.m | 33.9 ° | Temperature rising |
| 6. | 3:55 p.m | 35.4 ° | Temperature rising |
| 7. | 4:00 p.m | 36.4 ° | Start of rear fan at fullpower |
| 8. | 4:05 p.m | 34.1 ° | Temperature drops |
| 9. | 4:10 p.m | 34.2 ° | Temperature rising |
| 10. | 4:15 p.m | 34.4 ° | Temperature rising |
| 11. | 4:20 p.m | 34.6 ° | Temperature rising |
| 12. | 4:25 p.m | 34.8 ° | Start of top fan at full power |
| 13. | 4:30 p.m | 33.8 ° | Temperature drops |
| 14. | 4:35 p.m | 33.3 ° | Temperature drops |
| 15. | 4:40 p.m | 33.0 ° | Temperature drops |
| 16. | 4:45 p.m | 32.8 ° | Temperature drops |
| 17. | 4:50 p.m | 32.6 ° | Temperature drops |
| 18. | 4:55 p.m | 32.4 ° | Temperature drops |
| 19. | 5.00 p.m | 32.3 ° | Temperature drops |
| 20. | 5.05 p.m | 32.1 ° | Temperature drops |
| 21. | 5.10 p.m | 32.1 ° | Temperature stable |
| 22. | 5.15 p.m | 31.9 ° | Print job done |
Conclusion
While the temperature still rose even though the rear fan was running at full speed, it dropped consistently with the top fan. Airflow through both filters is around 1.33 m/s at full speed.

Parts needed
- You need a 120 mm high pressure fan (12 volts) which is capable of pushing enough air through both filters. I recommend a Noctua NF-F12 industrial PPC-3000 PWM or smiliar.
- If you want to control your fan, you need a 12 volt motor controller, like this one

- You will also need a 12 volts power supply.
- If you want it to be removable, you need a wiring that allows you to unplug and remove quickly. Which connection method / connector type you use is up to you. I choosed these guys:

- You need 1x HEPA and 1x carbon filter
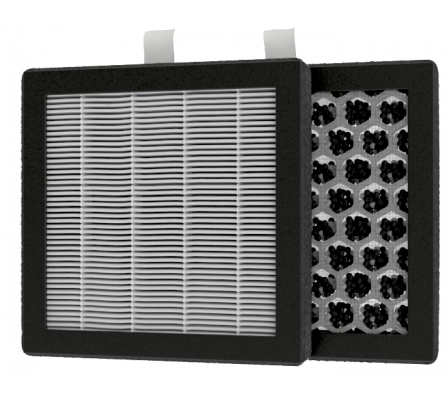
- You need several 3 mm square nuts and 3 mm screws of different lengths.
Download & Printing Instruction
- Either download the file:
- "Filter-Final-V7-All-Parts.stl" and split the parts with the split function of your slicer
OR
- "Filter-Final-V7-All-Parts.stl" and split the parts with the split function of your slicer
- download
- Filter-Final-V7-Part-01.stl
- Filter-Final-V7-Part-02.stl
- Filter-Final-V7-Part-03.stl
- Filter-Final-V7-Part-04.stl
- Some parts need support. Look at the gcode.


Hints
- Tube
You may wonder what's the intention of the little tube and where it goes?
It sits between the controller housing and the filter housing. You can run cables from the controller to the fan and microparticles or fumes can't escape through the gap beween both housings.
- Base
The base has a cable duct. You can use it for the power cable of your power supply to the controller.
Be very accurate in removing the remains of the support from the edge. Otherwise the top door won't close properly. Take a knife or a sanding block if necessary.
Don't remove the print from the printer until the base plate has cooled down. It's the best chance for it to stay straight and do not bend while cooling.
- Hinge
It's crucial that the screws for the hinge are completely even with the base plate.

- Controller
You may find that the controller is a bit too long to fit the controller housing. Just break off the marked part. Be careful.

- Push Back Blocker
Since the fan will have a hard time trying to push air trough the filters, some of the air won't make it and will be pushed back into the enclosure. That's normal. But if you fear this could affect your print, you can install the - what I call - "Push-Back-Blocker". You have to print the three large spacers and get some 50 x m3 screws.
If you have troubles to get the spacer into the holes of the blocker, simply widen them a bit with a knife. For the other end of the spacers, you may need a little force to plug them into the holes of the base plate. It's a little tight.
Warning: Do not use the Push Back Blocker if you print parts that need the entire height of the printer. The filament may stick to it.
Washer
You'll find three washers in the .stl. Use them to counter the screws and mount the Blow Back Blocker to the base.