
Creality Sonic Pad Top Rail Mount Ender 3 V2
Obliczymy ostateczną cenę na podstawie wybranego pliku. Sprawdzisz ją i zaakceptujesz przed płatnością.
Zapisane na tym urządzeniu.

I 3D scanned the Sonic Pad and made a mount for it to save space on my sideboard and replace the old Ender 3 V2 display.
- Ocena
- 5 / 5
- Polubienia
- 56
- Pobrania
- 389
- Wydruki
- 2
- Wyświetlenia
- 3756
- Oceny
- 2
Aktualizacja u źródła:
Informacje o modelu
- Źródło
- Printables
- Kategoria
- Creality Parts & Upgrades
- Licencja
- Creative Commons — Attribution — Noncommercial
Updated V2
- Added 25mm clearance to the bed to give the printhead enough space to reach the end of the bed
- fixed the mesh
- more clearance for the screw holes, you can use the original black screws of the Sonic Pad's leg now
V1
I 3D scanned the Sonic Pad and made a mount for it to save space on my sideboard and replace the old V2 display.
When you unscrew the black bolt of right leg of the Pad you see 2 M3 holes.
The Pad attaches to these with two M3x8 screws. (The original ones won't fit as they have a really weird size)
The display is flipped, so the side USB ports are on the right and still accessible for USB sticks and other devices. You can flip the screen software wise in the Sonic Pad settings under Configure / Advanced Settings / Flip Display
The printer is plugged in the back USB port. If you want to use that (instead of the default side port) you need to change the port in the printer.cfg to use it.
Easiest way is to use the web interface by entering the IP of the Sonic Pad in your computer's browser. Then:
- Go to Configuration

- Open the printer.cfg with a click
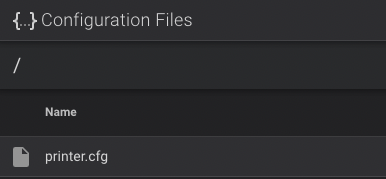
- Scroll down to the mcu section and change the number at the end to the port you want to use for your printer.
Default is 1, which is the upper port on the side, the lower port is 2. On the back the upper port is 3 (which is what I use) and the port saying CAM is number 4.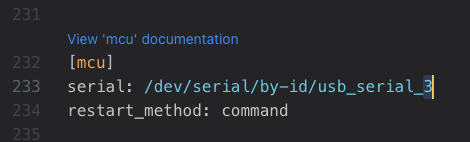
- Hit Save & Restart at the top right

- Done
See pictures for reference.
Printed with a .6 nozzle and .3 layer height, no supports neccessary. Any lower layer height or nozzle size will work as well.
Happy printing and let me know if you have questions in the comments :)
P.S.: I used the profile mounting part from vanilla chief's camera mount:
https://www.printables.com/model/196828-ender-3-v2-rail-slot-camera-mount/