
Honey Bee
Obliczymy ostateczną cenę na podstawie wybranego pliku. Sprawdzisz ją i zaakceptujesz przed płatnością.
Orientacyjna cena wydruku pliku
1,63 € – 1,99 € netto (bez VAT)
Dla pliku: BEE Wings with ironging and concentric layering_2h37m_0.10mm_205C_PLA_ENDER3V2NEO.gcode
To wstępna wycena jednego pliku. Dokładną cenę poznasz przed zamówieniem.
Plik i założenia wyceny
Plik użyty do wyceny
Średnia wycena orientacyjna: 1,81 € netto (środek widełek).
- Masa podana przez autora
- 6 g
- Czas druku podany przez autora
- 2,61 godz.
- Materiał u źródła
- PLA
- Materiał wyceny
- PLA
- Drukarka wyceny
- Bambu Lab P1S - 0.4 nozzle
- Proces wyceny
- 0.20mm Standard
Orientacyjna wycena wyłącznie wybranego pliku, oparta na masie i czasie druku podanych przez autora. Warianty plików nie są sumowane. Ostateczna cena zostanie obliczona po analizie pliku.
Zapisane na tym urządzeniu.

6 inch Posable Honey Bee decoration and toy made with TinkerCad
- Ocena
- 4,935 / 5
- Polubienia
- 460
- Pobrania
- 1979
- Wydruki
- 37
- Wyświetlenia
- 12 304
- Oceny
- 31
Aktualizacja u źródła:
Informacje o modelu
- Źródło
- Printables
- Kategoria
- Animals
- Licencja
- Creative Commons — Attribution — Noncommercial
Why did I make this?
My three-year-old is really into Bees right now. So of course, I went around looking for a good Bee design on printables for a 3-year-old to play with, and all the models I found mostly required glue for assembly or had parts that looked like they would snap off or be hard to print.
Stubbornly, I decided to design my own honeybee in Tinkercad.. (not the best tool, but the one I know how to use).
Design
This bee uses ball snap joints, making the wings, leg, head, and abdomen posable. All the pieces snap together easily. If dropped, or handled roughly, it will easily be reassembled without gluing.
While all the Bee Parts were designed by me, I did use the wing vein structure found in this Thingiverse project: Honey Bee by I-see-3D - Thingiverse
Advanced Printing and Assembly
General

- I successfully printed this entire project with Black, Yellow, and Transparent PLA.
- I've read that some folks don't have success with snapping parts with PLA. My success may be because I used:
- 3 perimeter layers on all shapes
- increased the infill bracing on the parts and changing the infill around the wing mounts on the Bee's thorax.
Infill
- 15% Gyroid infill on the legs
- I used 5% Gyroid infill on all the body and head parts, with a 25% infill around the wing mounts.

Head
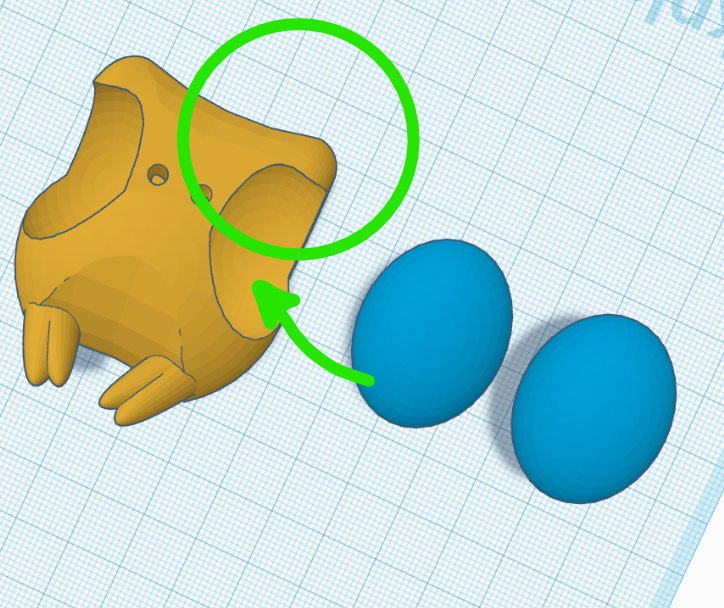
- There is one advanced part. To get the EYEs in the head socket, I use a heat gun briefly on the head, just to soften enough to press they eyes into place. If you don't want to do this, you can print the Model that includes the eyes in place.
Antanae and Stinger
- I left holes for a stinger and antennae. For my personal project, I opted to not include these. You could use Filament and glue to add these features.
Wings
- For the Wings, I used Transparent Filament with two main printing choices:
- Ironing on all top levels
- Concentric pattern for the top layer and bottom layers.
- This produced the best result. The wings also look good in white Filament, I'd still recommend ironing and concentric patterns, but you do you, once you download the files, it's your toy.


- I supplied the G-Code used for this in the downloadable files.
Legs
- This is probably where I wasted the most amount of time. The legs are “mostly” accurate to a honey bee. The intention was to make it look more realistic, easy to print, and still able to grab on to vertical surfaces.
- If requested, I'll publish some more leg models.
Future Concepts and Ideas.
If this is popular, I may make more bugs. Top Ideas below:
- Butterfly
- Housefly
- Dragonfly
- Ants
Comment if you have a preference, or a bug that you'd like in this design style.
This work is licensed under a
Creative Commons (4.0 International License)
Attribution-NonCommercial
You can message me if you wish to expand the usage of the models.