
Macropad - Seeed Xiao RP2040 - 1 key
Obliczymy ostateczną cenę na podstawie wybranego pliku. Sprawdzisz ją i zaakceptujesz przed płatnością.
Zapisane na tym urządzeniu.

Macropad enclosure for Seeed Xiao RP2040 - 1 key
- Ocena
- 5 / 5
- Polubienia
- 29
- Pobrania
- 219
- Wydruki
- 0
- Wyświetlenia
- 2666
- Oceny
- 1
Aktualizacja u źródła:
Informacje o modelu
- Źródło
- Printables
- Kategoria
- Computers
- Licencja
- Creative Commons — Attribution
Features:
- Designed for Cherry MX compatible switches.
- LED Window to leverage the built-in RP2040 neopixel RGB LED.
- No screws!
- Mechanical peg holders for the RP2040.
- Snap cover.
- USB port access hole on the back of the macropad.
- Cute and small footprint, just 1 key!
- Just 2 wires to solder!
Keycaps | |
| Productivity | Coming soon! |
| Various (48+) | https://www.printables.com/model/414597-cherry-mx-keycap-various-icons-50 |
| Dices | https://www.printables.com/model/414603-cherry-mx-keycap-dices |
| Playing cards | https://www.printables.com/model/414613-cherry-mx-keycap-playing-cards |
| Blank | https://www.printables.com/model/397305-cherry-mx-keycap-blank |
Overview
Microcontroller:
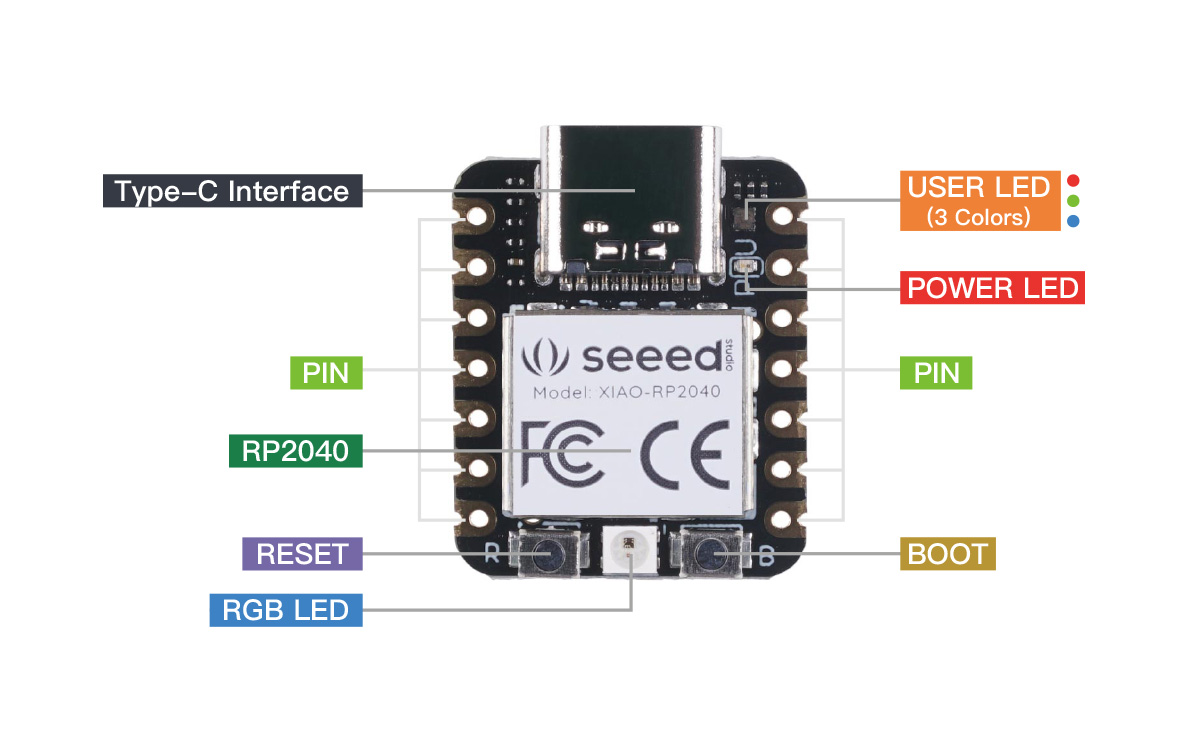
I built the macropad using a Seeed Studio Xiao RP2040 microcontroller (MCU) board. It is a 10$ (Canadian) board available on Amazon. I won’t go into the detailed specifications of the board but it is built around a dual-core RP2040 Raspberry PI processor. It can run Arduino, MicroPython, and CircuitPython. For this project, I opted to use CircuitPython and I am using 1 digital IO pin, the built-in neopixel RGB led, and the USB C port.
Wiring:
Keyboards and macropads are typically wired in a matrix of rows and columns interconnected using diodes. Each of the rows and columns are then connected to a digital IO on the MCU which allows to have more keys than digital IOs. As an example, if you wire a matrix of 5 rows and 6 columns, you can have 30 keys with just 11 digital IOs. I did not want to use diodes so I connected the switch directly to the MCU. QMK (not a typo, this is another popular keyboard firmware) has a very good hand wiring guide here.
In my case, one pin from the switch is connected to IO pin D0 on the MCU. I am using internal pull up resistors so no need for external resistors either. The other switch pin is connected to the ground pin on the MCU.

Macropad firmware (the code):
For the keyboard code, rather than reinventing the wheel, I used KMK, a keyboard focused layer that runs on top of CircuitPython. It is pretty well documented for matrix wiring with diodes but not so much for direct connections like I did so I'll share some code to help you get started if you go that route too.
When you connect the board, it starts by running boot.py and then code.py. boot.py is optional and only needed if you want to hide the USB drive (CIRCUITPY) and serial interface (COM port). I put code in boot.py to mount the USB drive and serial interface when the key connected to D0 is pushed and held while booting but otherwise only the keyboard interface is enabled.
The sample below has macros to open Google, notepad, cmd, powershell, your password (not secure, don't do it!), etc. It can be customized for your own needs. I did not do much yet but KMK allows you to create layers, change the color of the LED based on the layer and tons of other fun stuff. This is a work in progress so I will add more features later. If you come up with something nice, please share it in the comments!
I haven't seen examples using the keypad KeysScanner module so I hope this helps you.
code.py contains the main keyboard code:
#
# <code.py>
# Import modules
# KeysScanner is needed because we use direct switch connections instead
# of a matrix with diodes.
# simple_key_sequence and send_string are used in macros.
# RGB enables using the built-in RP2040 neopixel RGB LED.
# Mediakeys enables assigning things like increasing the volume to keys.
# Layers enables alternate key mapping by layer.
#
import board
from kmk.kmk_keyboard import KMKKeyboard
from kmk.scanners.keypad import KeysScanner
from kmk.keys import KC
from kmk.handlers.sequences import simple_key_sequence
from kmk.handlers.sequences import send_string
from kmk.extensions.RGB import RGB
from kmk.extensions.RGB import AnimationModes
from kmk.extensions.media_keys import MediaKeys
from kmk.modules.layers import Layers as _Layers
from kmk.modules.modtap import ModTap
Print a string to the serial console

print("NPQ Macropad")

GPIO to key mapping - We are using all the board digital IOs

Seed Xiao RP2040 pins:
'A0', 'A1', 'A2', 'A3'
'D0', 'D1', 'D2', 'D3', 'D4', 'D5', 'D6', 'D7', 'D8', 'D9', 'D10'
'I2C', 'MISO', 'MOSI', 'RX', 'SCK', 'SCL', 'SDA', 'SPI', 'TX', 'UART', 'board_id'
'LED', 'LED_BLUE', 'LED_GREEN', 'LED_RED', 'NEOPIXEL', 'NEOPIXEL_POWER'

_KEY_CFG = [
0 - D0
board.D0

]

Our own Keyboard class.  We need to do this because we have direct wiring of the switches
to the MCU instead of the "standard" matrix of columns and rows interconnected with diodes.

class MyKeyboard(KMKKeyboard):
    def init(self):
        # create and register the scanner
        self.matrix = KeysScanner(
            # require argument:
            pins=_KEY_CFG,
            # optional arguments with defaults:
            value_when_pressed=False,
            pull=True,
            interval=0.02,  # Debounce time in floating point seconds
            max_events=64,
        )
Our keyboard object!
keyboard = MyKeyboard()

Neopxiel RGB LED extension - http://kmkfw.io/docs/rgb

neopix = RGB(
    pixel_pin=board.NEOPIXEL,
    num_pixels=1,
    hue_default=170,  # Blue = 170
    sat_default=255,  # Blue = 255
    val_default=255,  # Blue = 255
    animation_mode=AnimationModes.BREATHING,
    animation_speed=6,
)

Layers

Layer colors
LYR_BLUE, LYR_WHITE, LYR_RED, LYR_GREEN, LYR_PINK, LYR_YELLOW = 0, 1, 2, 3, 4, 5
LAYOR_COLOR = ["BLUE", "WHITE", "RED", "GREEN", "PINK", "YELLOW"]
Replacing the Layers class with our own to implement
a LED layer color indicator
class Layers(_Layers):
    last_top_layer = 0
# HSV values for each layer
#           BLUE   WHITE  RED    GREEN  PINK   YELLOW
lyr_hue = [ 170,   0,     0,     85,    213,   42,       ]
lyr_sat = [ 255,   0,     255,   255,   255,   255,      ]
lyr_val = [ 255,   255,   255,   255,   255,   255,      ]

# Handles the LED color change when a layer is changed
def after_hid_send(self, keyboard):
    if keyboard.active_layers[0] != self.last_top_layer:

        self.last_top_layer = keyboard.active_layers[0]

        neopix.hue = self.lyr_hue[self.last_top_layer]
        neopix.sat = self.lyr_sat[self.last_top_layer]
        neopix.val = self.lyr_val[self.last_top_layer]

        # I used the serial console for debugging
        # print(LAYOR_COLOR[self.last_top_layer])
        # print(keyboard.active_layers)

modtap
optional: set a custom tap timeout in ms
modtap.tap_time = 300
modtap = ModTap()

Append extensions

keyboard.extensions.append(neopix)
keyboard.extensions.append(MediaKeys())
keyboard.modules.append(Layers())
keyboard.modules.append(modtap)

Macros - Can be assigned to keys

My keyboard layout is Canadian French so some keys did not work well for me.
The backslash and slash were problematic.  I resolved the issue of the slash
(gives me é) by using the keycode from the numeric pad.  For the backslash,
I haven't found a KC that will work on all layouts so this will need to be
adjusted in the macros...

On Canadian French keyboard:
\ = KC.RALT(KC.GRAVE)    # KC.BSLASH give "é" on a Canadian French keyboard
/ = KC.LSFT(KC.N3)       # KC.SLASH gives "<" on a Canadian French keyboard

On a US keyboard:
\ = KC.BSLASH
/ = KC.SLASH

This one works on both:
/ = KC.KP_SLASH

This is a sample of what you can do but there is more...  Look at the KMK
documentation to see what is possible.

Notepad
NOTEPAD = simple_key_sequence(
    (
        KC.LWIN(KC.R),
        KC.MACRO_SLEEP_MS(250),
        send_string("notepad.exe"),
        KC.ENTER,
        KC.MACRO_SLEEP_MS(250),
    )
)
Calculator
CALC = simple_key_sequence(
    (
        KC.LWIN(KC.R),
        KC.MACRO_SLEEP_MS(250),
        send_string("calc.exe"),
        KC.ENTER,
        KC.MACRO_SLEEP_MS(250),
    )
)
Command prompt
CMD = simple_key_sequence(
    (
        KC.LWIN(KC.R),
        KC.MACRO_SLEEP_MS(250),
        send_string("cmd.exe"),
        KC.ENTER,
        KC.MACRO_SLEEP_MS(250),
    )
)
Windows PowerShell
WPOWERSHELL = simple_key_sequence(
    (
        KC.LWIN(KC.R),
        KC.MACRO_SLEEP_MS(250),
        send_string("powershell.exe"),
        KC.ENTER,
        KC.MACRO_SLEEP_MS(250),
    )
)
Windows PowerShell ISE
WPOWERSHELLISE = simple_key_sequence(
    (
        KC.LWIN(KC.R),
        KC.MACRO_SLEEP_MS(250),
        send_string("powershell_ise.exe"),
        KC.ENTER,
        KC.MACRO_SLEEP_MS(250),
    )
)
PowerShell 7
POWERSHELL7 = simple_key_sequence(
    (
        KC.LWIN(KC.R),
        KC.MACRO_SLEEP_MS(250),
        send_string("pwsh.exe"),
        KC.ENTER,
        KC.MACRO_SLEEP_MS(250),
    )
)
Certificate manager - Local Machine
CERTLM = simple_key_sequence(
    (
        KC.LWIN(KC.R),
        KC.MACRO_SLEEP_MS(250),
        send_string("mmc.exe CERTLM.MSC"),
        KC.ENTER,
        KC.MACRO_SLEEP_MS(250),
    )
)
Certificate manager - Current User
CERTMGR = simple_key_sequence(
    (
        KC.LWIN(KC.R),
        KC.MACRO_SLEEP_MS(250),
        send_string("mmc.exe CERTMGR.MSC"),
        KC.ENTER,
        KC.MACRO_SLEEP_MS(250),
    )
)
Opens Google in a new tab in the default browser
GOOGLE = simple_key_sequence(
    (
        KC.LWIN(KC.R),
        KC.MACRO_SLEEP_MS(250),
        send_string("https:"),
        #KC.LSFT(KC.N3),                # / on a Canadian french keyboard
        #KC.LSFT(KC.N3),                # / on a Canadian french keyboard
        KC.KP_SLASH,                    # / on Canadian French and US layout!
        KC.KP_SLASH,                    # / on Canadian French and US layout!
        send_string("www.google.com"),
        KC.ENTER,
        KC.MACRO_SLEEP_MS(250),
    )
)
MS Word (32bit)
C:\Program Files (x86)\Microsoft Office\root\Office16\WINWORD.EXE
MSWORD32 = simple_key_sequence(
    (
        KC.LWIN(KC.R),
        KC.MACRO_SLEEP_MS(250),
        send_string("C:"),
        KC.RALT(KC.GRAVE),                # \ on a Canadian french keyboard
        # KC.BSLASH,                      # \ on a US keyboard
        send_string("Program Files (x86)"),
        KC.RALT(KC.GRAVE),                # \ on a Canadian french keyboard
        # KC.BSLASH,                      # \ on a US keyboard
        send_string("Microsoft Office"),
        KC.RALT(KC.GRAVE),                # \ on a Canadian french keyboard
        # KC.BSLASH,                      # \ on a US keyboard
        send_string("root"),
        KC.RALT(KC.GRAVE),                # \ on a Canadian french keyboard
        # KC.BSLASH,                      # \ on a US keyboard
        send_string("Office16"),
        KC.RALT(KC.GRAVE),                # \ on a Canadian french keyboard
        # KC.BSLASH,                      # \ on a US keyboard
        send_string("WINWORD.EXE"),
        KC.ENTER,
    )
)
MS Excel (32bit)
C:\Program Files (x86)\Microsoft Office\root\Office16\EXCEL.EXE
EXCEL32 = simple_key_sequence(
    (
        KC.LWIN(KC.R),
        KC.MACRO_SLEEP_MS(250),
        send_string("C:"),
        KC.RALT(KC.GRAVE),                # \ on a Canadian french keyboard
        # KC.BSLASH,                      # \ on a US keyboard
        send_string("Program Files (x86)"),
        KC.RALT(KC.GRAVE),                # \ on a Canadian french keyboard
        # KC.BSLASH,                      # \ on a US keyboard
        send_string("Microsoft Office"),
        KC.RALT(KC.GRAVE),                # \ on a Canadian french keyboard
        # KC.BSLASH,                      # \ on a US keyboard
        send_string("root"),
        KC.RALT(KC.GRAVE),                # \ on a Canadian french keyboard
        # KC.BSLASH,                      # \ on a US keyboard
        send_string("Office16"),
        KC.RALT(KC.GRAVE),                # \ on a Canadian french keyboard
        # KC.BSLASH,                      # \ on a US keyboard
        send_string("EXCEL.EXE"),
        KC.ENTER,
    )
)
MS Outlook (32bit)
C:\Program Files (x86)\Microsoft Office\root\Office16\OUTLOOK.EXE
OUTLOOK32 = simple_key_sequence(
    (
        KC.LWIN(KC.R),
        KC.MACRO_SLEEP_MS(250),
        send_string("C:"),
        KC.RALT(KC.GRAVE),                # \ on a Canadian french keyboard
        # KC.BSLASH,                          # \ on a US keyboard
        send_string("Program Files (x86)"),
        KC.RALT(KC.GRAVE),                # \ on a Canadian french keyboard
        # KC.BSLASH,                      # \ on a US keyboard
        send_string("Microsoft Office"),
        KC.RALT(KC.GRAVE),                # \ on a Canadian french keyboard
        # KC.BSLASH,                      # \ on a US keyboard
        send_string("root"),
        KC.RALT(KC.GRAVE),                # \ on a Canadian french keyboard
        # KC.BSLASH,                      # \ on a US keyboard
        send_string("Office16"),
        KC.RALT(KC.GRAVE),                # \ on a Canadian french keyboard
        # KC.BSLASH,                      # \ on a US keyboard
        send_string("OUTLOOK.EXE"),
        KC.ENTER,
    )
)
MS Word (64bit)
C:\Program Files\Microsoft Office\root\Office16\WINWORD.EXE
MSWORD64 = simple_key_sequence(
    (
        KC.LWIN(KC.R),
        KC.MACRO_SLEEP_MS(250),
        send_string("C:"),
        KC.RALT(KC.GRAVE),                # \ on a Canadian french keyboard
        # KC.BSLASH,                      # \ on a US keyboard
        send_string("Program Files"),
        KC.RALT(KC.GRAVE),                # \ on a Canadian french keyboard
        # KC.BSLASH,                      # \ on a US keyboard
        send_string("Microsoft Office"),
        KC.RALT(KC.GRAVE),                # \ on a Canadian french keyboard
        # KC.BSLASH,                      # \ on a US keyboard
        send_string("root"),
        KC.RALT(KC.GRAVE),                # \ on a Canadian french keyboard
        # KC.BSLASH,                      # \ on a US keyboard
        send_string("Office16"),
        KC.RALT(KC.GRAVE),                # \ on a Canadian french keyboard
        # KC.BSLASH,                      # \ on a US keyboard
        send_string("WINWORD.EXE"),
        KC.ENTER,
    )
)
MS Excel (64bit)
C:\Program Files\Microsoft Office\root\Office16\EXCEL.EXE
EXCEL64 = simple_key_sequence(
    (
        KC.LWIN(KC.R),
        KC.MACRO_SLEEP_MS(250),
        send_string("C:"),
        KC.RALT(KC.GRAVE),                # \ on a Canadian french keyboard
        # KC.BSLASH,                      # \ on a US keyboard
        send_string("Program Files"),
        KC.RALT(KC.GRAVE),                # \ on a Canadian french keyboard
        # KC.BSLASH,                      # \ on a US keyboard
        send_string("Microsoft Office"),
        KC.RALT(KC.GRAVE),                # \ on a Canadian french keyboard
        # KC.BSLASH,                      # \ on a US keyboard
        send_string("root"),
        KC.RALT(KC.GRAVE),                # \ on a Canadian french keyboard
        # KC.BSLASH,                      # \ on a US keyboard
        send_string("Office16"),
        KC.RALT(KC.GRAVE),                # \ on a Canadian french keyboard
        # KC.BSLASH,                      # \ on a US keyboard
        send_string("EXCEL.EXE"),
        KC.ENTER,
    )
)
MS Outlook (64bit)
C:\Program Files\Microsoft Office\root\Office16\OUTLOOK.EXE
OUTLOOK64 = simple_key_sequence(
    (
        KC.LWIN(KC.R),
        KC.MACRO_SLEEP_MS(250),
        send_string("C:"),
        KC.RALT(KC.GRAVE),                # \ on a Canadian french keyboard
        # KC.BSLASH,                      # \ on a US keyboard
        send_string("Program Files"),
        KC.RALT(KC.GRAVE),                # \ on a Canadian french keyboard
        # KC.BSLASH,                      # \ on a US keyboard
        send_string("Microsoft Office"),
        KC.RALT(KC.GRAVE),                # \ on a Canadian french keyboard
        # KC.BSLASH,                      # \ on a US keyboard
        send_string("root"),
        KC.RALT(KC.GRAVE),                # \ on a Canadian french keyboard
        # KC.BSLASH,                      # \ on a US keyboard
        send_string("Office16"),
        KC.RALT(KC.GRAVE),                # \ on a Canadian french keyboard
        # KC.BSLASH,                      # \ on a US keyboard
        send_string("OUTLOOK.EXE"),
        KC.ENTER,
    )
)
I doubt that you will actually use these "color" macros in real life but this
is what i used for debugging and clarity
Types: BLUE<Enter>
BLUE = simple_key_sequence(
    (
        send_string("BLUE"),
        KC.ENTER,
    )
)
Types: WHITE<Enter>
WHITE = simple_key_sequence(
    (
        send_string("WHITE"),
        KC.ENTER,
    )
)
Types: RED<Enter>
RED = simple_key_sequence(
    (
        send_string("RED"),
        KC.ENTER,
    )
)
Types: GREEN<Enter>
GREEN = simple_key_sequence(
    (
        send_string("GREEN"),
        KC.ENTER,
    )
)
Types: PINK<Enter>
PINK = simple_key_sequence(
    (
        send_string("PINK"),
        KC.ENTER,
    )
)
Types: YELLOW<Enter>
YELLOW = simple_key_sequence(
    (
        send_string("YELLOW"),
        KC.ENTER,
    )
)
Aliases - looks better in the keymap
_______ = KC.TRANSPARENT     # Transparent
XXXXXXX = KC.NO              # No key

Keymap!

You will need to customize this for your own needs.  The sample
below will give you a good idea of what you can do.

Holding the D0 key will cycle between layer 0-5 and then go
back to layer 0.

To cycle between layers, we use KC.TG to go to higher level
layers and then KC.TO to go back to the lowest (first) layer when
we reach the last layer. I initially used KC.TO everywhere
which resulted in the current layer being the only active layer
and transparent keys not working as expected.  A big thumbs up
to "regicidal plutophage" for helping me understand that on the
zulip support chat https://kmkfw.zulipchat.com/

Cycle between layers:
Layer 0 (Blue LED)   - Active layers [0]
Layer 1 (White LED)  - Active layers [1,0]
Layer 2 (Red LED)    - Active layers [2,1,0]
Layer 3 (Green LED)  - Active layers [3,2,1,0]
Layer 4 (Pink LED)   - Active layers [4,3,2,1,0]
Layer 5 (Yellow LED) - Active layers [5,4,3,2,1,0]

GO_WHITE  = KC.TG(LYR_WHITE)
GO_RED    = KC.TG(LYR_RED)
GO_GREEN  = KC.TG(LYR_GREEN)
GO_PINK   = KC.TG(LYR_PINK)
GO_YELLOW = KC.TG(LYR_YELLOW)
GO_FIRST  = KC.TO(0)
keyboard.keymap = [
    # LYR_BLUE
    [
    #   D0
        KC.MT(GOOGLE, GO_WHITE),
    ],
    # LYR_WHITE
    [
    #   D0
        KC.MT(WHITE, GO_RED),
    ],
    # LYR_RED
    [
    #   D0
        KC.MT(RED, GO_GREEN),
    ],
    # LYR_GREEN
    [
    #   D0
        KC.MT(GREEN, GO_PINK),
    ],
    # LYR_PINK
    [
    #   D0
        KC.MT(PINK, GO_YELLOW),
    ],
    # LYR_YELLOW
    [
    #   D0
        KC.MT(YELLOW, GO_FIRST),
    ],
]
if name == "main":
    keyboard.go()
boot.py (optional) contains the code to hide the CIRCUITPY USB drive and serial COM port (REPL) unless you press and hold a specific key while booting, in this case this is the key connected to D10. For me, it is underneath the LED window:
# <boot.py>
Include this file at the root of the CIRCUITPY drive if
you want to disable the USB drive and serial interface
unless you press and hold key 10 while booting
import board
import digitalio
import storage
import usb_cdc
Need this to make the keyboard visible in the BIOS
This is a macropad so unlikely that we'll need it
import usb_hid
usb_hid.enable(boot_device=1)
The USB drive (CIRCUITPY), and serial interface (REPL)
are enabled by default

If the key on pin D10 is not held during boot,
execute the code to disable the USB drive and serial interface.
(Hold the key to mount the drive and serial interface)

https://learn.adafruit.com/customizing-usb-devices-in-circuitpython/circuitpy-midi-serial
bypass_key = digitalio.DigitalInOut(board.D0)
bypass_key.pull = digitalio.Pull.UP
if bypass_key.value:
    # Disable the CIRCUITPY USB drive
    storage.disable_usb_drive()
# Disable both serial devices
# Equivalent to usb_cdc.enable(console=False, data=False)
usb_cdc.disable()

bypass_key.deinit()
Installation steps | |
| Install CircuitPython | There is a detailed tutorial available for Mac OSX here, beware the download link provided is for an outdated version of CircuitPython; I suggest getting the latest stable version from the CircuitPython download page.
Start the RP2040 in bootloader mode: Press and hold the “BOOT” button (see diagram in the overview section for reference) on the RP2040 board and then connect it to USB or hit and release the “reset” button (while still holding “BOOT”) if the board is already connected to USB. Release the “BOOT” button after the board has started and you see the RP1-RPI2 USB drive.
Download and copy CircuitPython for the Seeed Xiao RP2040 board: I downloaded the current stable version (8.0.3) from here. Copy the UF2 file to the root of RP1-RPI2 USB drive. The board will restart and you will see a CIRCUITPY USB drive instead of RP1-RPI2. Congrats, you just installed CircuitPython! |
| Install KMK and the neopixel library | Download KMK from here. Open the zip file and copy the KMK folder and its content to the root of the CIRCUITPY drive. Download the neopixel library from here. Open the zip file and copy the neopixel.py file to the root of the CIRCUITPY drive. |
| Setup KMK | Create a code.py file at the root of the CIRCUITPY drive. The file can contain your own code or the sample that I have provided. Optionally, create a boot.py file at the root of the CIRCUITPY drive. This file is only needed if you prefer to hide the USB drive and serial port. You need to unplug and reconnect the USB cable to apply changes to the boot.py file (a simple reset is not sufficient). |
Print Settings:
If you are willing to sacrifice the LED window, you can print with a single color but I recommend printing the top layer with transparent filament.

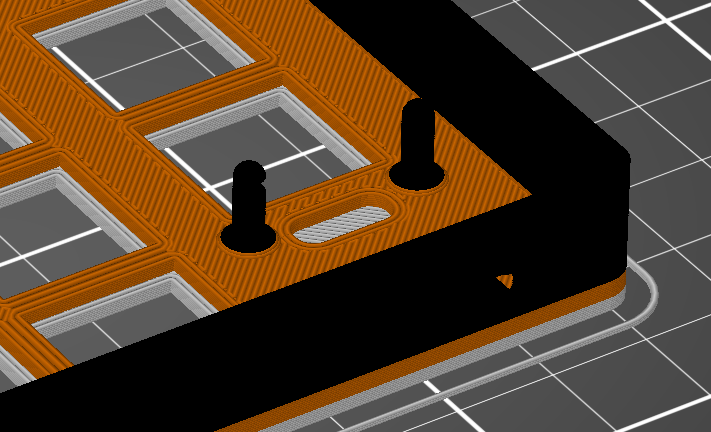
Color changes instructions: https://help.prusa3d.com/article/color-change_1687
| Recommended settings | |||
| Layer Height | 0.2 mm | 0.15 mm | 0.1 mm |
| Material | PETG | ||
| Infill - Bottom fill pattern | Hilbert Curve | ||
| Layers and perimeters - Solid Layers - Bottom | 15 | 20 | 29 |
Color changes Color change instructions for Prusa slicer. | 1.8 mm 3.2 mm | 1.7 mm 3.2 mm | 1.6 mm 3.1 mm |
I printed the top with a 0.6 nozzle because that's what I had installed / 0.2 mm layer height but I would probably print with a 0.4 nozzle. All color changes are optional if you are willing to sacrifice the LED window. The first layer should be printed with transparent filament with a change of color at the height specified in the table above. The first color change is highly recommended. The second is optional but the color change gives a nice look. Hilbert Curve gives a wonderful finish on the transparent layer (much better than diagonal lines!). PLA will probably work but I am not sure how the RP2040 pegs will handle being bent when inserting the microcontroller (PLA is more brittle than PETG). I also don’t remember ever seeing transparent PLA so you would need to sacrifice the LED window. If you print it with PLA, please let me know how it worked for you! | |||
If you want to learn more about CircuitPython you can check this tutorial on the Adafruit website.
The KMK github page is here.
The KMK web site is here.