
Train Track Modules For Toy Trains
Obliczymy ostateczną cenę na podstawie wybranego pliku. Sprawdzisz ją i zaakceptujesz przed płatnością.
Orientacyjna cena wydruku pliku
5,31 € – 6,48 € netto (bez VAT)
Dla pliku: CE3PRO_recto_recto corto_curva.gcode
To wstępna wycena jednego pliku. Dokładną cenę poznasz przed zamówieniem.
Plik i założenia wyceny
Plik użyty do wyceny
Średnia wycena orientacyjna: 5,89 € netto (środek widełek).
- Masa podana przez autora
- 48 g
- Czas druku podany przez autora
- 7,13 godz.
- Materiał u źródła
- PLA
- Materiał wyceny
- PLA
- Drukarka wyceny
- Bambu Lab P1S - 0.4 nozzle
- Proces wyceny
- 0.20mm Standard
Orientacyjna wycena wyłącznie wybranego pliku, oparta na masie i czasie druku podanych przez autora. Warianty plików nie są sumowane. Ostateczna cena zostanie obliczona po analizie pliku.
Zapisane na tym urządzeniu.

Two sets of toy train track modules.
- Ocena
- 0 / 5
- Polubienia
- 9
- Pobrania
- 68
- Wydruki
- 1
- Wyświetlenia
- 435
- Oceny
- 0
Aktualizacja u źródła:
Informacje o modelu
- Źródło
- Printables
- Kategoria
- Vehicles
- Licencja
- Creative Commons — Attribution — Noncommercial — Share Alike
I had some toy trains lying around, but no tracks, so I designed some simple ones. It should be noted, that the dimensions of these tracks were designed to work with my specific trains, I don't think they are "universal" and will work with any train, but if they work for you great.
As stated in the summary, in this post we have two different sets of toy train track modules. The difference between them is the union piece. In one this piece is independent of the track and in the other it is not.
Having only the previusly stated minor diference, the are three main types of pieces:
- A straight section with 160mm of track.
- A short straight section with 80mm of track (being half of the full straight section).
- A bend section turning 90º. When the union piece is included, two types are differentiated (type 1 and type 2) depending on the turning side of the curve.
For the version without the connecting piece already included, the model for that part is also attached in the post.
This being said, these are the dimesions for a typical section of the track:

And these are the radiuses of the curve section:
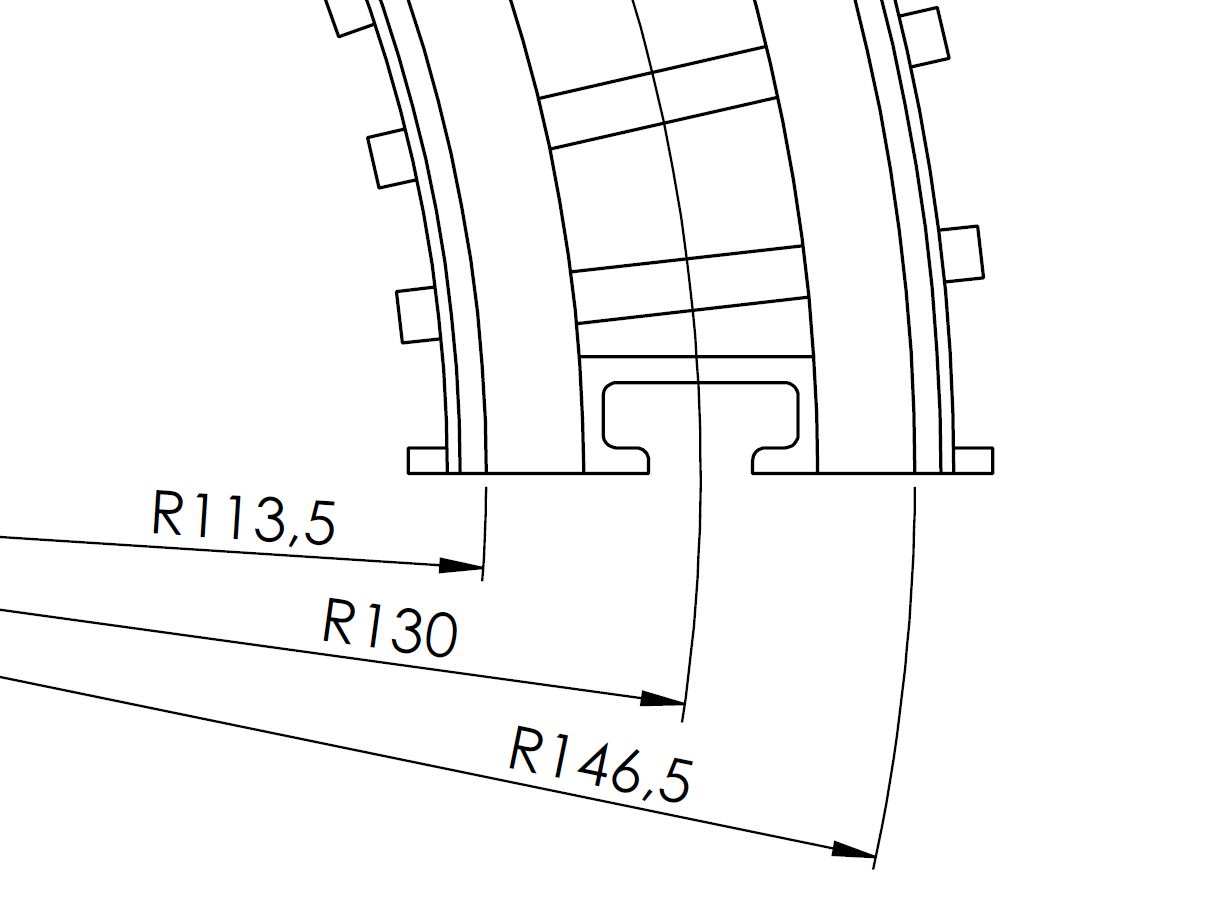
If your train fits on the tracks and you want to print a set, I recommend that you first print a curve section to see if it can go through it. This way you'll be sure that, whatever layout you devise, it will pass through without any problems.
Print Settings
Printed everything in PLA, without rafts or supports, at 0.2 mm resolution and 100% infill.
I would say that there is not need for supports in any case. But if you want to play safe, in the version with the union piece attach, you can turn the supports on (for the little overhang under the union piece).
Also, when printing the joining piece I would turn it face up, comparing when this is in use.
Assembly
The assembly process is very easy.
For the version without the already included connecting piece, the connecting piece is inserted into one track and then into another, as seen in the following gif:

The assembly for the version with the piece already included is simpler, you simply face two compatible sides of rails and hook them together as in the gif:

In the two versions, you can or glue them once assembled or pressure fit them for future disassembly.
Annex
In this section I just wanted to show how everything turned up in my case with a simple gif:
