
Lulzbot Taz 6 X Linear Rail Mod
Obliczymy ostateczną cenę na podstawie wybranego pliku. Sprawdzisz ją i zaakceptujesz przed płatnością.
Zapisane na tym urządzeniu.
These are models that allow you to remove the rods from the X gantry and allow you to install MGN15H linear rails.
- Ocena
- 0 / 5
- Polubienia
- 6
- Pobrania
- 42
- Wydruki
- 1
- Wyświetlenia
- 639
- Oceny
- 0
Aktualizacja u źródła:
Informacje o modelu
- Źródło
- Printables
- Kategoria
- Other Printer Parts & Upgrades
- Licencja
- Creative Commons — Attribution — Share Alike
Wanted to give a quick warning: There are a lot of tight tolerances at play here, you may have to heat up certain things to make them a snug fit, etc, depending on your printer. THIS MOD REQUIRES A PRETTY DEEP UNDERSTANDING OF HOW THESE THINGS WORK. But as usual, enjoy :)
See also: https://www.printables.com/model/1037313-lulzbot-taz-6-y-linear-rail-mod
Make sure to use a strong filament to print the parts. PETg, ABS, Etc.
I went ahead a published this, but A LOT more info needs added. I will add the rest later, I wasn't very prepared to add this to Printables, ( It was meant to be just a GitHub thing ), but I will try my best to make it as detailed as I can given the amount of time I have to do these things, haha
LINKS:
https://a.co/d/asvMYez ← I used two of these in my build.
https://a.co/d/7lZNEgn ← Use this to lubricate the rails.
https://a.co/d/aOkivR2 ← More precise bearings if you need these for other rails.
The BEAUTY of open source hardware
https://ohai.lulzbot.com/group/taz-6/ ← Any info related to the hardware of this printer is located here: These are Open Hardware Assembly Instructions.
https://download.lulzbot.com/TAZ/6.0/ ← All things related to printer: printable parts, manuals, software, etc.
https://cad.onshape.com/documents/db1314645041f433a24b6dc3/w/6aee9c13ac54c11d09e02da0/e/b7de97fc974a48bdc73dd85b ←←← A VERY good model of anything on this printer. In this model, everything is STOCK. A MASSIVE Thanks to Daniel and Helton at Engineerable.
I also had an issue with the PEI, ( I think it's called that, the thin layer used for adhesion ), peeling away from the glass. Instead of ordering a new piece and replacing, I altered it. I took the bed off the printer, peeled off the PEI sheet, and removed the glue. Removing the glue is a royal PITA, so if you attempt to do this as well, be prepared to use a lot of alcohol and goo gone.
Afterwards though, you should end up with a nice smooth piece of glass. Now for adhesion, I use this on the bare glass: https://a.co/d/6tAwpxu Follow the instructions carefully it work very well for me.
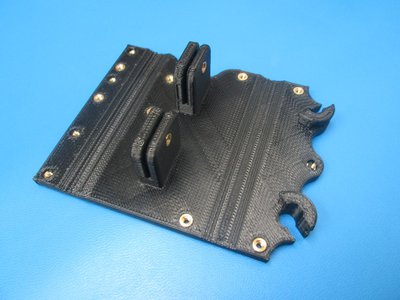
I redid the belt clamp system to be stronger for photo listed below, (stock part shown) :
X Carriage and Belt Clamp STL Files.
The system is a little finicky, but it is used to position the belt in the location you choose to allow for better tension across the entire X axis.
MY GITHUB PAGE For this printer and the BigTreeTech Octopus Mainboard swap.
https://github.com/FunkyNuggets007/Taz6_BTTOctopus_BLTouch_Klipper_HemeraXSRevo_CB1-PI4B