
Auto-UnderClippy for 3D Chameleon Mk4
Obliczymy ostateczną cenę na podstawie wybranego pliku. Sprawdzisz ją i zaakceptujesz przed płatnością.
Zapisane na tym urządzeniu.

A 3D Chameleon Mk4 Auto-3DClippy for mounting under Orbiter v2, Galileo 2 and Sailfin Extruders!
- Ocena
- 0 / 5
- Polubienia
- 30
- Pobrania
- 72
- Wydruki
- 0
- Wyświetlenia
- 1236
- Oceny
- 0
Aktualizacja u źródła:
Informacje o modelu
- Źródło
- Printables
- Kategoria
- Accessories
- Licencja
- Creative Commons — Attribution
Auto UnderClippy:
This design is based on wjsteele's marvelous open source Auto 3DClippy. It differs in that it's installed under the extruder adding only 10mm to the filament path. So far, I've designed bodies for use with the Orbiter v2, Galileo 2 and the various Sailfin extruders. I'll add more if requested.
The blade holder is identical to the original and only included here for convenience. There is a 2.5mm longer version for the Sailfin body because of the needed depth.
The Auto UnderClippy should be installed under the Extruder with the Servo mounted in front of the extruder, opposite the stepper motor. Technically, if space allowing, the Sailfin model could be installed inverted as the mounting bolts would still align.
The Clockwise (cw) Body variants operate in reverse to the original design and require the Alternate MK4 firmware be flashed to the 3D Chameleon control board. Here is a link to the Mk4 Firmware flashing instructions.
Additional Hardware Required:
20KG Digital Servo 180 degree rotation - 4.8 - 6 volt (1)
9mm Wide Snap-Off Blades from box cutter (1)
M3 8-12mm bolt for mounting Servo (4)
M3 bolt 10mm longer than what is currently used for the extruder (2)
Note: These links are only suggested sources.
Printing Instructions:
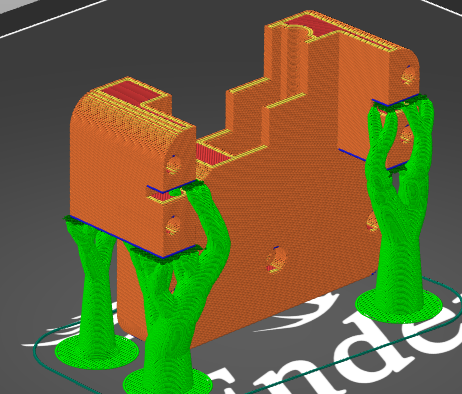
Print your desired body along with the blade holder. Use Standard PLA at 35% infill or more. Do not use Velvet type PLA since it expands when printed and will interfere with critical tolerances. The body requires supports. I recommend organic supports. Print it with the back side down and the opening of the body up (See attached photo). It's important that your printer is tuned as well as possible.
Assembly Instructions:
Assembly couldn't be much more intuitive! Nothing will fit wrong.
Before assembly, connect the servo to the 3D Chameleon control board to initialize the servo's position. Note that the Vcc and Sense wires need to be reversed before connecting. See the instructions in the 3D Chameleon Forums
Insert the blade segment into the blade holder. Note that the blade only fits properly in one direction. I recommend adding a drop of superglue to the back end of the blade before final insertion to secure it into the slot.
Mount the Servo using the 4 M3 bolts. Tighten firmly, but don't over tighten.
Insert the blade holder. It will only fit one way.
Break off 3 of the 4 arms from the 4 prong arm and install onto the servo so that the blade is clear from the filament path. Fasten it down with the included screw.
Connect the Servo again the the 3D Chameleon control board to verify operation. Insert a filament scrap and send 6 pulses to test operation.
Install the Auto-UnderClippy:
Measure a piece of Bowden tubbing to fit all the way into your hot-end. Add 2mm to that length and cut it. Do the same with the Extruder exit port.
Place the hot-end's Bowden tube into the hot end and press the Auto-UnderClippy firmly into position. Place the Bowden tube into the Extruder and place it on top of the Auto-UnderClippy. Using the longer M3 bolts, attach your Extruder through the Auto-UnderClippy and into your original mount.
GCode Example:
Include the code in the appropriate area of your Tool change G-code.
Adjust position of filament before sending the command to change filament, then finish extracting after cutting:
; go to holding position to unload the stock extruder
G0 Y254 F2000  ; <<----- EDIT THIS LINE TO SET THE INITIAL LOCATION OF THE BUTTON
; if this is the first load, then don't unload
G91 ; move to relative mode
M83; load extruder #{next_extruder}
M117 Loading Tool T{next_extruder}
{if previous_extruder>-1}; Not First Load
; back out the filament for cutting
G0 E5 F1500; spit a little filament before retracting.
G0 E-55 ; retract to 5-10mm before cutter, adjust this to tune waste.
; we skipped to here if it was extruder -1
{endif}
;*******
; Insert Filament Selection Code Here
; The filament will be cut when selected
;*******
{if previous_extruder>-1}; If NOT first extruder
; retract it back out of the extruder
G4 S2 ; Wait for cutter to complete
G92 E0
G0 E10 F1500;  push filament past cutter
G0 E-35; retract again 5mm beyond extruder's gear
G92 E0
{endif}
;*******
; Proceed to extract and replace filament