
50mm Pendulum Clock Escapement
Obliczymy ostateczną cenę na podstawie wybranego pliku. Sprawdzisz ją i zaakceptujesz przed płatnością.
Zapisane na tym urządzeniu.
Informacje o modelu
- Źródło
- Printables
- Kategoria
- Physics & Astronomy
- Licencja
- GNU General Public License v3.0
Disclaimer
This is a work in progress and iterative testing is done to facilitate the design improvements to get a perfectly working escapement.
Test Results and Revision History
V11 - 7 July 2024
Sadly, the first test attempt(v11) failed, the escapement slips teeth and the cage design (v2) obscures visibility to allow clear observation to troubleshoot and adjust.
- Adjust parameters for escapement to tighten up tolerances
- Adjust cage layout to allow clear visualisation during testing.
Escapement chassis 2 - V4 - 8 July 2024
- Uploaded new design, currently printing overnight for assembly and testing tomorrow.
Parts needed:
- 3mm rods x 2
- 3x8x3mm bearings x 4
- 4 x 4mm x 80mm M4 screws and nuts.
Project motivation
The first part of a working clock is the escapement and pendulum. This part aims to get a one second escapement going. If this is successful I intend to go to the next stage of designing and tuning the pendulum.
My aim is not just to make another clock, but to create a simplified path, at least in my mind, to understand the steps needed to get to the final destination and clearly document them using visual tools.
The technical stuff I found in this book: The Project Gutenberg eBook of The Modern Clock, by Ward L. Goodrich
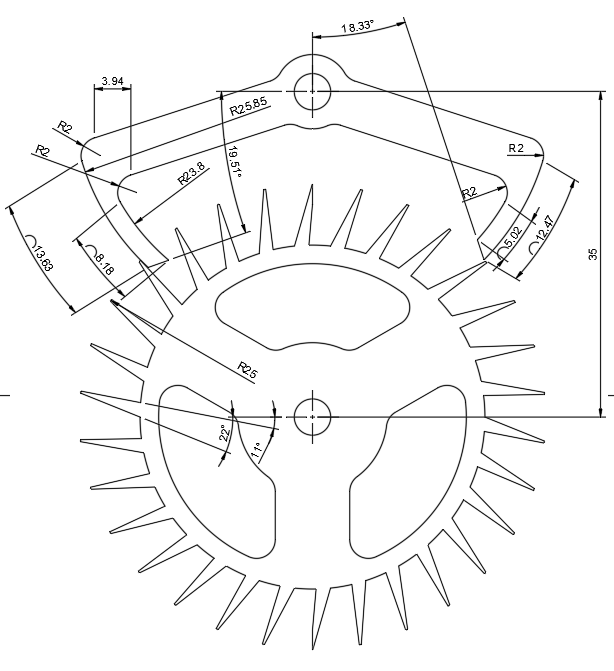
To be honest, it's a long and tedious read, but if you care about the details, it is already there and I am not going the repeat that. I found a shortcut to the near perfect escapement, way more advanced than in the book. The Graham Clock Escapement - Wolfram Demonstrations Project, from this source I then produced this sketch.
I bought micro bearings on amazon, 3mm x 8mm x 3mm, so I want to use them everywhere. I also wanted a small escapement of only 50mm, it might be too small, by I am going to try this size first.
Design One

This is my sketch in Fusion 360 that I then extruded to 3mm and modelled a pendulum and cage to hold it all and test the escapement.
There is way more detail in the book that you can read from the chapters on escapements, but all the perfect angles is captured in the sketch details above.
Design Two
- The escapement badges were moved out by 0.05mm.
- The chassis design was changed to a modular assembled design with the bearings moved into the chassis. The chassis was also changed to allow a clear view on the escapement functioning to facilitate video recording for slow speed analyses.