
Modular Hexagonal Terrain for 6 mm Scale Wargames
Obliczymy ostateczną cenę na podstawie wybranego pliku. Sprawdzisz ją i zaakceptujesz przed płatnością.
Zapisane na tym urządzeniu.

Collection of hexagonal terrain pieces for wargames in 6 mm scale, like Battletech.
- Ocena
- 0 / 5
- Polubienia
- 12
- Pobrania
- 87
- Wydruki
- 0
- Wyświetlenia
- 657
- Oceny
- 0
Aktualizacja u źródła:
Informacje o modelu
- Źródło
- Printables
- Kategoria
- Props & Terrains
- Licencja
- Creative Commons — Attribution — Share Alike
Modular system of interlocking hexagonal terrain tiles, buildings and accessories to make various battle scenarious.
This is an ongoing project. More tiles will be added, see roadmap.
Scale reference: Miniatures on the pictures are in 6 mm scale (1:285) and are printed with 0,25 mm nozzle (see Timberland Hound II for 6 mm Scale Wargames).
The content
- basic surfaces (with rugged variants),
- road tiles and bridges (with rugged variants),
- water tiles,
- elevators and spacers,
- connectors.
Dimensions
The tiles are bigger than classic Battletech hexes to accomodate terrain on the side and miniature in the center as well. Thus, this system is not compatible with Battletech mats. It is intended as a standalone terrain system for various 6 mm scale war games.
- Tile size is 25 mm.
- Point to point is 50 mm.
- Edge to edge is 43.3 mm.
The inner hexagon for a miniature base has 36 mm point to point and 18 mm side (outside dimensions) and is 2 mm wide.
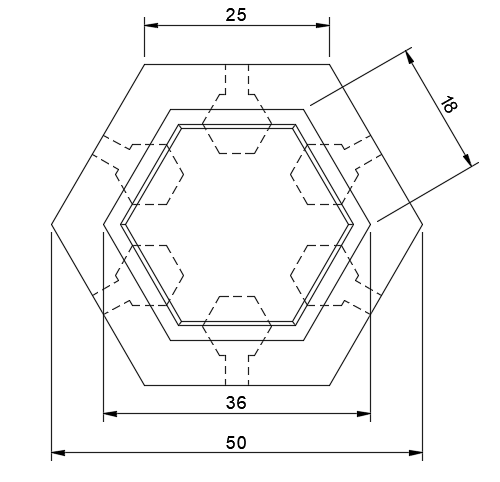
Miniature base compatibility
Tiles have a groove designed to hold miniatures with hexagonal bases with point to point size of 34 to 36 mm. Compatible base is included in the files.
Map Construction
Battle map is constructed from individual tiles using connectors:
- Full Connector is used for connecting on the top and bottom as well. It is typically used for connecting Elevators and their Surface.
- Halt Connector is the most common connector for attaching two tiles together from the bottom.
- Stud Connector is used on Elevators to attach the surface when no other connection is required.
Elevated tiles are constructed using the Elevator. Elevators are stached using Elevator Spacer to offset the surface tile.
Printing Instructions
The terrain pieces has been made to be printed easily with standard gear even though they are meant for the tiny 6 mm scale.
- Nozzle diameter: 0.4 mm
- Layer height: 0.2 mm
- Multicolor: can be printed in single color/multicolor without MMU/AMS
- Supports: not required
- Brim: not required
- Infill: 5 % grid
Multicolor Instructions
For printing without MMU/AMS follow this guide for fillament switches.
Basic
- Layer 0 (0 mm) - start with underground color - typically brown or grey.
- Layer 18 (3.6 mm) - change to surface color - typically grass green, sand yellow, or concrete grey.
Roads
- Follow Basic instructions.
- Layer 21 (4.2 mm) - change to road surface color - typically concrete grey.
- Layer 23 (4.6 mm) - change to stripes color - typically signal white or yellow.
- Layer 24 (4.8 mm) - change to road surface color - typically concrete grey to finish the sidelines. You can skip this and have sidelines in stripes color as well.
Water
- Layer 0 (0 mm) - start with water color - typically aqua blue.
- Layer 16 (3.2 mm) - change to surface color - typically grass green or sand yellow.
Rocks Dense & Sparse
- Follow Basic instructions.
- Layer 21 (4.2 mm) - change to rock color - typically stone grey.
Rocks Single
- Follow Basic instructions.
- Layer 21 (4.2 mm) - change to rock color - typically stone grey.
- Layer 33 (6.6 mm) - change to solitaire rock color - go wild.
Roadmap
- more roads variants - cross roads,
- solitaire rocks,
- railway tracks and bridges,
- industrial tiles,
- trees and bushes,
- compound tiles,
- standalone buildings and other props.
I am taking requests. If you need a specific tile, just let me know.
Changelist
- 2024/9/23 - Added new roads crossing.
- 2024/10/01 - Added new single rock.