
Nozzle Wiper Arm, CryoGrip compatible, right side remix
We calculate the final price from your selected file. You review and accept it before payment.
Saved on this device.

-Slightly modified the angles to be able to grab the corner of standard prusa steel sheets. -Added square nut slot.
- Rating
- 5 / 5
- Likes
- 34
- Downloads
- 165
- Makes
- 16
- Views
- 573
- Reviews
- 15
Updated at source:
Model information
- Source
- Printables
- Category
- Prusa Parts & Upgrades
- License
- Creative Commons — Attribution — Noncommercial — Share Alike
To be used together with langjais purge bin or my remix of that one.
Parts required:
1x 10mm m3 bolt
1x m3 square nut
1x bambu lab silicone nozzle wiper for A1
Push the square m3 nut all the way into the slot, then attach the wiper arm with one 10mm m3 bolt to the right side of the heatbed carriage (The bolt goes in from the bottom through the hole in the carriage).
Before sticking on the silicone wiper, you might want to scuff the printed surface a bit for better grip.
Start with the same G-code that langjai wrote and double check that it works for you.
Move the extruder with the printers interface to see if the values will work or cause issues before running it.
I modified the G-code to:
G0 X245 Y-15 Z1.5 F5000 ; Move hotend to position
G0 X211 Y-15 Z1.5 F150000 ; wipe left further in
G0 X240 Y-15 Z1.5 F50000 ; wipe right further in
G0 X240 Y-18 Z1.5 F50000 ; move position
G0 X211 Y-18 Z1.5 F150000 ; wipe left further out
G0 X240 Y-18 Z1.5 F50000 ; wipe right further out
G0 X240 Y-16.5 Z2 F50000 ; move position
G0 X211 Y-16.5 Z2 F150000 ; wipe left middle
G0 X245 Y-16.5 Z2 F50000 ; wipe right middle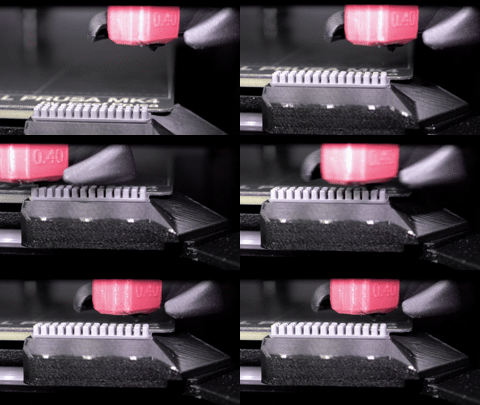
I pasted in the G-code above the “G29 P9 X208 Y-2.5 W32 H4” command (the regular nozzle cleaning).
This way it runs the wipe sequence right before it tries to do the original nozzle cleaning.