
Large format camera leaf shutter
We calculate the final price from your selected file. You review and accept it before payment.
Saved on this device.
Model information
- Source
- Printables
- Category
- Photo & Video
- License
- Creative Commons — Attribution — Share Alike
Introduction
This design offers a completely new large format camera shutter, building further on this previous design. It offers a number of improvements making it a more practical, ergonomical and reliable tool.
The most notable improvements and changes in features and approach:
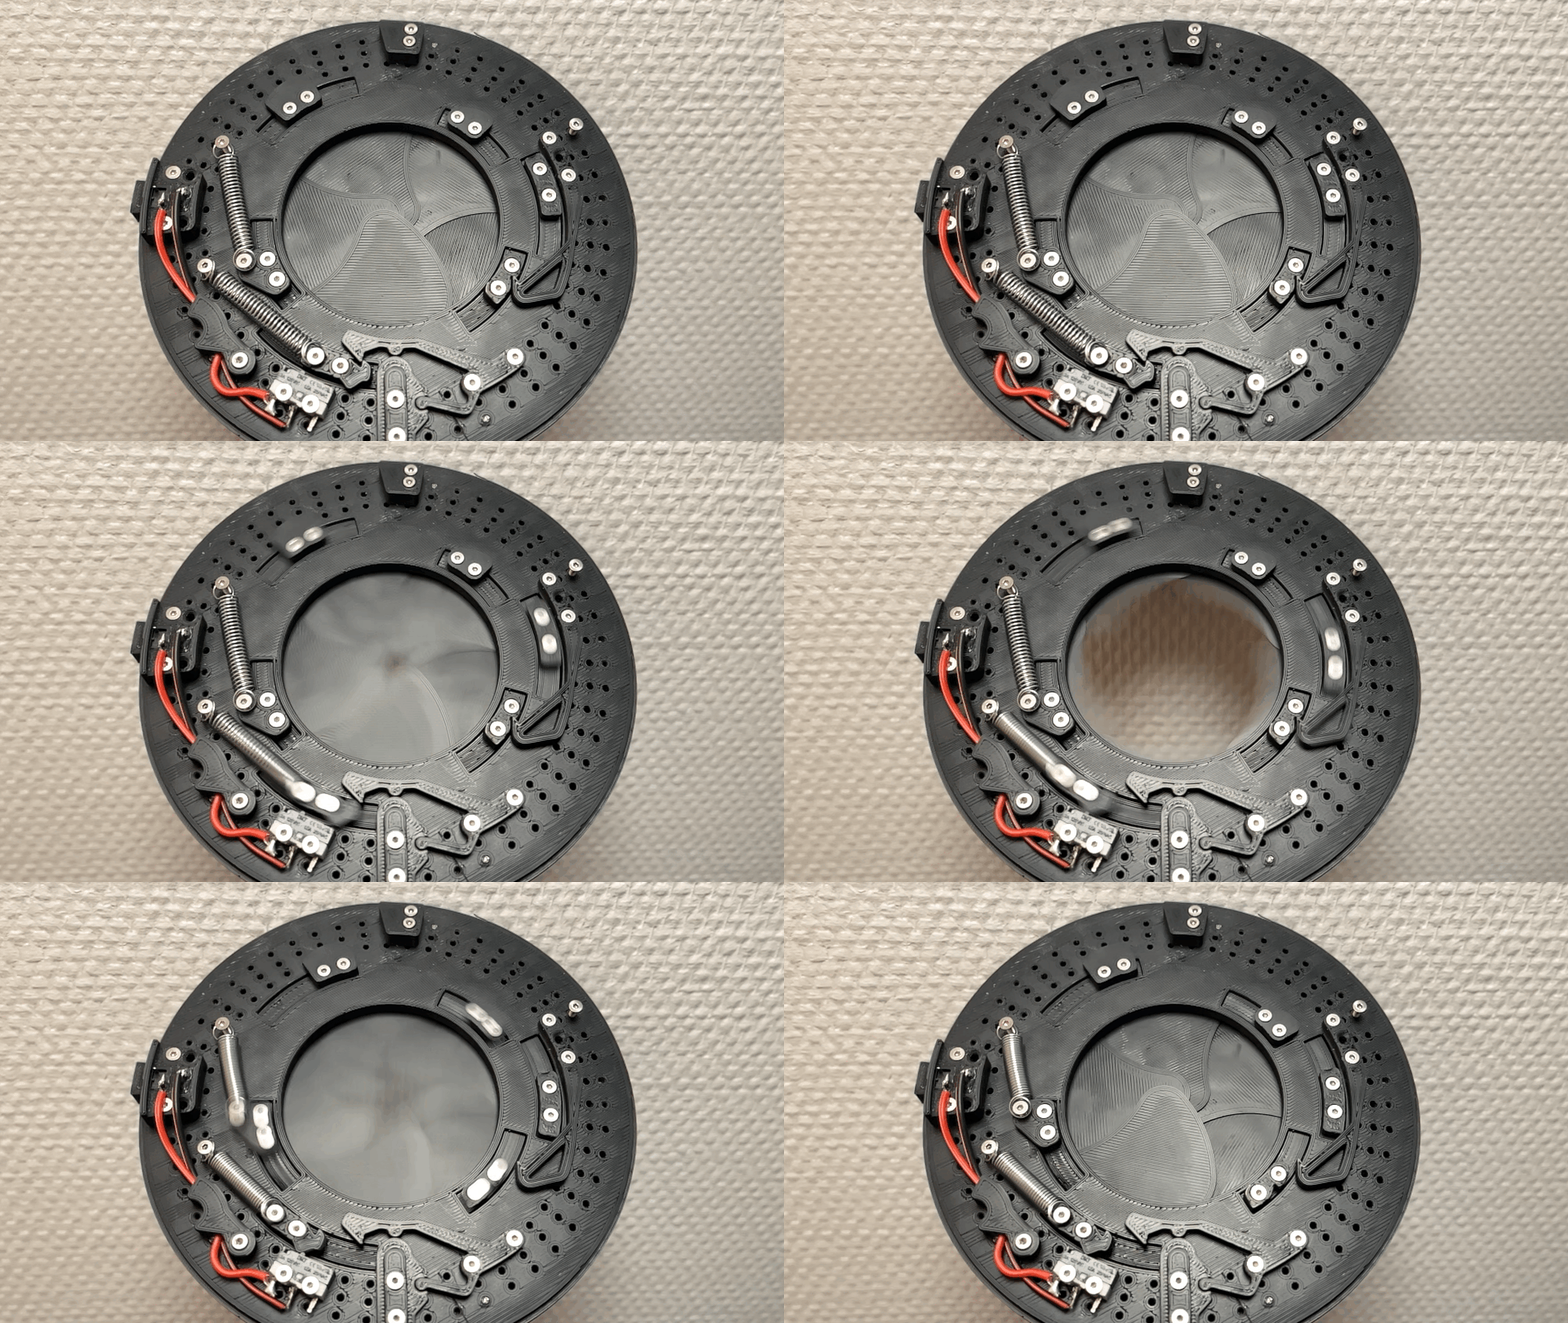
This version uses a single shutter instead of two. It opens and closes by consecutively shifting the inner and outer hinges. This makes the shutter much thinner by eliminating a second shutter assembly.
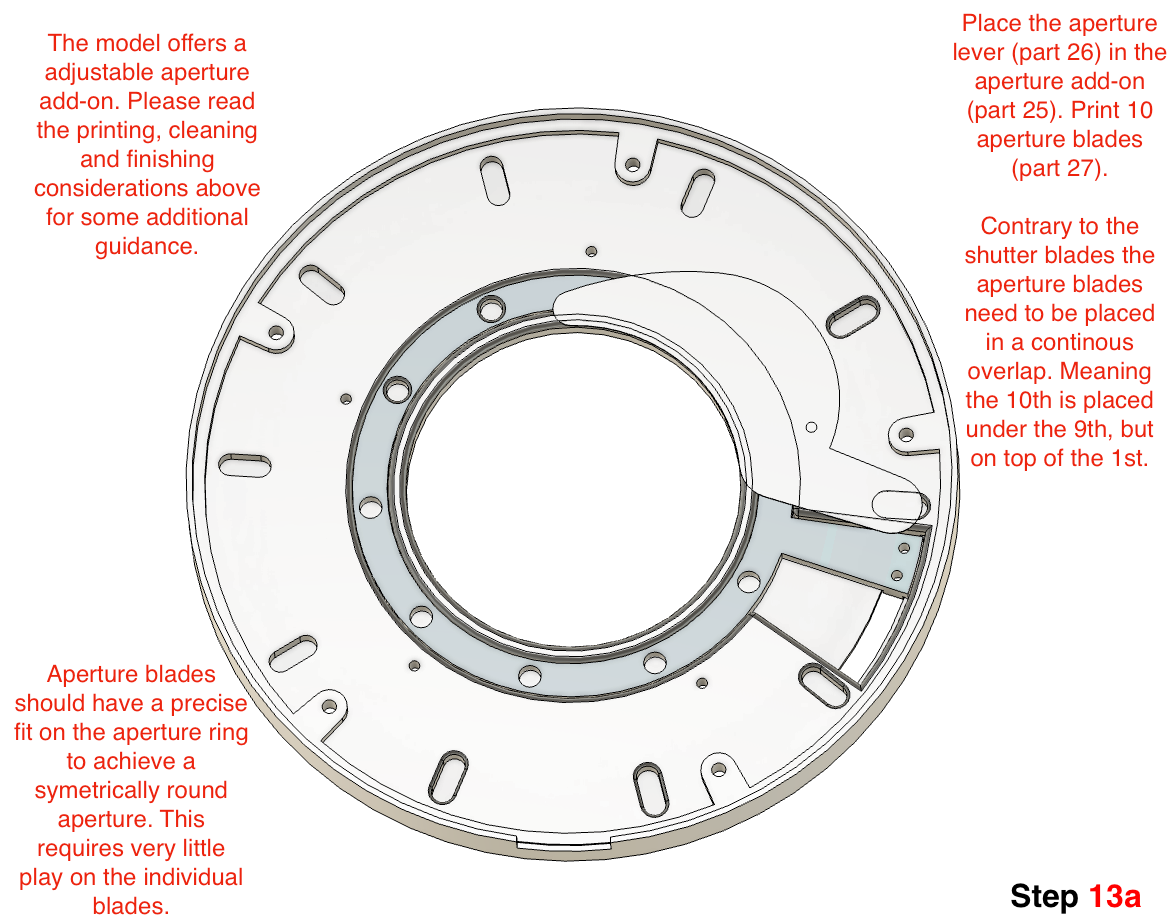
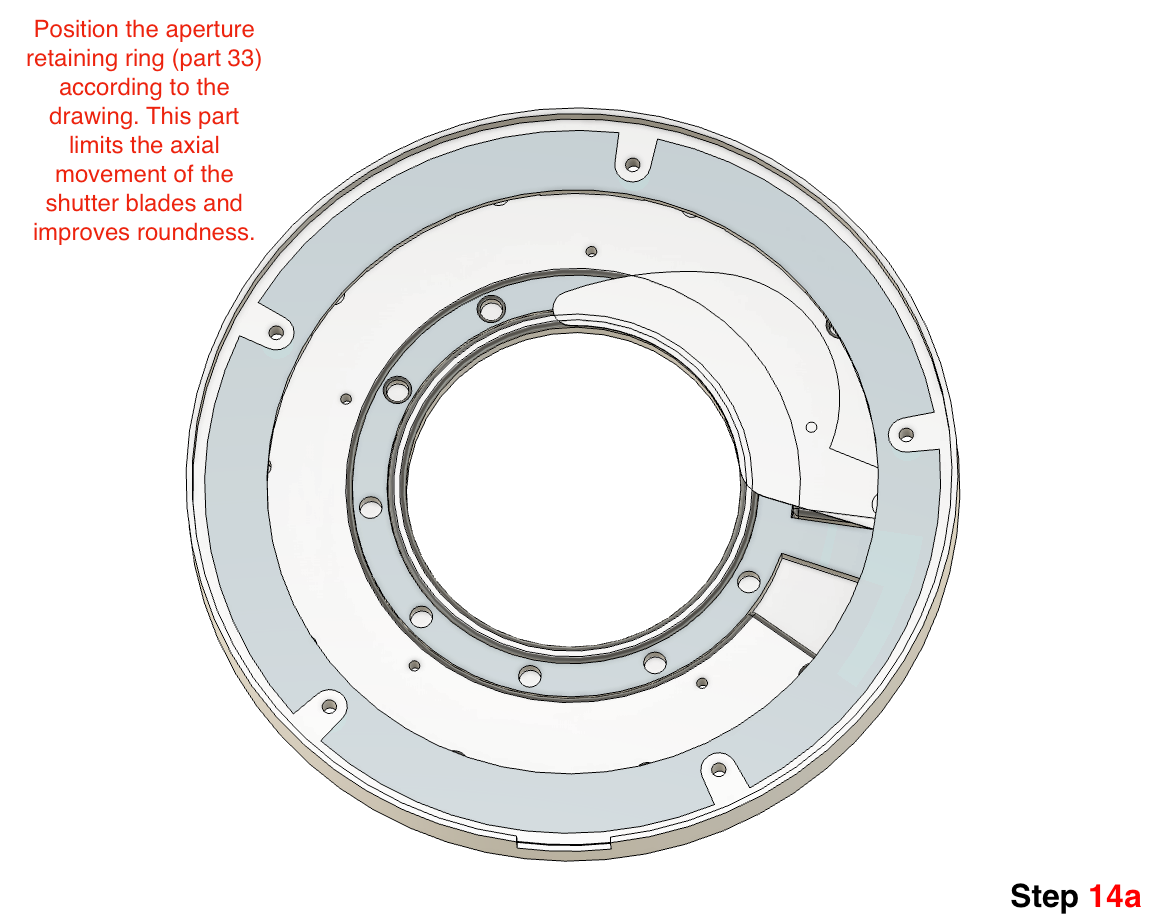
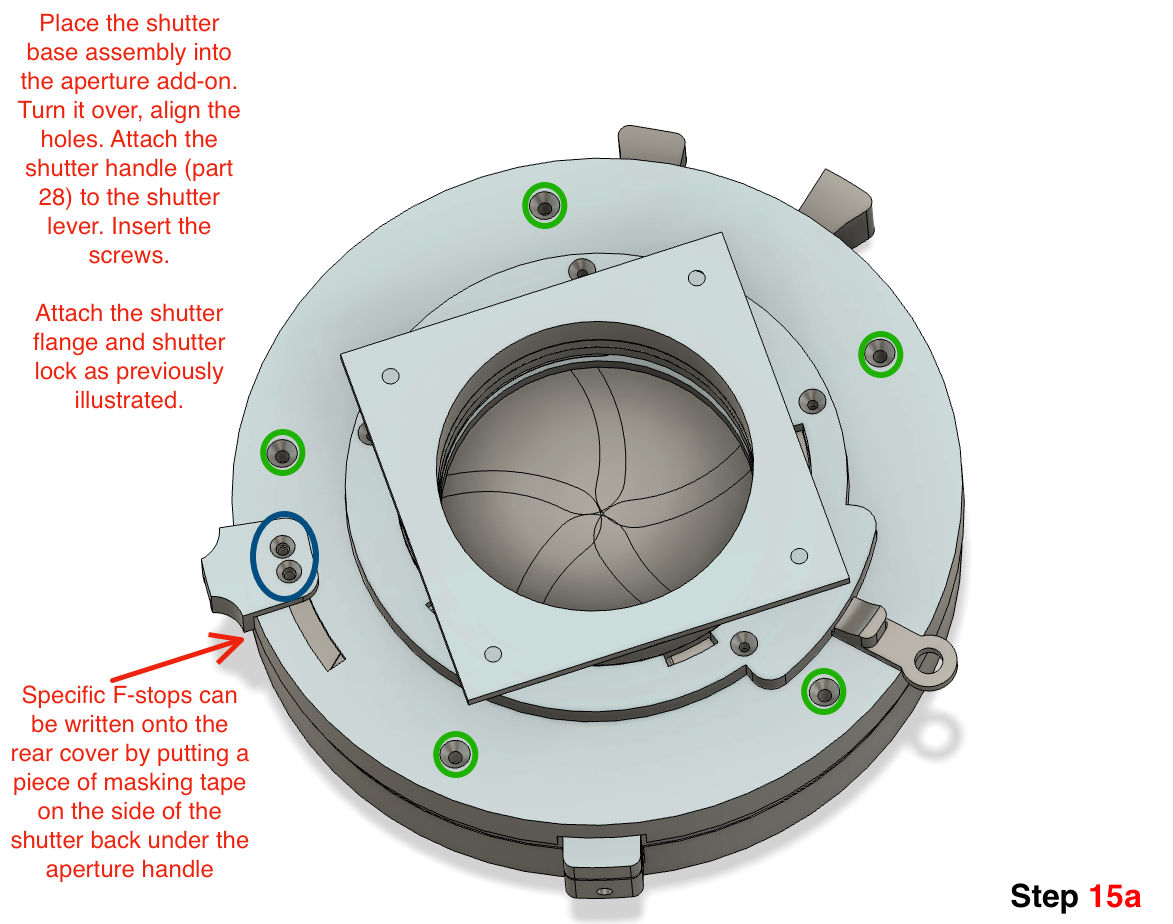
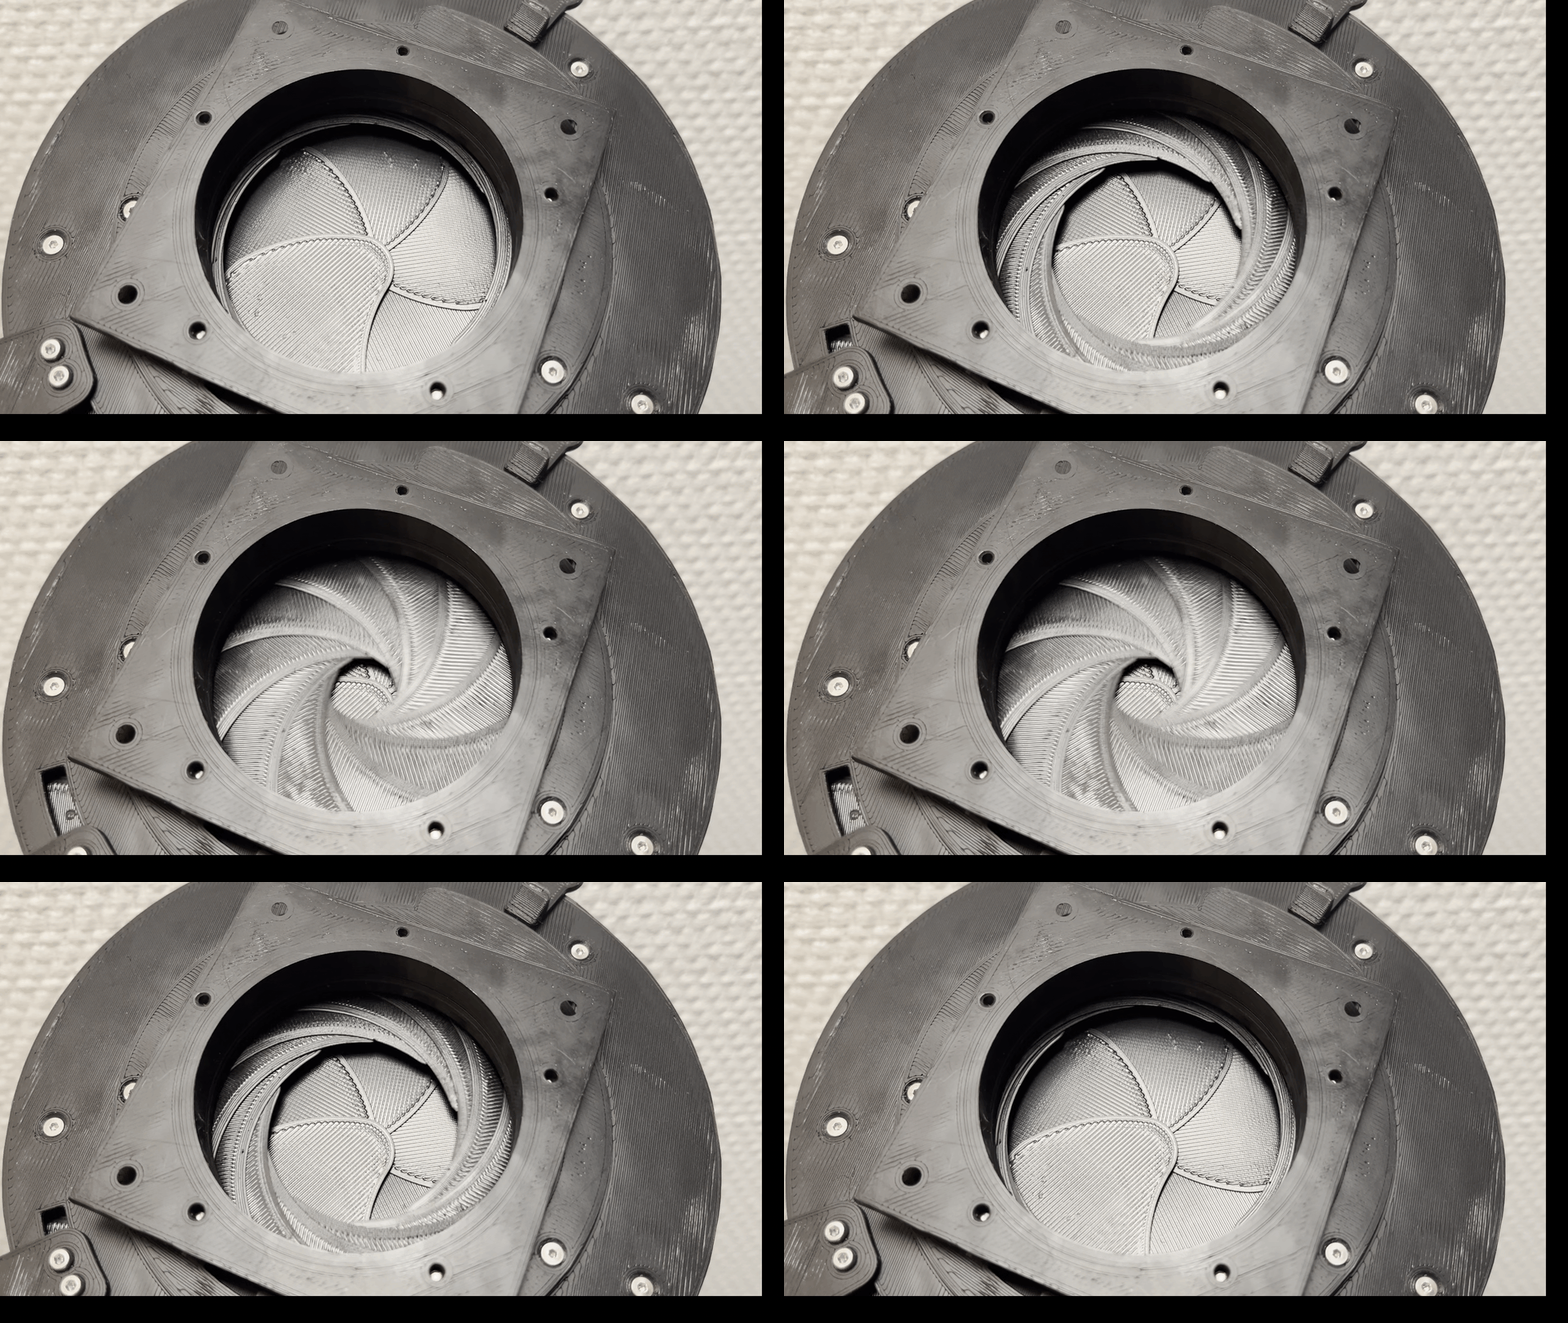
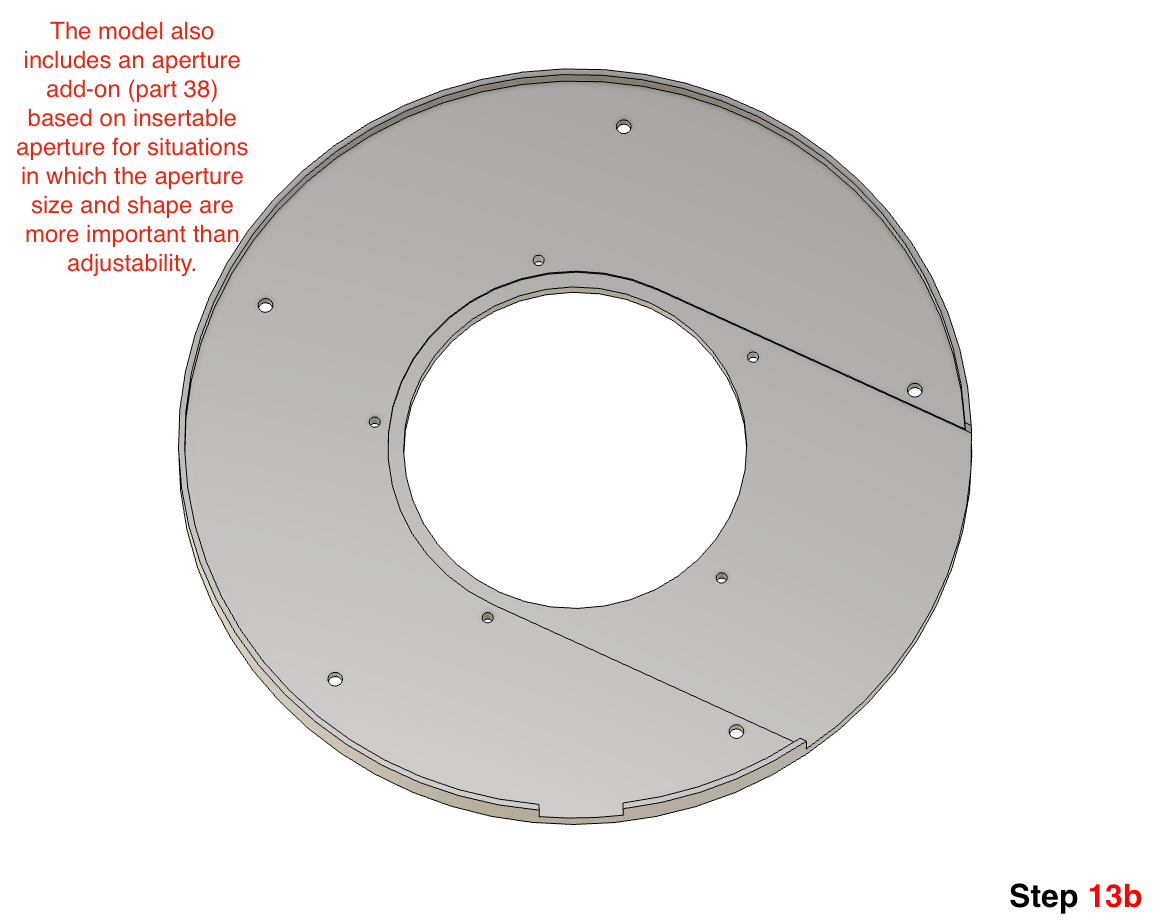
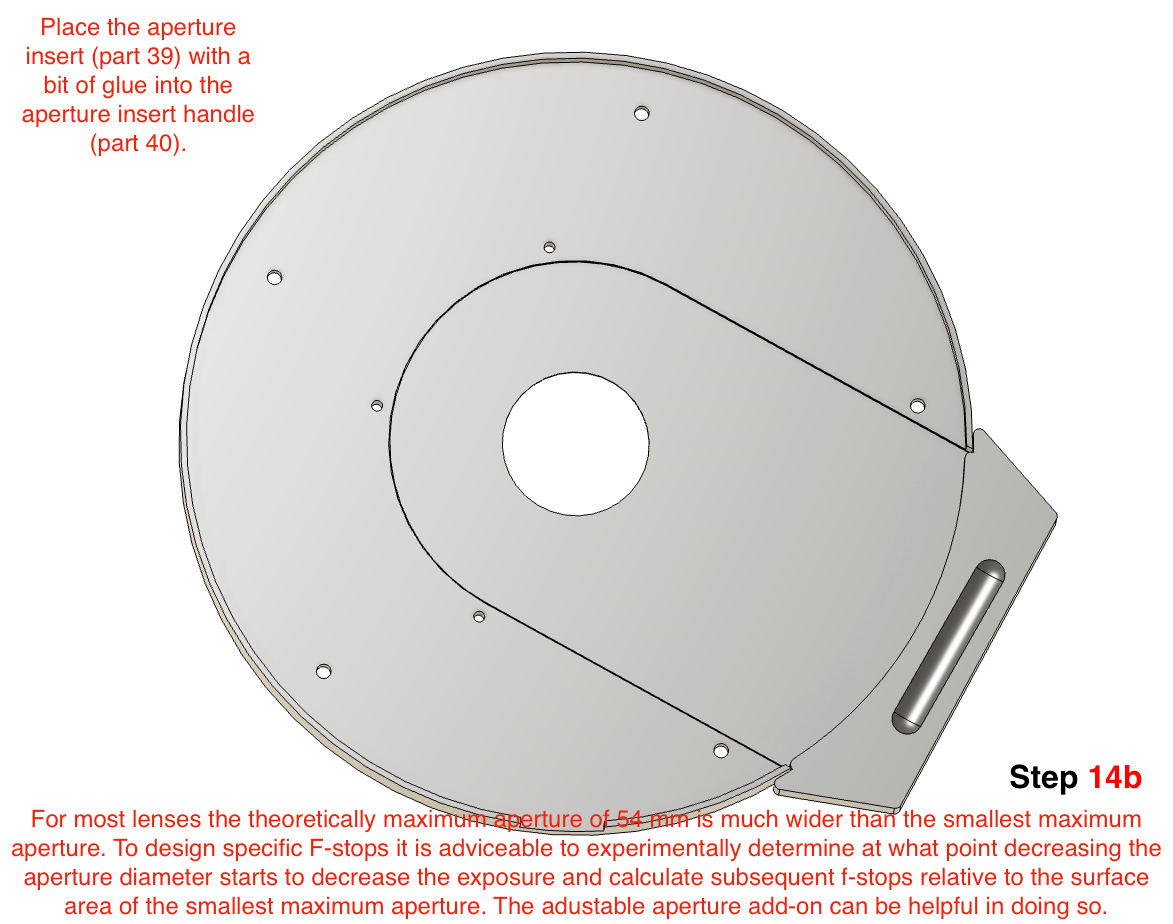
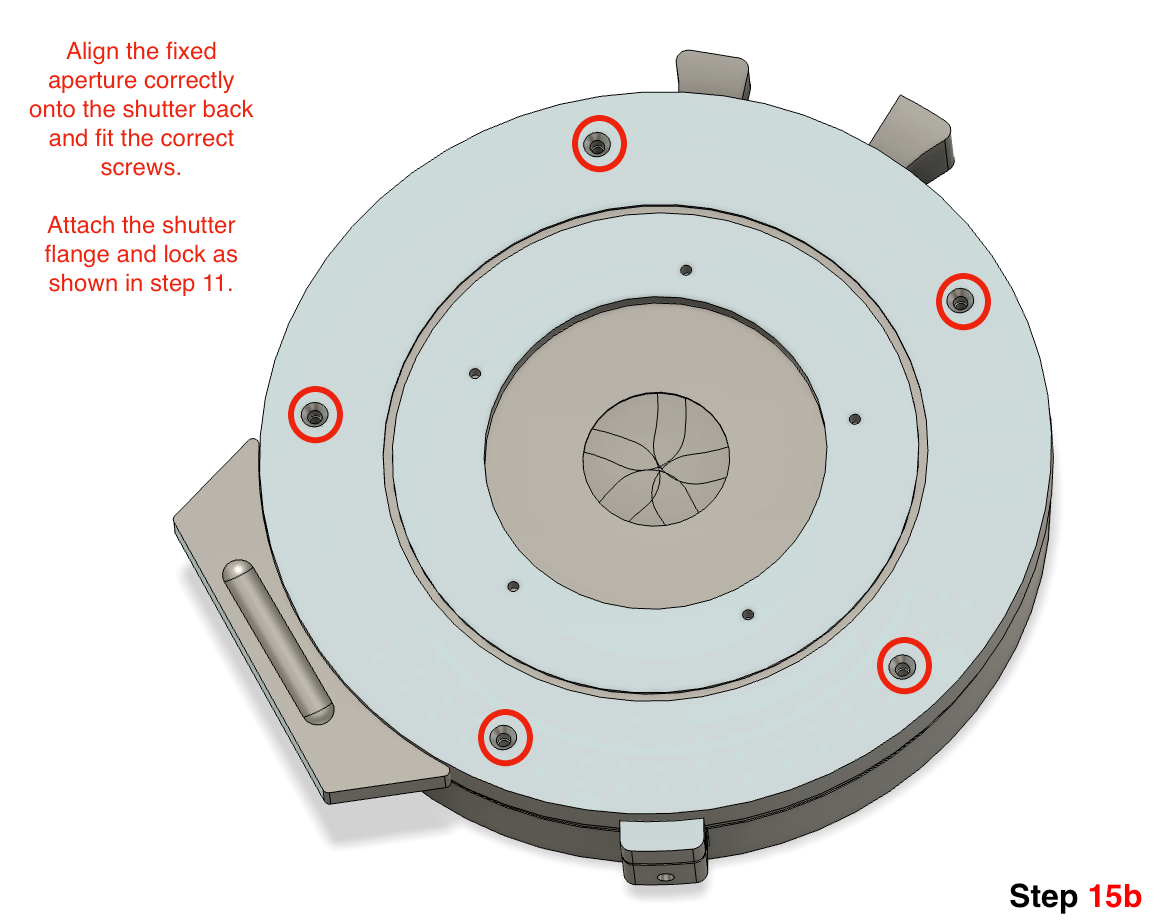
It provides two different types of optional diaphragm add-ons. A stepless variable aperture and a fixed aperture using tailor made aperture inserts. The 4.5mm distance between the shutter blades and aperture blades probably allows this shutter to be used in between front and rear lens assemblies for some types of lenses.
It is much more light tight. The design houses most of the moving parts inside the housing and offers light barriers for protruding parts. This greatly reduces the risk of light leaks from incident sunlight. Using matte black ASA filament seemingly eliminates light leaks through the shutter blades, significantly increasing the amount of time one safely has without using a dark slide
It offers easy cocking in complete darkness by moving/squeezing a single lever. In complete darkness means that the shutter blades stay securely closed while cocking the shutter; making it potentially interesting as a shutter in medium format 3d printed rangefinder camera's.
It offers a reliable an convenient way to keep the shutter open during focussing by triggering the shutter while gently squeezing and guiding the cocking lever.
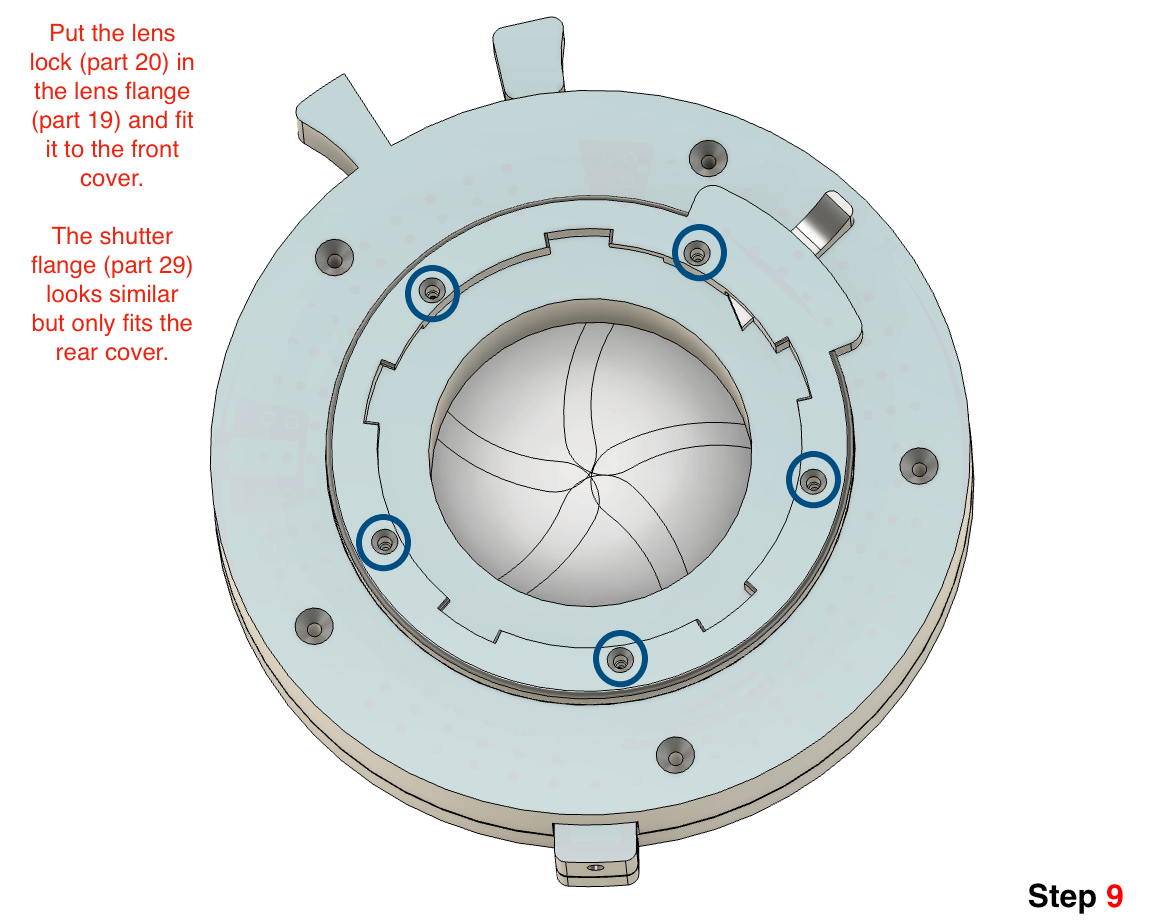
It offers removable mounts on both side of the shutter, making it easier to use the shutter with different lenses and removing the shutter from camera systems without a removable lens board.
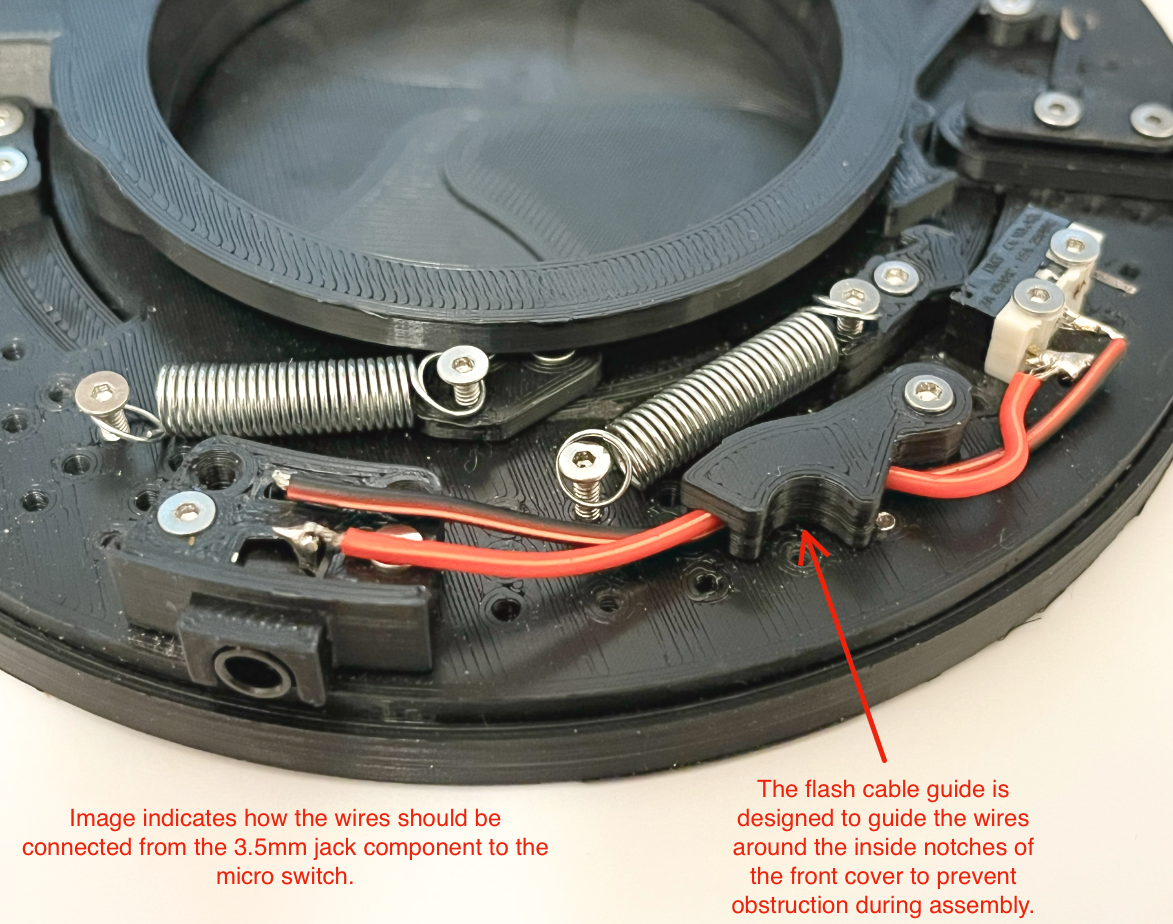
It provides flash support like the previous design, but does so by using a either a 3.5mm stereo port or a generic pc-sync extension cable (instead of using a specific type of salvaged flash port). Making it easier to collect compatible parts.
It is designed to use a common type metal spring instead of rubber bands. Metal springs don't wear out like rubber does, and objective dimensions contribute to clear instructions for builders.
An important changes is that it heavily relies on several lengths of countersunk M2 screws instead of glue. These screws should be easy and cheap to source, but the design can't be built without it.
List of Materials and Printing
This design has been developed with ASA. This is not the easiest material to print, but when it adheres to the bed it prints clean and precise. I have not tested with other materials, but I think it could work as well with PETG or even PLA for the static parts. If other filaments are used I do recommend using a matte black for optimal light tightness if available.
Shutter
Matte black ASA filament
21 M2x6 finely threaded countersunk screws
30 M2x8 finely threaded countersunk screws
5 M2x12 finely threaded countersunk screws
2 x Short spring (Check instructions below for exact dimensions)
1 x Long spring (Check instructions below for exact dimensions)
Aperture add-on
Matte black ASA filament
2 or 0 M2x6 finely threaded countersunk bolts (depending on configuration)
5 or 0 M2x8 finely threaded countersunk bolts (depending on configuration)
5 or 0 M2x10 finely threaded countersunk bolts (depending on configuration)
Flash sync
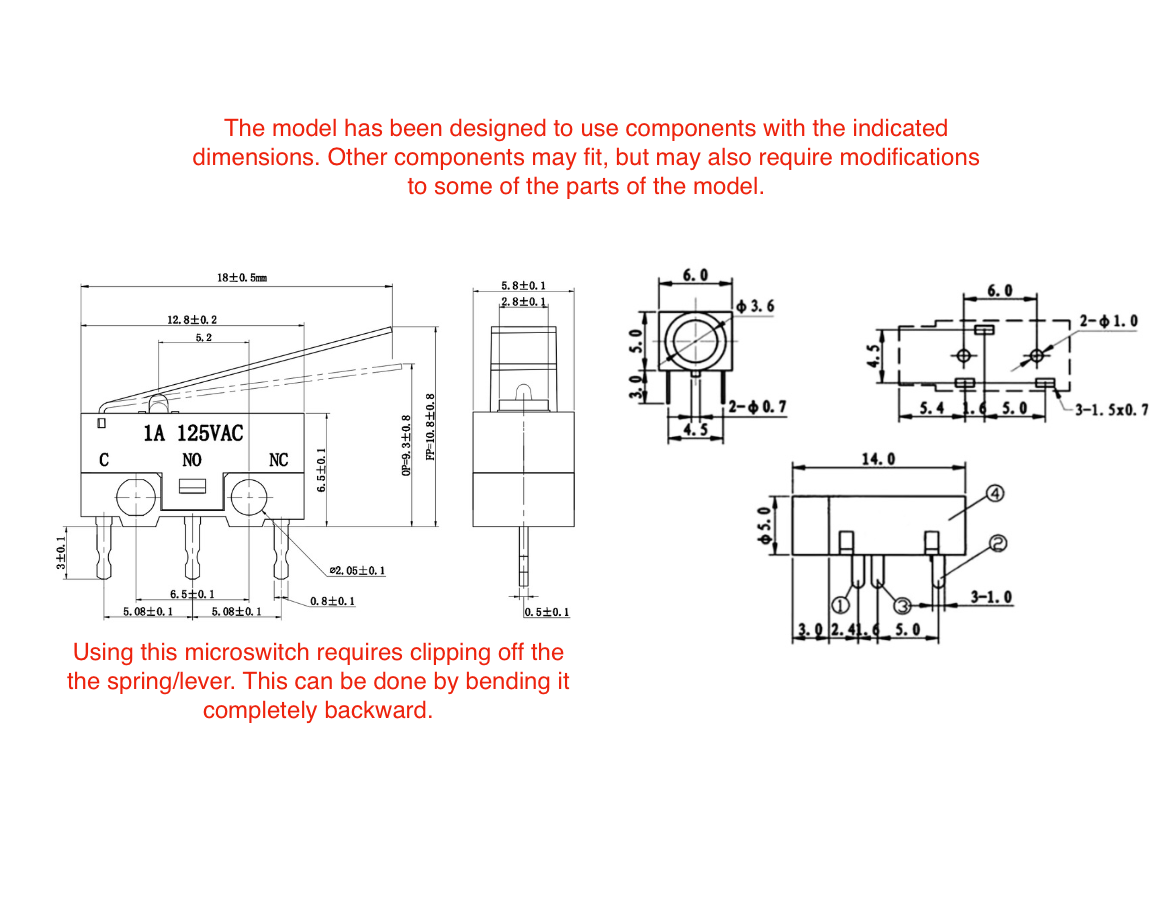
1 x Micro switch with lever 12,80 x 6,50 x 5,80 mm (Check instructions below for exact dimensions)
1 x Cable with whatever type of connector you use for connecting flash units (cable thickness of c.a. 3.5mm)
or
1 x Female 3.5mm stereo port (Check instructions below for exact dimensions).2 x M2x10 finely threaded countersunk bolts
4 Drops of solder
Deciding which parts to print and modify
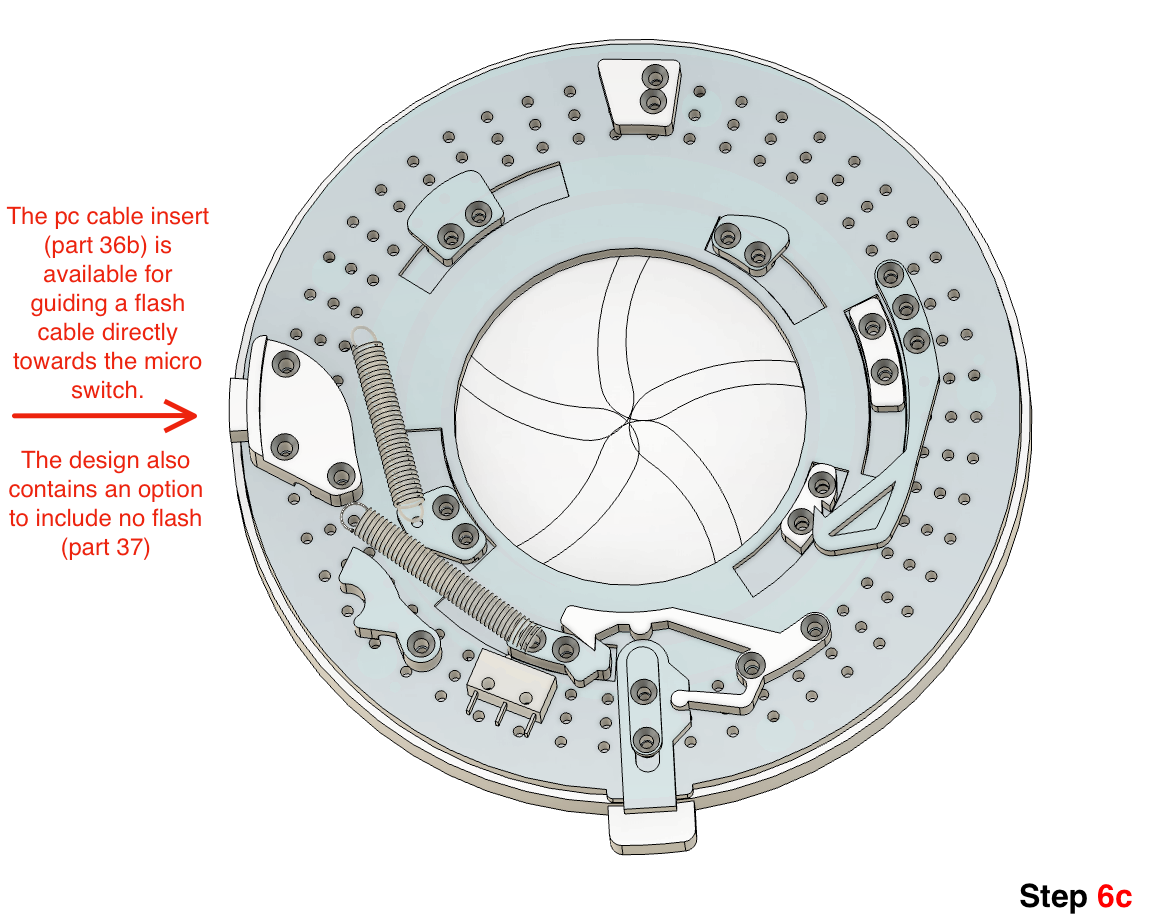
The design offers a few different configurations for the shutter. With or without the aperture, with or without a flash sync, and the option of soldering a pc-cable directly to the micro switch, or putting a 3.5mm jack connector in the shutter housing. There are also two different versions of the shutter base. A fully perforated version for making modifications, or a version with only the necessary perforations.
The assembly instruction below should show which parts are needed for the different configurations of the shutter. The parts numbers are included in the names in the STEP-file and the individual STL files in the folder of this page.
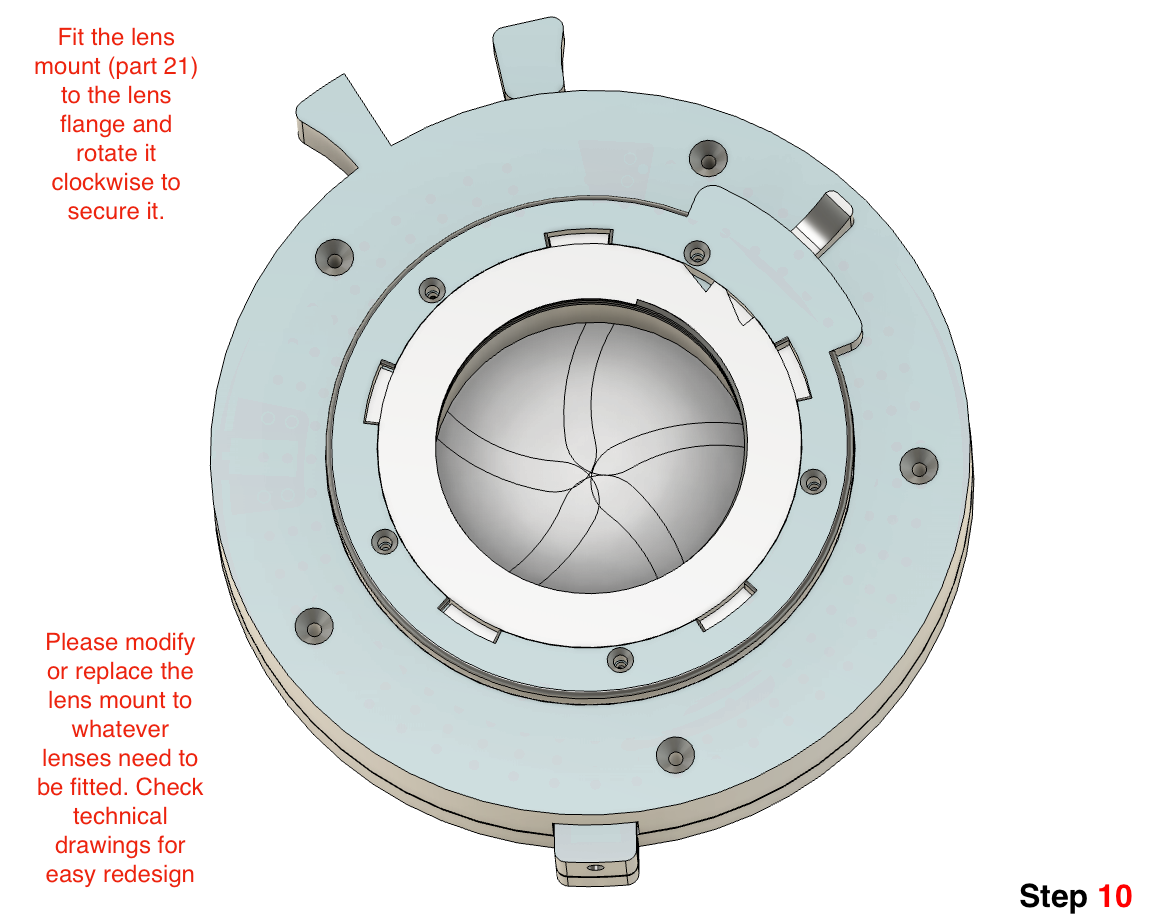
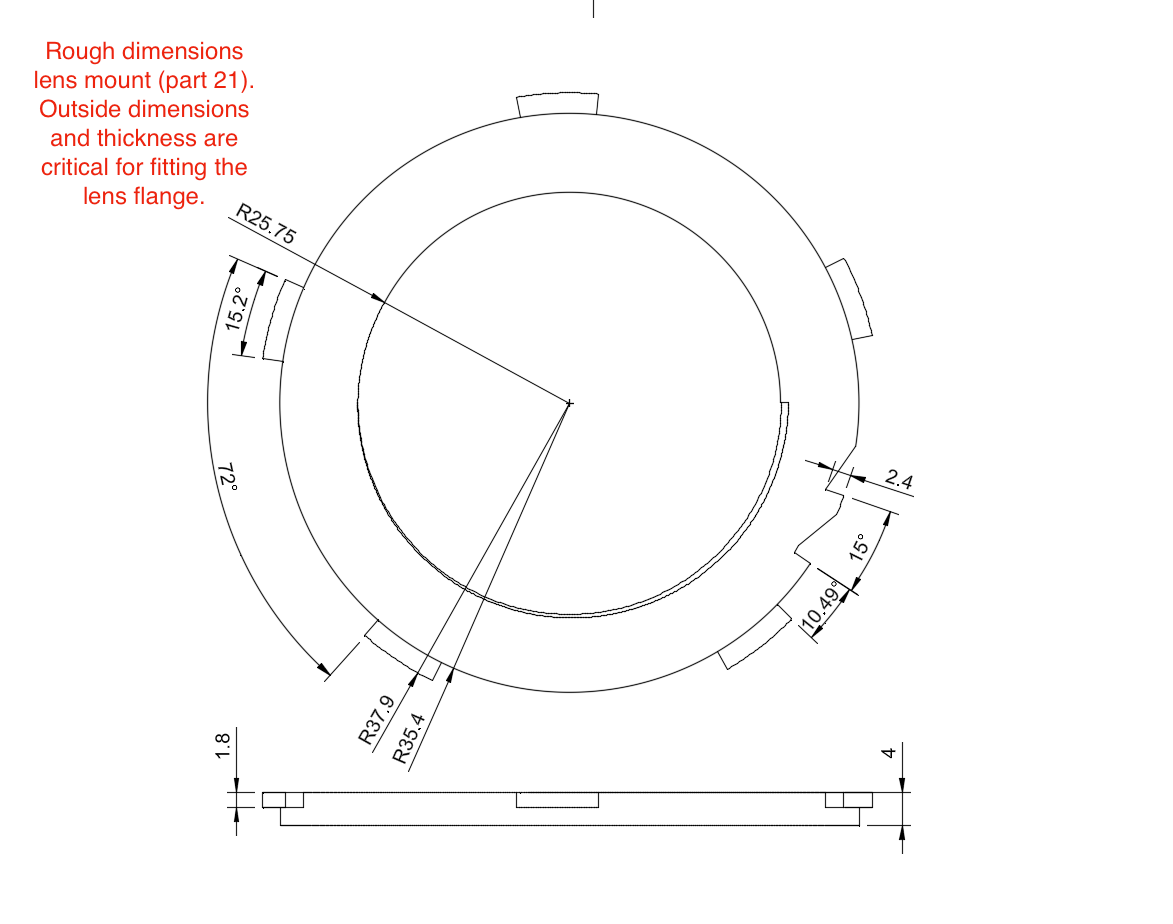
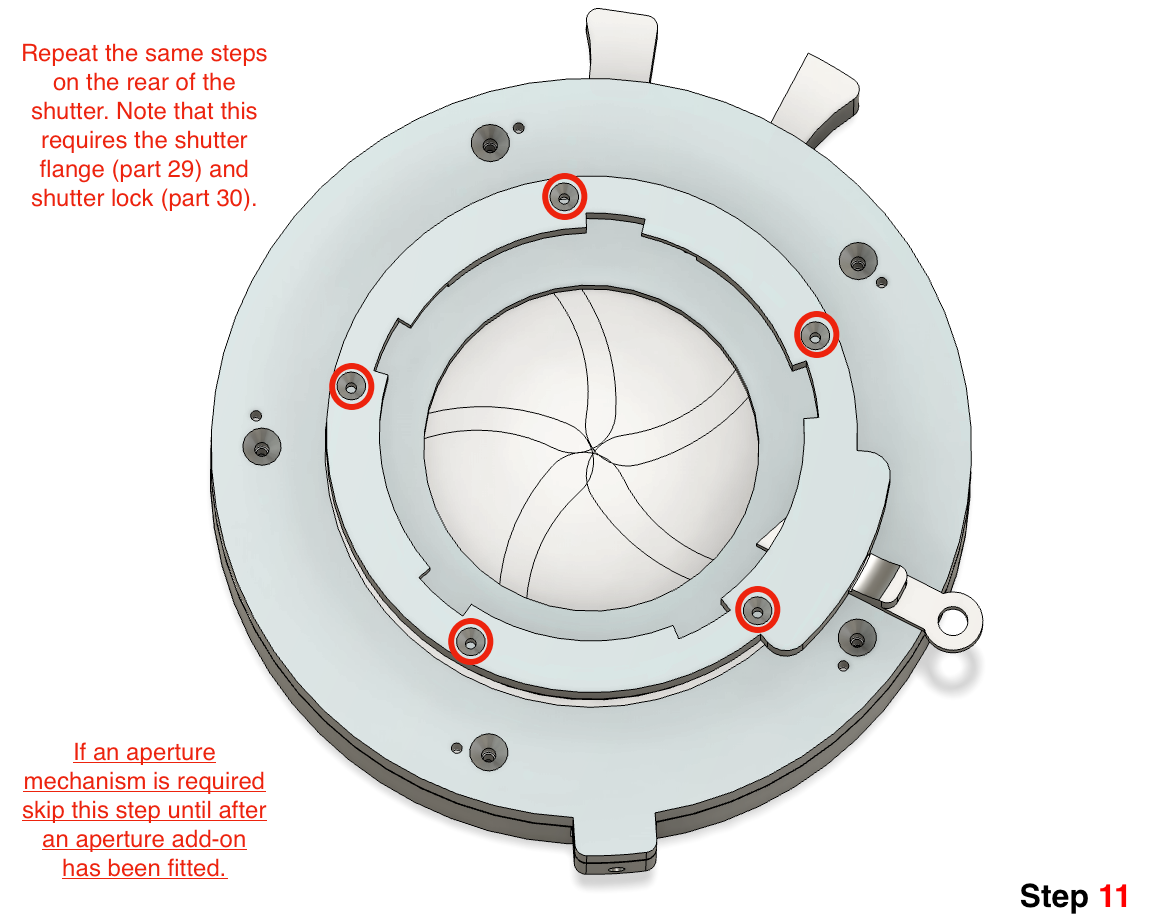
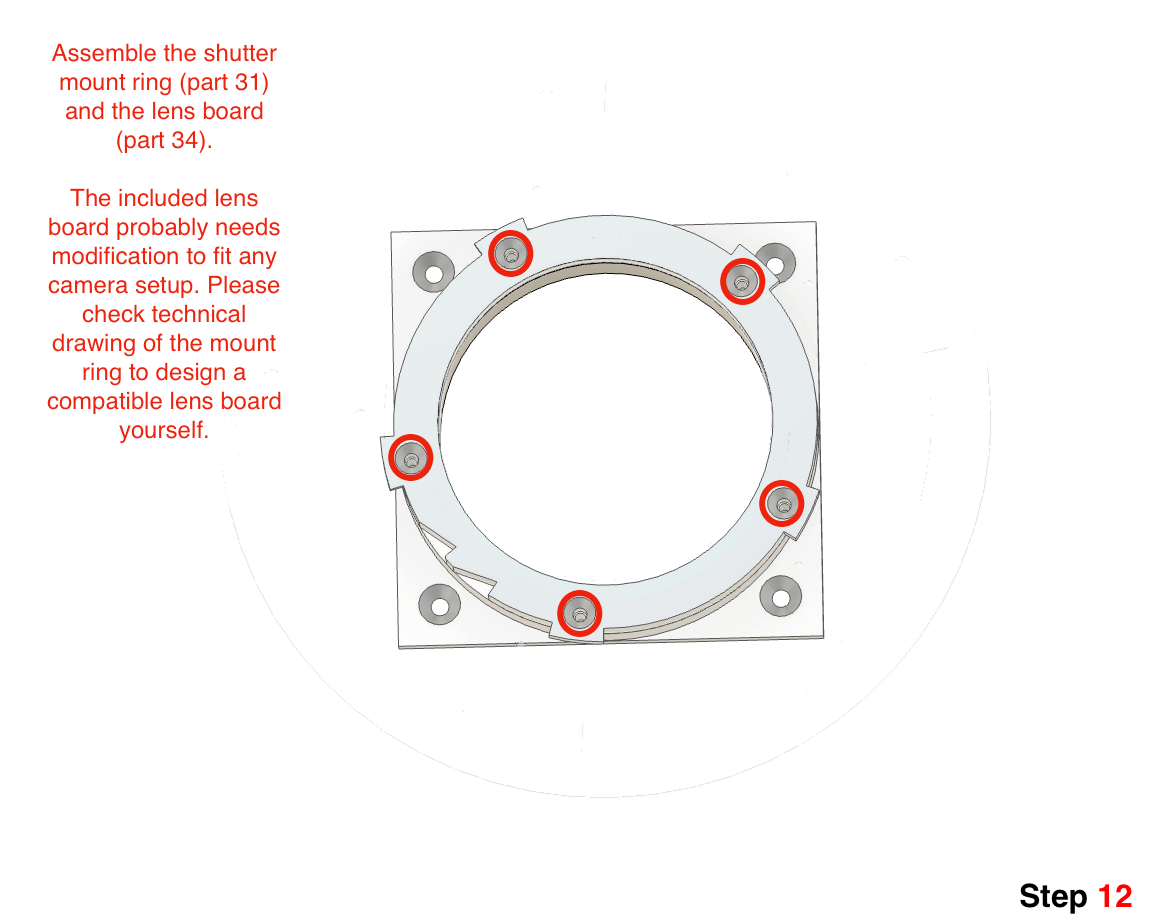
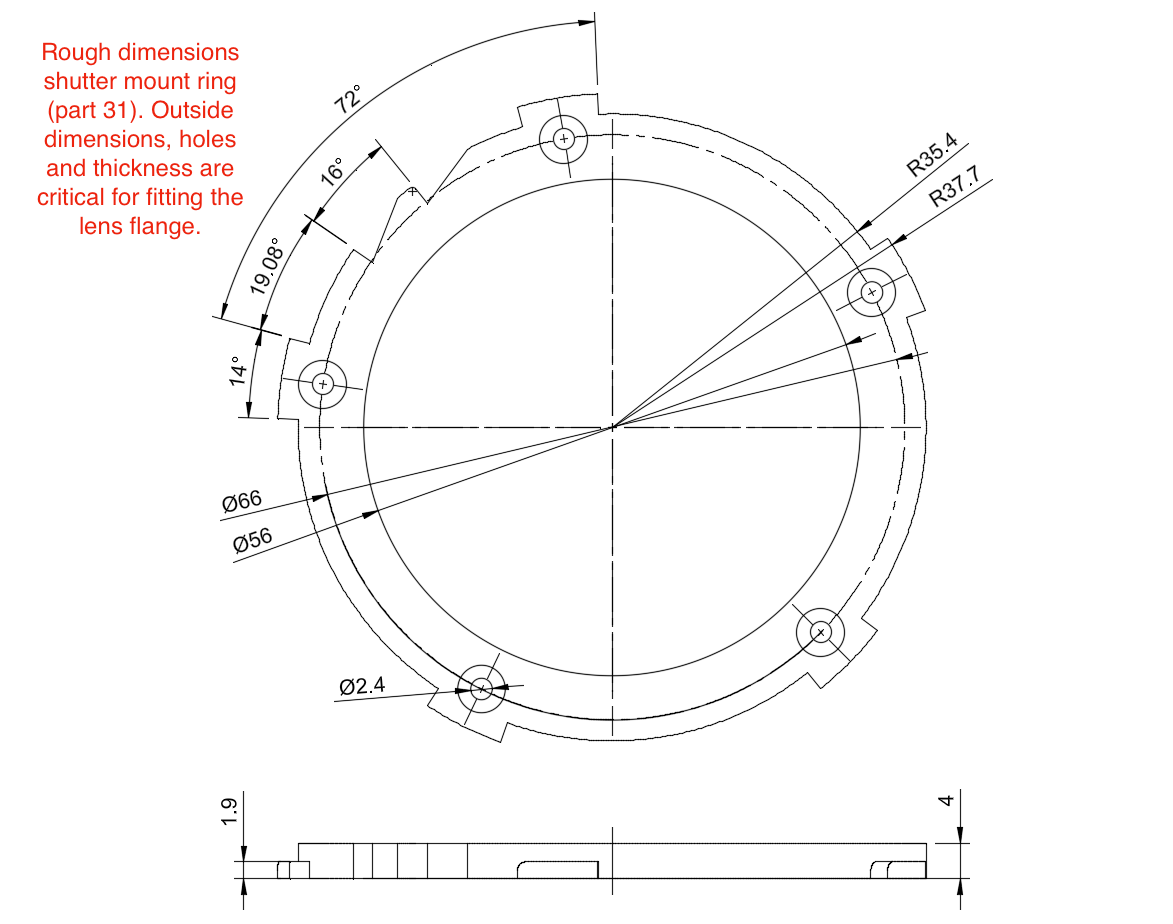
Some parts may need end-user modification to fit it to a particular lens or camera. These parts are identified in the step file by parts with "(tailor to needs)' in their name. This is particularly true for the lens mount (part 21) and the lens plate (part 34). Look in the printing and assembly instruction for the dimensions of the lens mount and lens plate for easy redesign and adjustment.
There may of course be other parts that may need adjustment like the 3.5mm jack clamp (part 36) if a differently sized jack component is being used. Another optional is a part for fitting differently sized spring (part 9). This part is probably not necessary in most circumstances, but is included for prototyping needs.
Printing, cleaning and finishing considerations
All parts, except the shutter and aperture blades and the 3.5mm jack clamp, have to be printed with a layer height of 0.15. The blades and the clamp at 0.10. This too is indicated at the end of part-names in brackets like this (0.15).
All parts have been designed not to require supports in printing. Disable supports and allow overhangs to be printed directly. In the step file a light blue color has been applied to the surfaces that need to be placed on the printing bed. This should make sure that supports are not necessary. For some of the parts it is advisable to use a brim to help bed adhesion to the print bed is advised.
There are a few parts that require some special attention in printing and finishing to achieve the correct results. This makes sure that parts fit and operate correctly.
shutter base and action rings:
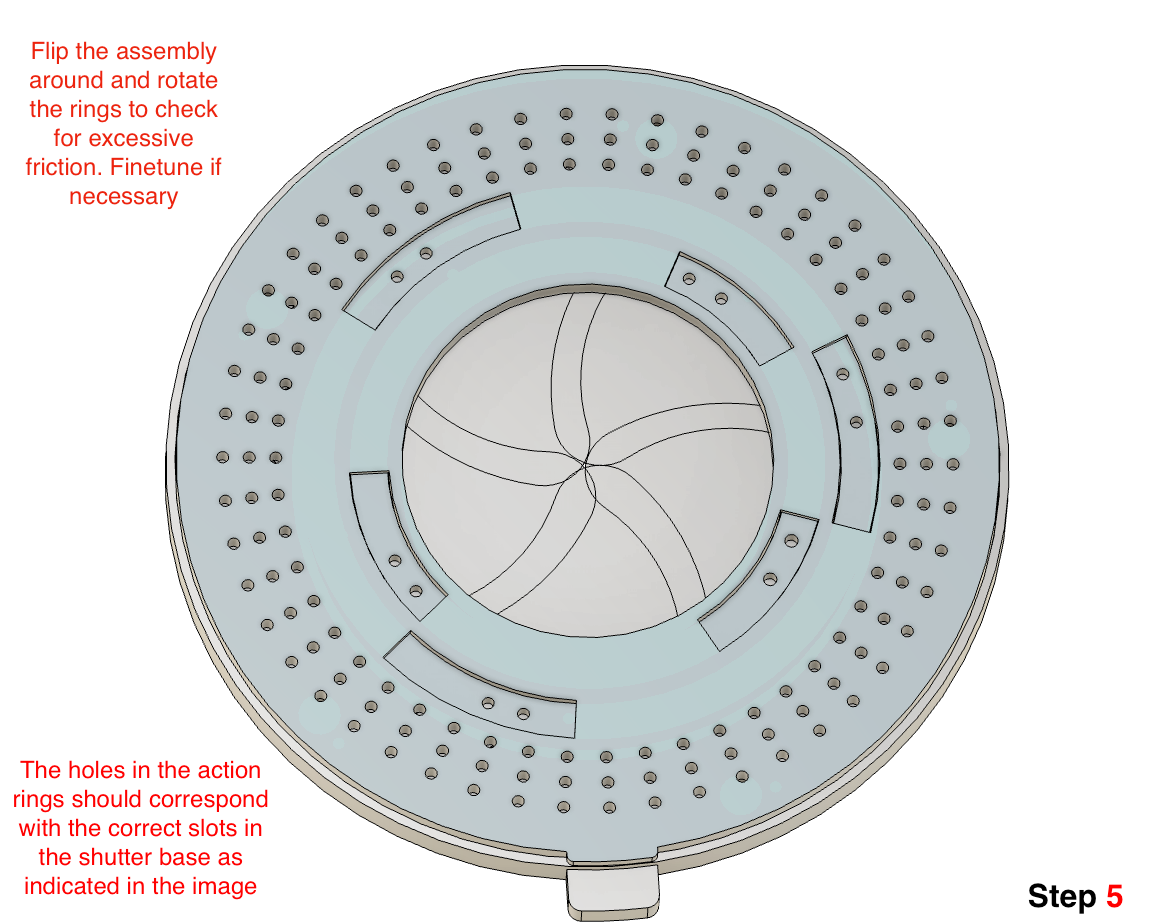
The inner and outer action ring should be able to move smoothly and with very little friction in the shutter base. Make sure to clean off any excess plastic and make sure that all surfaces are smooth. Flat surfaces can be scraped smooth with a sharp chisel or a small piece of snap-off knife if necessary.
Make sure to check for 'flaring' or 'elephant's foot' on the first layer of the print. This would increase dimensions and exceed tolerances. Printing on 0.15 (instead of 0.10) is enough on my prusa mini, but this may very between printers. Check this reddit post for a more detailed overview of coping strategies.
Shutter leafs and action rings:
Every shutter leaf hinges on both the inner and outer action ring. The leafs need to be able to rotate around the pins on the action rings with as little friction as possible without losing a precise enough fit. Reducing friction probably requires removing the excess material of the Z-seam of every individual pin on the action rings. A small tool with a very sharp edge works best. Assemble the shutter base and the action rings and check the friction for every individual leaf. Sometimes repeating the shutter movement a few times helps. If the hinges still feel too tight, try scraping the holes of the leafs. In my experience rotating one half of a pair of scissors around 360 degrees in the hole with a bit of pressure applied works well.
Printing the shutter blades with a 0.10mm layer height helps reducing the risk of having light leaks between the perimeter walls and the infill of the shutter blades. If light leaks remain a problem, increasing the amount of perimeters, reducing the printing speed or ironing the top surface may be a solution.
Optional aperture add-on
In contrast to the shutter, the aperture blades shouldn't move too smoothly. If the fit of the aperture blades in the ring of the aperture lever is too loose, it negatively impacts the roundness of the aperture. This may require several attempts. Look at the above recommendations for trimming the pins and holes.
Hooks and latches
For accurate operation of the shutter it is important that the hooks and hook receivers latch and release accurately. The contact surfaces of the hooks and receivers have been angled slightly back to be slightly self tightening. This helps prevent accidental releases. With my particular printer these fits have all been accurate enough straight from the printing bed, but do check if this is the same for your parts. A sharp knife or chisel can help to sharpen the tip of the hooks or angle the contact surfaces back a bit further if necessary.
Step by step assembly instructions
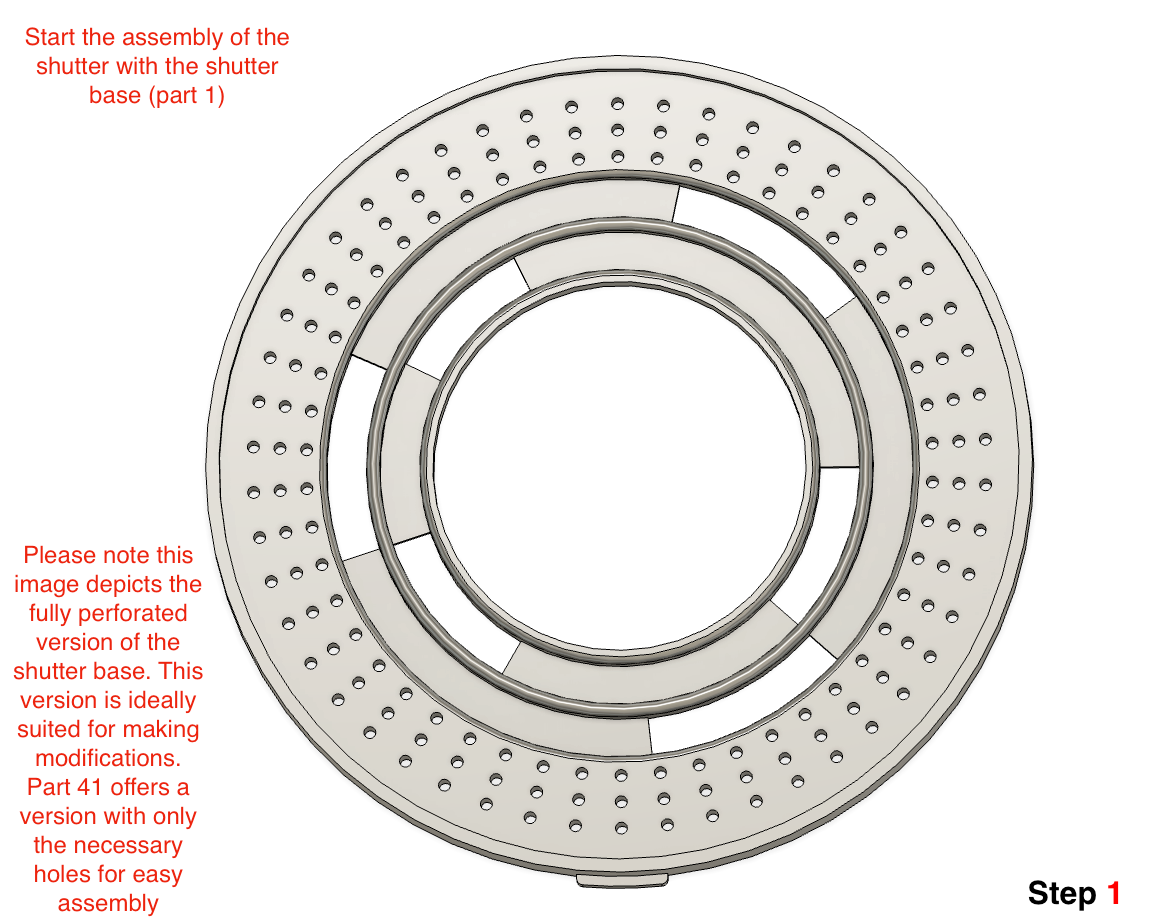
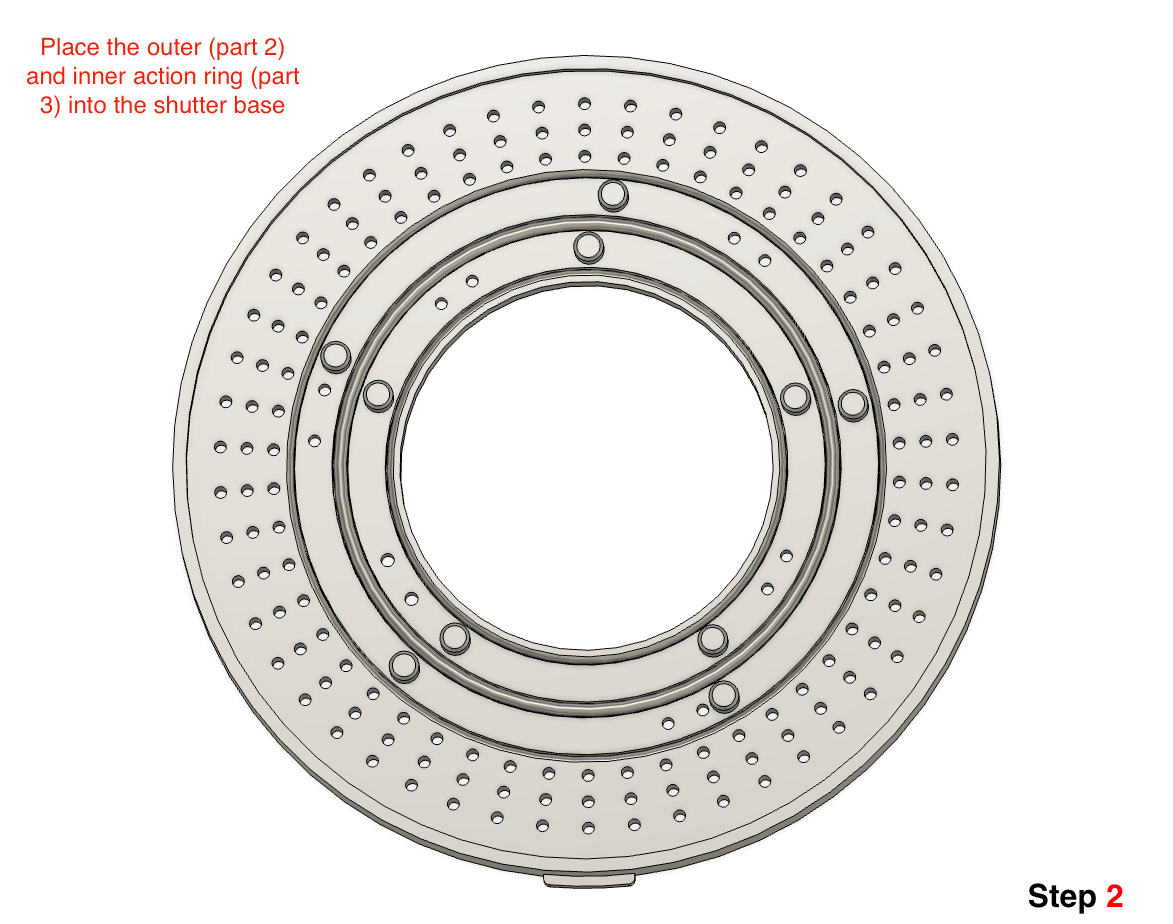
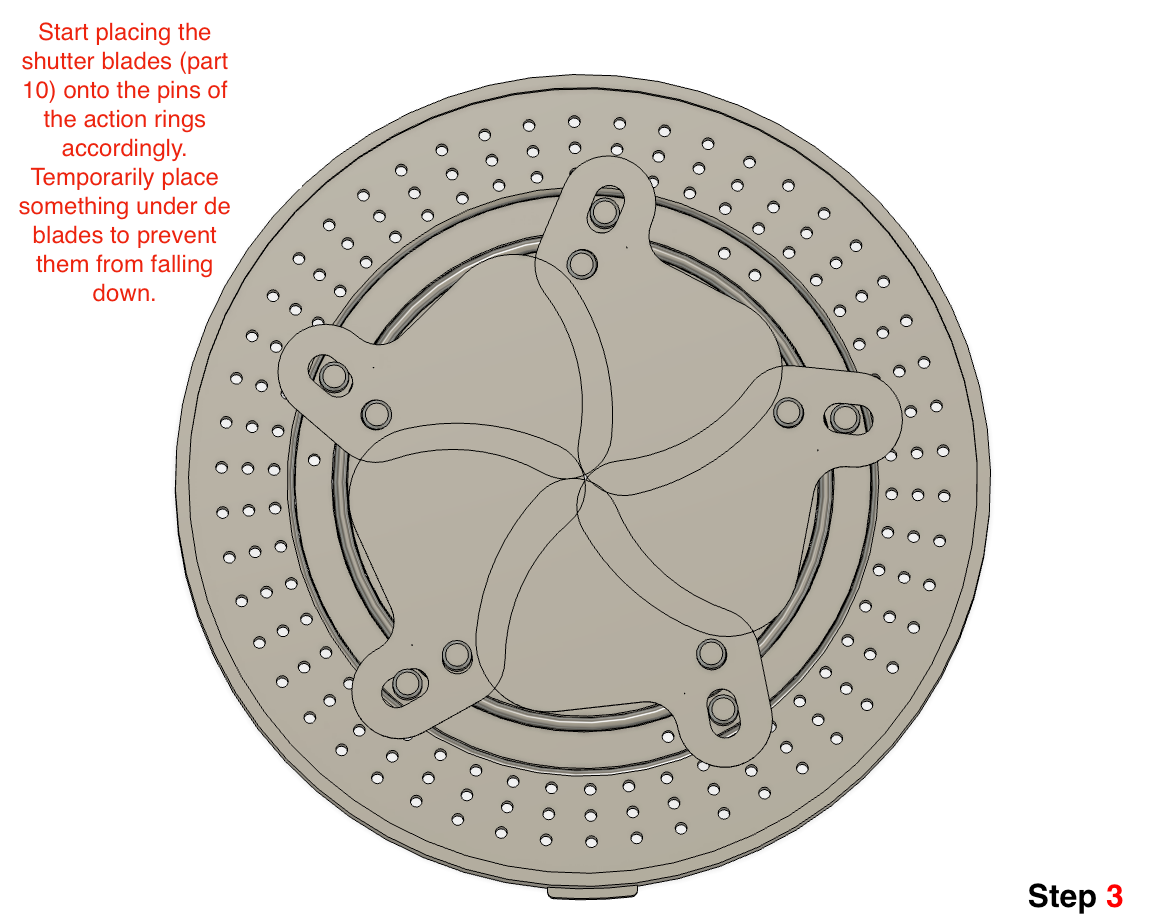
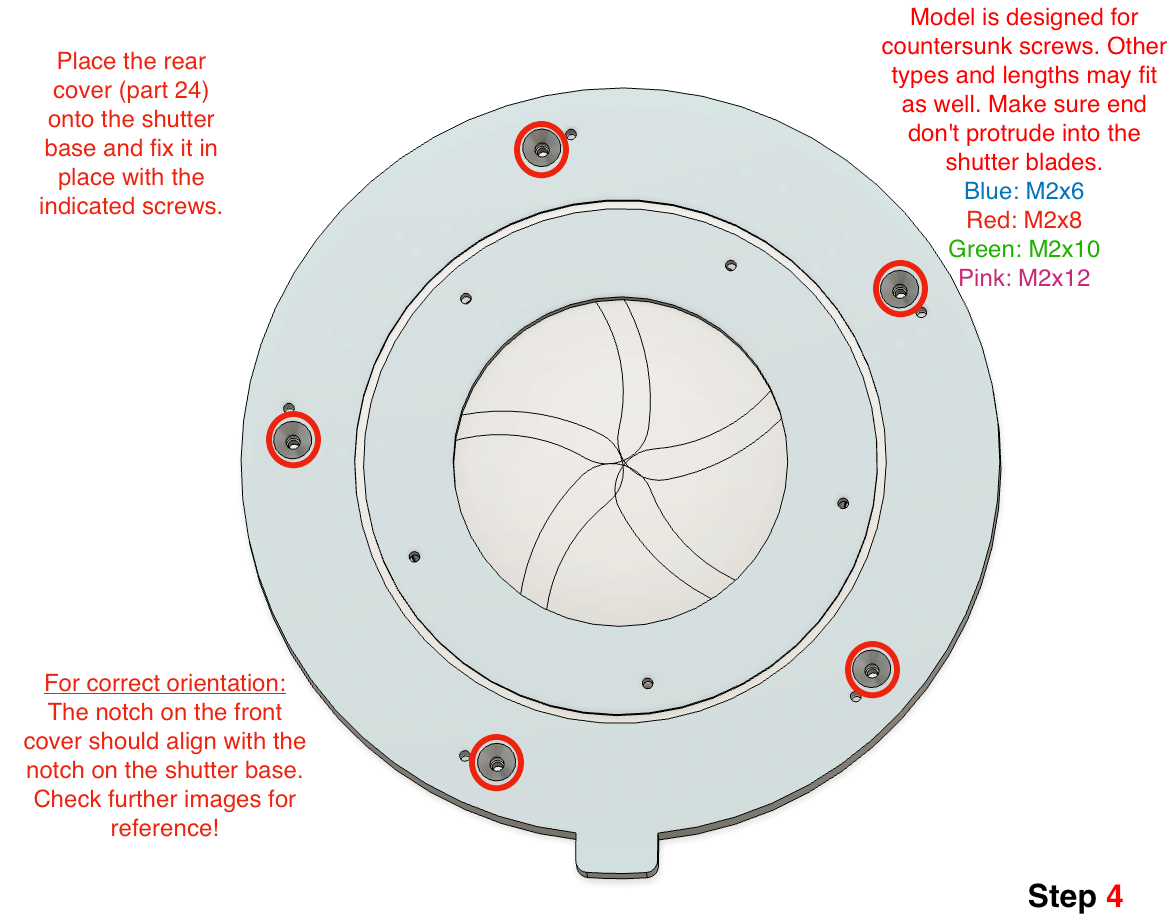
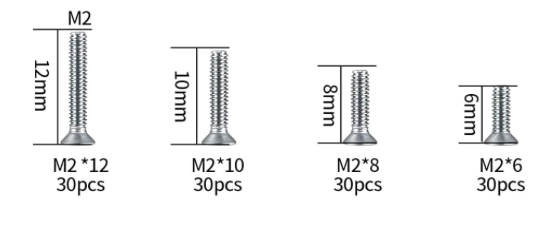
Screws like these should be universally and cheaply available.
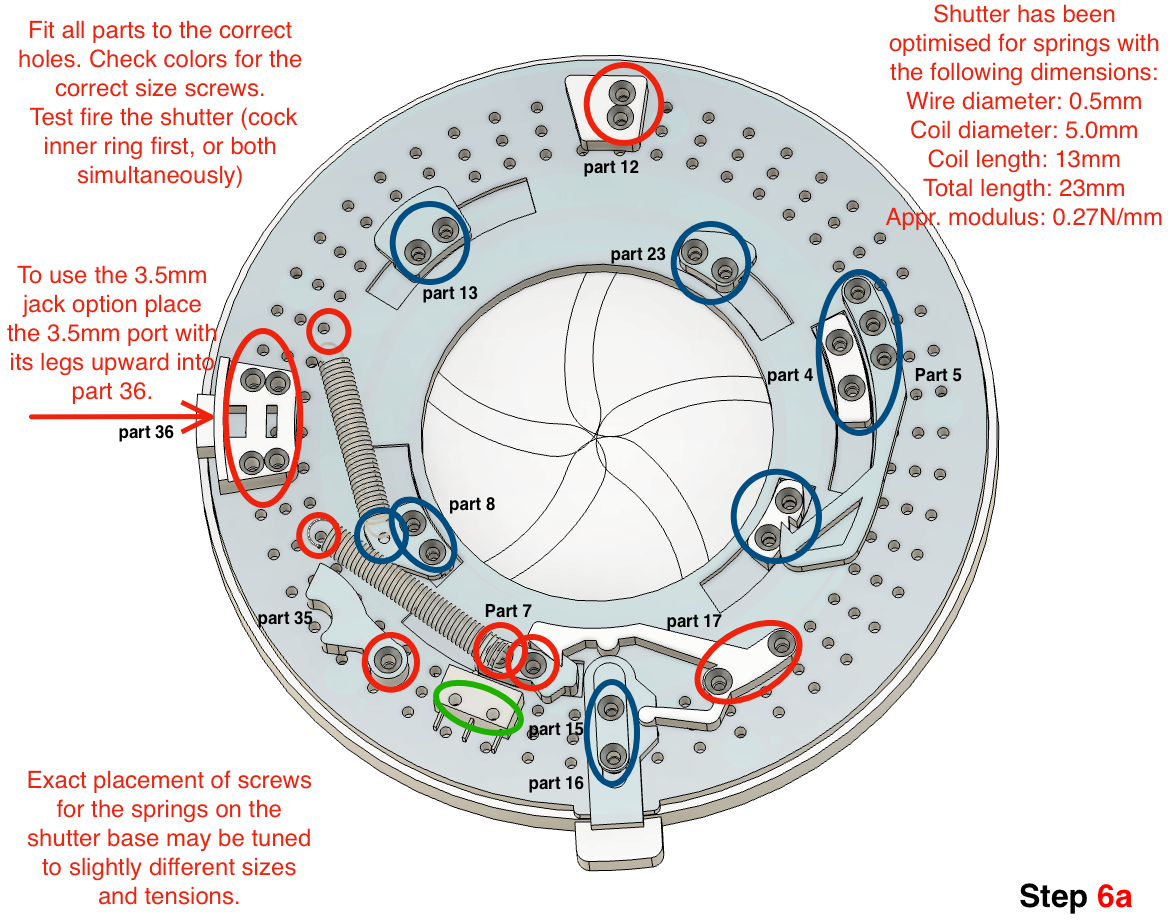
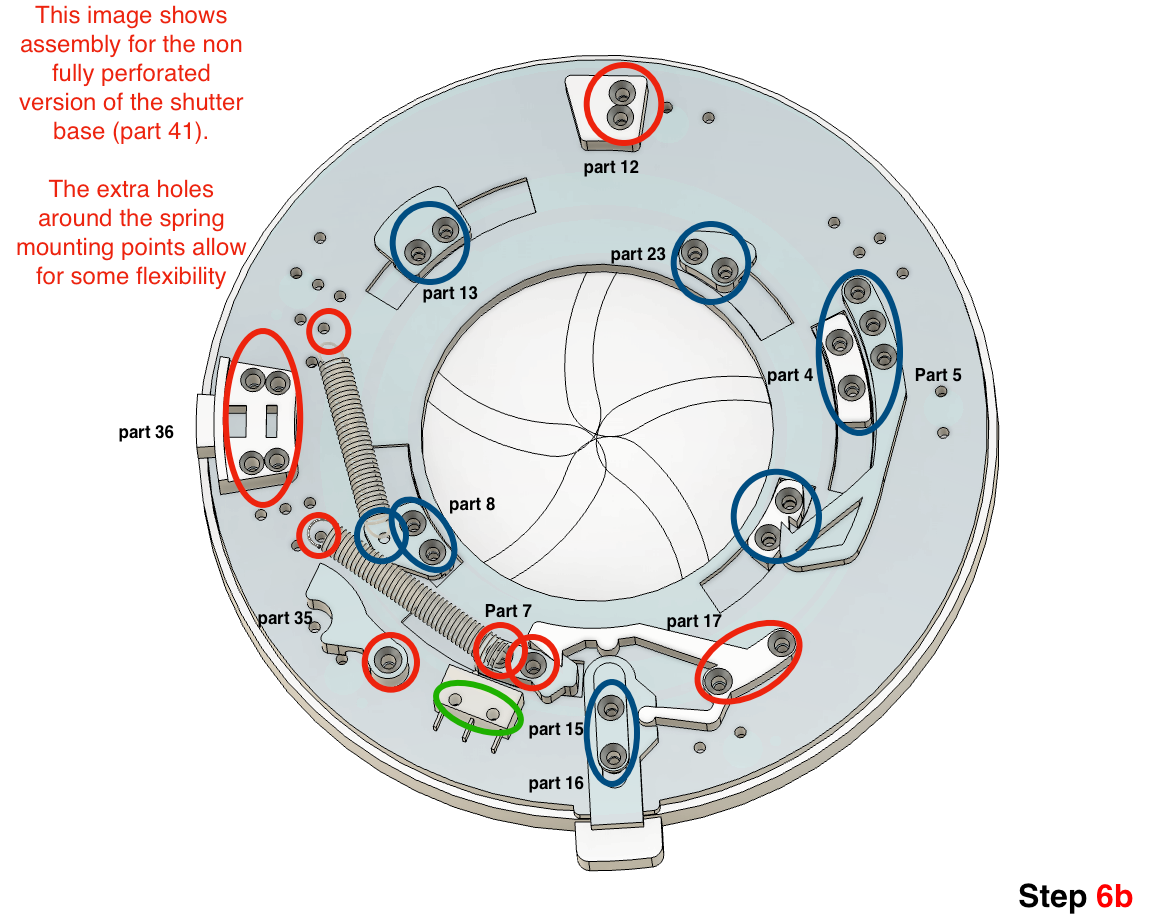
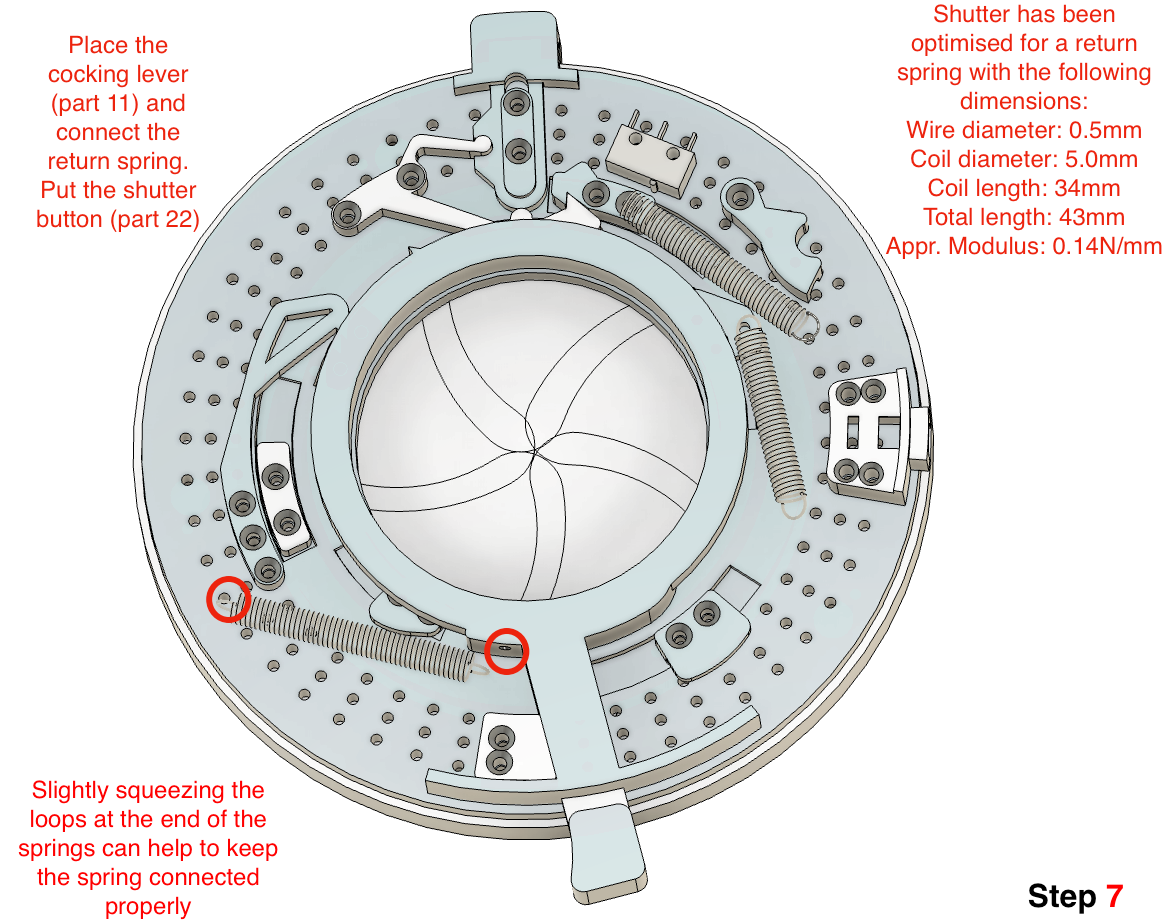
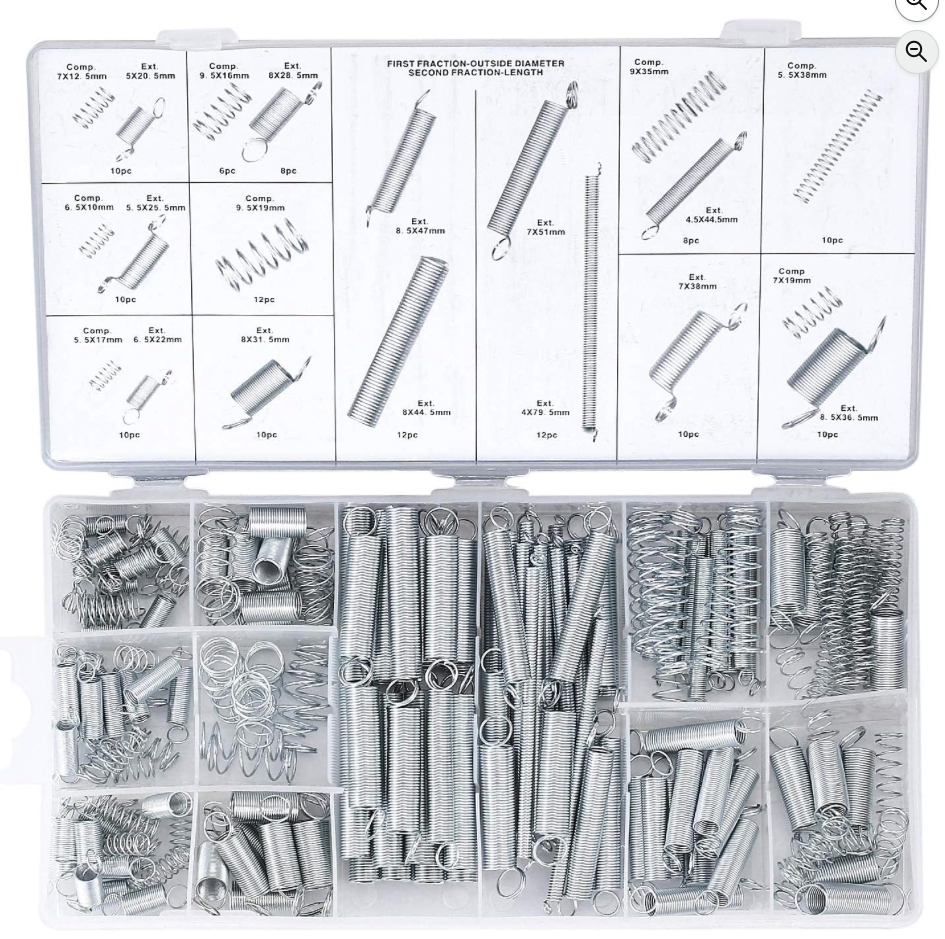
Shutter has been designed around some springs from a cheap kit like this. Specifically the "5.5x25.5mm" and the "4.5x44.5mm" were used. My own measurements of these springs deviate slightly. Perhaps doing a reverse image search can help finding a similar set.
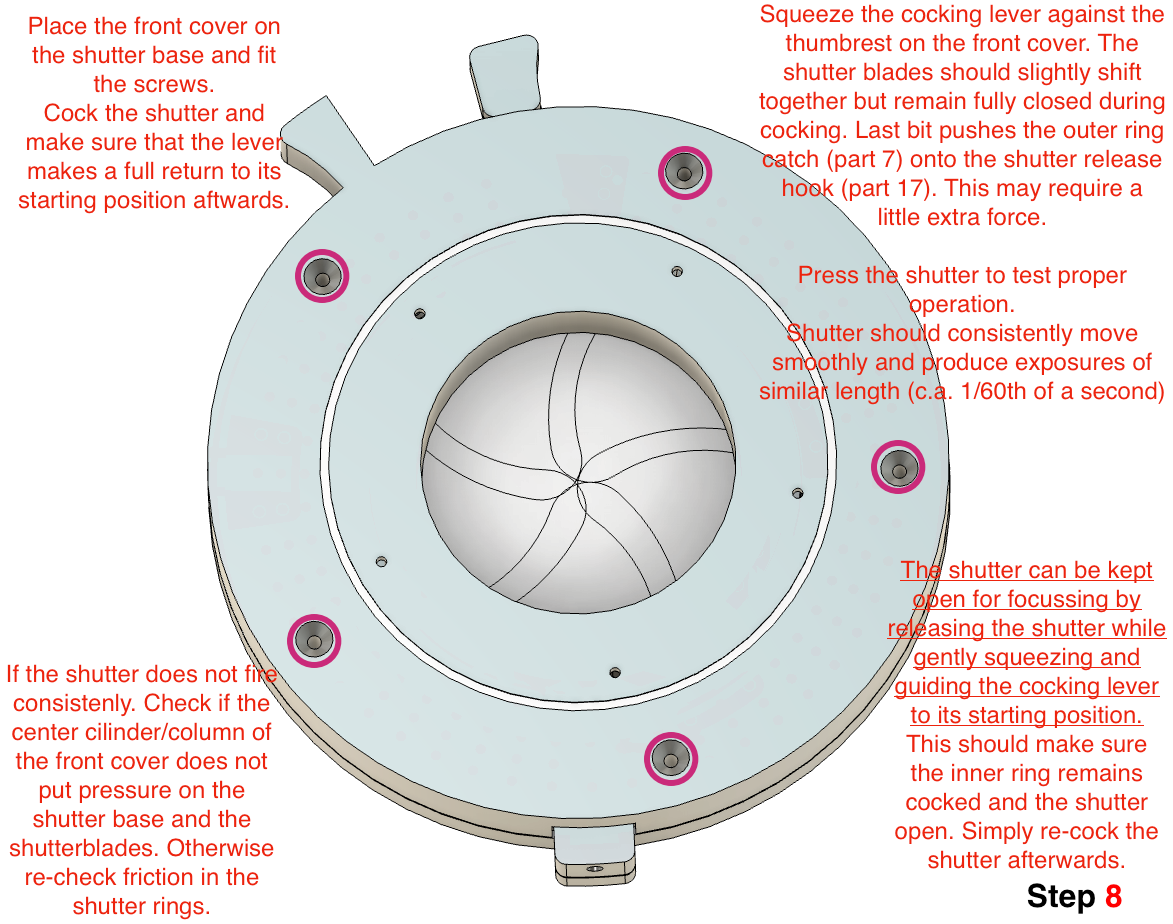
Limitations and final thoughts
Aperture size is limited by the with of the adjustement lever. Theoretically the aperture could be a bit smaller, but this pushes the aperture blades towards the shutter blades, obstructing their movement.
The shutter still offers only one shutter speed. Potentially this design moves lightly enough to enable the integration of some kind of electronic control over the release of the action rings.
The action ring releases seem to require little enough force to allow for triggering it using electronic solenoids. With some controls this may provide the possibility of a variable shutter speed.
I have personally no experience with lubricating plastic parts; nor do i have appropriate lubricants at my disposal. The good news is that the shutter works perfectly well without it. But it is possible that some of the moving parts may benefit from lubrication. If anyone experiments with it and shares their experience it is much appreciated!