
10:1 Precision Miter Gauge
We calculate the final price from your selected file. You review and accept it before payment.
Saved on this device.
Model information
- Source
- Printables
- Category
- Tools
- License
- Standard Digital File License
Achieve dead-accurate, repeatable angles for fine furniture and cabinetmaking with this Precision Gear Train Miter Gauge, a fully modular accessory for your table saw.
This model replaces standard friction-lock mechanisms with a mechanical gear train. By leveraging a smooth 10:1 gear reduction, you can dial in precise micro-adjustments without the frustration of tapping your fence into place. The integrated Vernier scale is optimized for AMS/multicolor printing, embedding the high-contrast markings flush into the part so they never wear off or peel.
The modular mounting system lets you swap out brackets to fit various aluminum extrusion profiles, allowing you to build the exact fence you need (As well as future integration with my 3D printed stop)
Key Technical Specs:
10:1 Compound Gear Train: Features a two-stage spur gear system (40/12 and 36/12 tooth counts) specifically designed for reliable FDM printability without sacrificing mechanical advantage. (1mm Module with a 0.4mm nozzle)
2 Arc Minute Dial Resolution: The dual-color dial boasts 60 distinct marks spanning just 2 degrees of movement, giving you unparalleled control over micro-adjustments for perfect joinery.
2 Degree Protactor Scale and 0.5 Degree Vernier Scale for general adjustment.
The bracket is designed for a 20x40 aluminum extrusion.
Ask me for a different size and I will add it.
The Download unlocks:
All the models required for the print.
Assembly file on STEP.
Free future Upgrades/Updates and Redesigns.
Hardware:
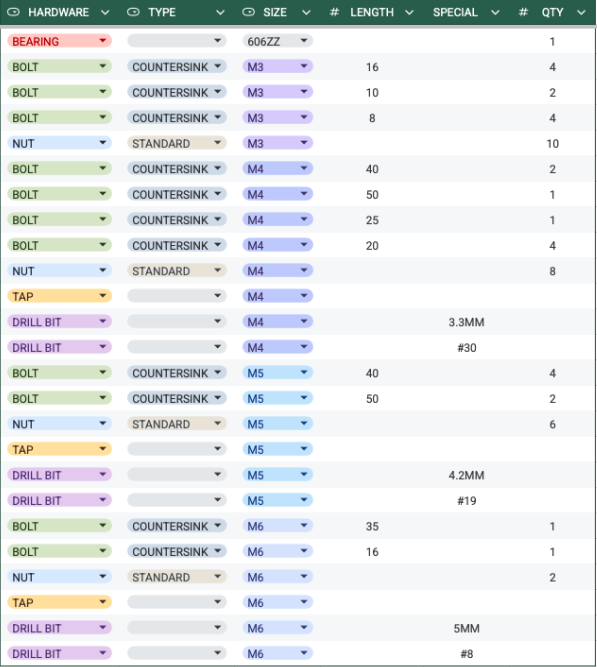
IMPORTANT INFO BEFORE BUYING
The aluminum rail:
I only provide the files for the components that can be 3D printed, not the rail nor the profiles. The marking, drilling, threading and alignment of the mounting holes for the housing on the rail is your responsibility.
I used t a cheap 450mm one from amazon, the brand is Wytino. The protactor pivots on an M6 hole, the vernier scale to an M5 and the gear housing to an M6. But the downside to buying a cheap rail is that none of the countersinks were done correctly so I machined them on my drill press until the head was flush with the bottom. Another thing to note is that it might be better to just drill all the holes again to avoid problems and guarantee alignment, its aluminum so not a big deal, but a drill press is a NEED for perpendicular drilling.
Recommended parameters:
I used PLA PRO for my tests and they came out pretty good, but if you're concerned about other factors that might affect the gauge you can change materials as you please.
My setting on Orca Slicer are:
Arachne
Bridge counterbore holes by sacrificial layer
4 wall loops
5 top and 5 bottom layers
25% sparse infill
Gyroid Infill pattern
Update 28/03/26: Initial Release V1.0.