
Pen Plotter for Sprite Extruder ~ Ender 3 S1
We calculate the final price from your selected file. You review and accept it before payment.
Estimated printing price per file
€0.35 – €0.43 net (excluding VAT)
For file: Ender3S1_PenMount.gcode
This is an estimate for one file. You’ll confirm the exact price before ordering.
File and estimate settings
File used for this estimate
Average indicative estimate: €0.39 excluding VAT (range midpoint).
- Weight reported by the author
- 1 g
- Print time reported by the author
- 34.8 min
- Source material
- PLA
- Estimate material
- PLA
- Estimate printer
- Bambu Lab P1S - 0.4 nozzle
- Estimate process
- 0.20mm Standard
Indicative estimate for the selected file only, based on the author’s weight and print time. File variants are not added together. The final price is calculated after file analysis.
Saved on this device.

Pen Plotter Attachment for the Ender 3 S1
- Rating
- 4.778 / 5
- Likes
- 756
- Downloads
- 2,821
- Makes
- 20
- Views
- 17,996
- Reviews
- 18
Updated at source:
Model information
- Source
- Printables
- Category
- Accessories
- License
- Creative Commons — Attribution — Share Alike
Also see our Latest Project Launching on Kickstarter 30th April 2023
https://www.kickstarter.com/projects/fizzychickens/3d-printable-antikythera-mechanism
Remix of Three Ducks in a Bear Suit Pen Plotter
Requires 2 x M3 Bolts (To hold Pen in Place)
I use the spare M4 bolt that comes with the Sprite Extruder.
EASY CONFIG!
Configuration:
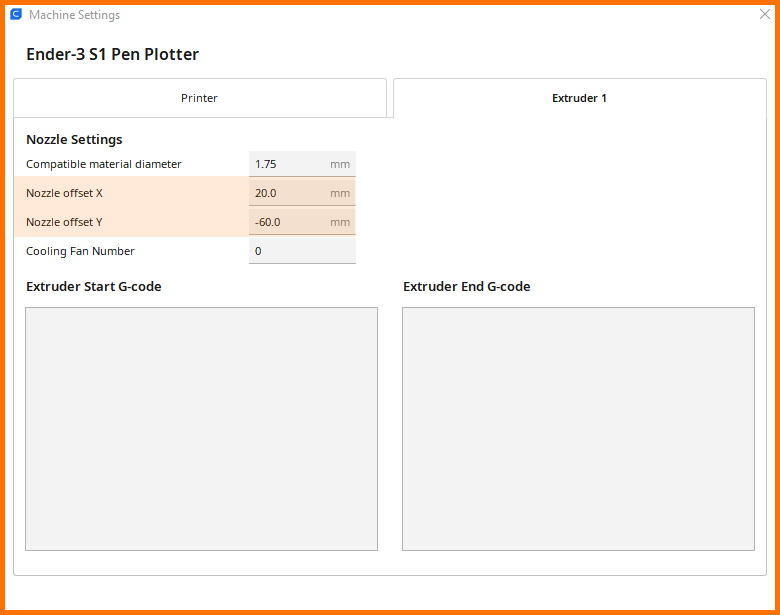
In Cura, you'll need to offset the extruder so your printer knows where your pen is. The easiest way to achieve this is by adding a new printer, and pasting the Start and End G-code in their place.

; Ender 3 S1 Start G-code
G92 E0 ; Reset Extruder
G28 ; Home all axes
G92 E0 ; Reset Extruder
Ender 3 S1 End G-code
G91 ; Relative positioning
G1 Z10 ; Raise Z more
G90 ; Absolute positioning
G1 X0 Y{machine_depth} ; Present print
M84 X Y E ; Disable all steppers but Z
Select: Extruder 1 and, for the Ender 3 S1, I recommend a Nozzle Offset of:
X20 Y-60
“Must Have” Slicer Settings:
- Print Temp 0
- Bed Temp 0
- Line Width 0.7mm
- Layer Height 0.5mm
- Walls 1 (Outlines) / 2+ Detailed
- Infil 100%
- Retractions ON
- Z-Hop when Retracted ON
- Z-Hop Height 1.5mm
- Cooling OFF
- Build Plate Adhesion NONE
Convert Jpeg into STL Files Here:
https://anyconv.com/jpeg-to-stl-converter/
Side Notes:
- After converting the JPEG into an STL via website, import the STL into Cura, and scale your Z to 200% for one layer. It will scale it to 10,000% automatically.
- Print the Pen Holder Parts with a 0.12 line width, 0.2 will make the two Pen Plotter Parts stuck and you'll need to print more than needed.
- The conversion website handles Black and White images best.
- I recommend the easy-to-use software Paint.NET as a way to edit your images.