
Two-tone Backgammon Doubling Die
We calculate the final price from your selected file. You review and accept it before payment.
Preliminary estimate for PETG
€0.33 – €0.41 net (excluding VAT)
For file: Doubling-Dice-counter-free_0.3mm_PETG_MK3S_24m.gcode
This is an estimate for one file. You’ll confirm the exact price before ordering.
File and estimate settings
File used for this estimate
Average indicative estimate: €0.37 excluding VAT (range midpoint).
- Weight reported by the author
- 4 g
- Print time reported by the author
- 24.6 min
- Source material
- PET
- Estimate material
- PETG
- Estimate printer
- Bambu Lab P1S - 0.4 nozzle
- Estimate process
- 0.20mm Standard
Indicative estimate for the selected file only, based on the author’s weight and print time. File variants are not added together. The final price is calculated after file analysis.
Saved on this device.
A backgammon doubling die that you print in two stages for two-tone!
- Rating
- 0 / 5
- Likes
- 1
- Downloads
- 29
- Makes
- 0
- Views
- 342
- Reviews
- 0
Updated at source:
Model information
- Source
- Printables
- Category
- Board Games
- License
- Creative Commons — Attribution — Share Alike
There's a backgammon set at my job that has a lot of missing parts, and I've taken it upon myself to make some of the missing pieces to hone the 3D modelling skills!
I decided to have some fun and figure out the way to make it interesting.
The outside that has the numbers has a hollow core. I printed the small cube in one color (white PLA in my example) and then printed the outer part (black PETG) in two stages.
If you want to have the negative space in the numbers stay put - called “counters” in typography IIRC - you'll probably need to include some supports. Mine ended up failed to glue well because I can be impatient and I ultimately liked how it came out without the negative space in the numbers. 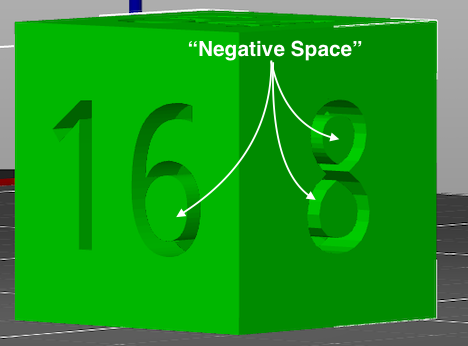
(image description: A dice that shows the Arabic numeral for 16 on one visible face and the numeral for 8 the other visible face. Text and arrows in white point to the counters within 16 and 8 and labels them “Negative Space.”)
Order of Operations (aka How I Did It)
- Split objects in Slicer and isolate the small cube.
- If you have a fancier setup than I, you may be able to print multicolor without having to do this. You do you.
- If you split the objects, you will also loose the negative space within the numbers. You may wish to keep them, so put some supports in before splitting!
- Print the inner core in a good contrasting color.
- Layer Height: your choice. I think I picked 3.00mm for speed?
- Color: I picked white.
- Material: PLA (it's what I had). But do whatever.
- Move the small cube off the printer. Congrats you're half way there!
- In the slicer, isolate the numbered outer shell.
- In the slicing settings, around 17mm insert a “color change”/pause.
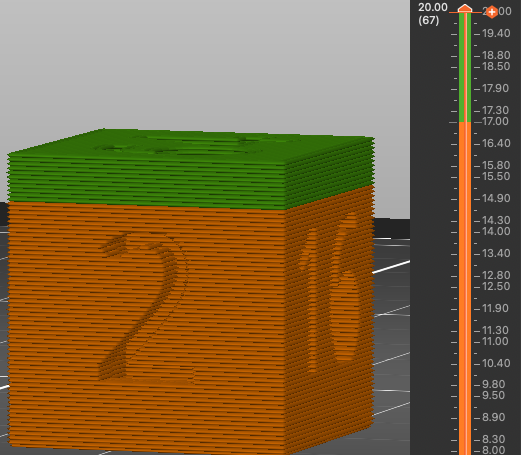
(image description: A 3D-sliced dice that shows the division of printing a “color change” at 17mm. The first stage is indicated in orange, and the second stage is indicated in green.) - Note: I suggest printing with the 4-face down since that will likely look the least messy. I didn't, but in hindsight, probably the move.
- Start printing the outer shell.
- Layer Height: your choice. Again, I picked 3.00mm for speed!
- Color: Black.
- Material: PETG. But do whatever!
- During that pause, pop in the contrasting core!
- If you have the right angles/glue, you could probably take this moment to add glue beneath any negative space. That is, any place where that negative space will be touching the contrasting core. I tried and failed so negative space-less it will be!
- Arabic numerals are distinct enough in their silhouettes that this works wonderfully.
- Once the core is in nice and snug, continue to print to seal it in!
- Tada, you have a fun little doubling dice!
Some Notes
I printed mine with the 64-face down so many of the overhangs got a bit messy in some of the numbers. It muddies a little bit of the print, but it's minor and I plan on fixing it later with some filing. You can see the wobbly overhangs in the pictures and my imperfect first layer, but I still think it looks rad as heck.