
Door Pinch Protection Profile Child Safety 4 Sizes
We calculate the final price from your selected file. You review and accept it before payment.
Saved on this device.

This is a 3D printable profile to add to your doors to prevent kids from pinching their fingers.
- Rating
- 0 / 5
- Likes
- 1
- Makes
- 0
- Views
- 348
- Reviews
- 0
Updated at source:
Model information
- Source
- Printables
- Category
- Other House Equipment
- License
- Standard Digital File License
Heyho
Some weeks ago we had to modify some doors in our kindergarden with pinch protections where the hinges are.
Since the commercial ones made out of aluminium are quite expensive and also need to be cut and fit in place I decieded to create a 3D printable solution. All sizes are desigend to be printed with standard printers like the MK4/ Bambulab P1/X1 Series.
After printing you still need to fit the parts in place properly. You can do that by sawing them into fitting parts just like with the aluminium profiles.
Additional hardware:
You can use (good quality) double sided adhesive tape to put the base parts into place or use some 3 mm countersunk screws. (I designed the base parts with 4 holes if you cut them short but you will only need screws in 2 of them!)
Parts describtion
The core of this design is theprofile and its base. To have a cleaner look you can also use the bottom/ top parts. Best is to “dry” assemble all parts to see where/ how much you will need to cut away of the profile/ base later on.
The “puzzle style” connectors of the base plates helps to align the assembly. You can also cut these away if necessary.
4 Sizes:

Installation:
1. Measure the distance of the hinges & the space in between them.
2. Print all parts (base & profile and if you like the top/ bottom Parts).

3. Cut the parts to the fitting length if necessary.
Tipp: If you have difficulties to cut the parts cleanly you can print and use a simple saw guide.

4. Assemble the Base parts to the Door. Use M3 countersunk screws or double sided tape.
Tipp: If you plan on screwing the protection to the door I recommend to use some double sided tape on the first element too to check a good alignment and that there is no collision between the parts and the opening door!
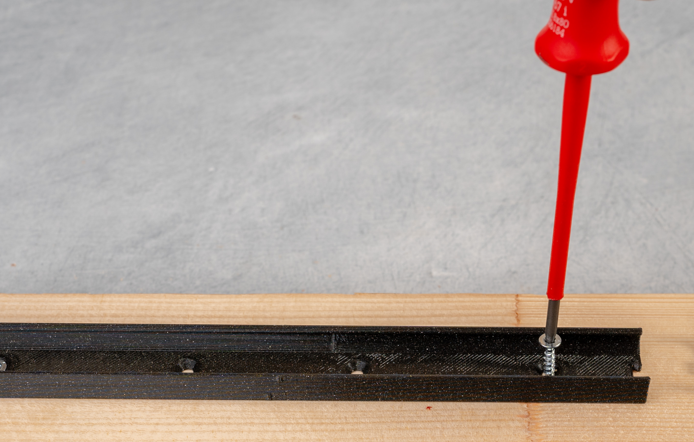

5. Click the Profile into the Base elements. You can slide them up and down after assembly.
Tipp: If your tolerances are a little off you can use a piece of wood and a hammer to give it light taps.


Printing Instructions:
I recommend printing these in PETG or similar filaments! - Turn your fan as low as possible for best toughness.
I went with 0,2 mm layer hight and Supports for the Profile elements.
- The printing orientations are preset. For more toughness you could probably print the Holder staying upright but it is faster to print it lying down. If your layer adhesion is good this will do the job just fine! After installation there should be no high forces on this part.
Have fun!