
Scissor Arm Grabber Toy
We calculate the final price from your selected file. You review and accept it before payment.
Estimated printing price per file
€0.35 – €0.43 net (excluding VAT)
For file: Plate 2 - PLA option_0.4n_0.2mm_PLA_MK4_23m.bgcode
This is an estimate for one file. You’ll confirm the exact price before ordering.
File and estimate settings
File used for this estimate
Average indicative estimate: €0.39 excluding VAT (range midpoint).
- Weight reported by the author
- 5 g
- Print time reported by the author
- 22.8 min
- Source material
- PLA
- Estimate material
- PLA
- Estimate printer
- Bambu Lab P1S - 0.4 nozzle
- Estimate process
- 0.20mm Standard
Indicative estimate for the selected file only, based on the author’s weight and print time. File variants are not added together. The final price is calculated after file analysis.
Saved on this device.

A fun scissor arm grabber toy with PLA body and flexible TPU grabber pads. All printable (no screws/hardware).
- Rating
- 4.25 / 5
- Likes
- 51
- Downloads
- 710
- Makes
- 3
- Views
- 3,463
- Reviews
- 4
Updated at source:
Model information
- Source
- Printables
- Category
- Other Toys & Games
- License
- Creative Commons — Attribution — Noncommercial — Share Alike
Inspiration
This design was inspired by a toy that my son had which was made very cheaply and broke much too quickly. Years later I now have a 3D printer and some CAD knowledge with which I was able to create a much more robust version based on the same idea.
Components
The parts necessary to construct one Scissor Arm Grabber consist of:
- (PLA) 2 scissor handles
- (PLA) 6 straight stick segments
- (PLA) 2 curved stick segments
- (PLA) 13 connector bottoms
- (PLA) 13 connector tops
- (TPU) 2 grabber pads
- (PLA) Assembly tool (not needed after assembly is complete, except for connector repair “just in case”)
Print Recommendations
I recommend against using any kind of “silk” PLA for the connector halves - in my experience they will break easily if you do. More standard or matte PLA works very well for the connector pieces. The rest of the PLA parts can be printed with any kind of PLA. PETG is not recommended for any of the parts.
- 0.2mm layer height
- at least 2 walls
- 15% infill
- no brims or supports needed
Assembly

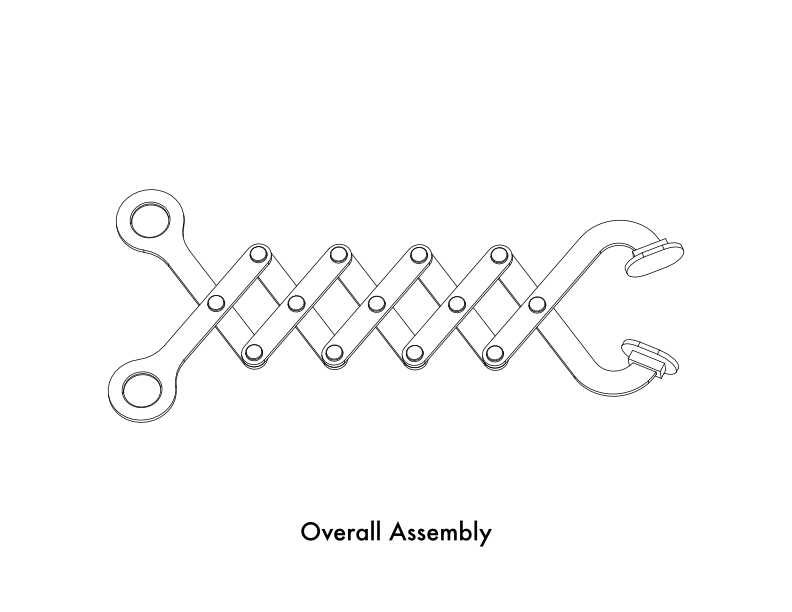
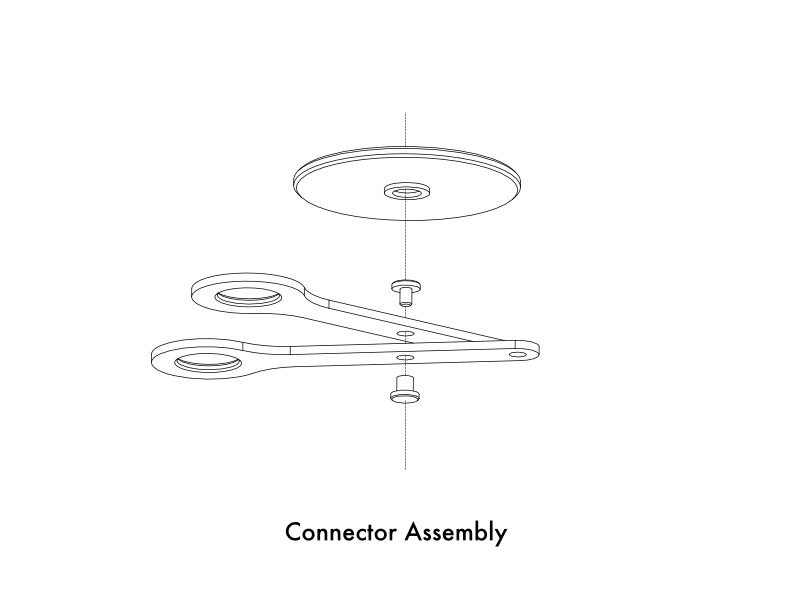
Assembly is straightforward - arrange the pieces as indicated in the “Overall Assembly” diagram and use two connector halves at each joint. At each joint location, insert a connector bottom (the half with a hole) from the bottom of a joint through the two stick segments. Then insert the connector top (the half with a post) from above into the bottom half's hole. Use enough force with your fingers to get the connector halves to stick in place. Then fit the assembly tool over the top connector half while the bottom half rests on a hard and flat surface. Apply force as evenly and directly downward as possible onto the assembly tool in order to drive the connector halves together completely. Once two connector halves are joined in this manner, they cannot be disassembled without breaking them so make sure you have the joint arranged correctly before using the assembly tool!
After assembling all of the scissor handles, straight stick segments, and curved stick segments as indicated in the assembly diagram the next step is applying the TPU grabber pads. Make sure they are aligned correctly - they should be oriented such that the two grabber halves come together perfectly aligned when the scissor handles are in the closed position. You can optionally use super glue to permanently attach the grabber pads.
Watch the time-lapse assembly video to help make sense of these instructions!
Revisions
10/26/2024 - Added PLA option for grabber pads in case you can't or don't want to print in TPU