
PRUSA MK4/MK4S NOZZLE WIPER(A1 and A1 mini version)
Obliczymy ostateczną cenę na podstawie wybranego pliku. Sprawdzisz ją i zaakceptujesz przed płatnością.
Zapisane na tym urządzeniu.
NOZZLE WIPER for your MK4 and MK4S....2 versions of wiper...You can try A1 or A1 mini version
- Ocena
- 4,909 / 5
- Polubienia
- 141
- Pobrania
- 354
- Wydruki
- 13
- Wyświetlenia
- 3387
- Oceny
- 11
Aktualizacja u źródła:
Informacje o modelu
- Źródło
- Printables
- Kategoria
- Prusa Parts & Upgrades
- Licencja
- Creative Commons — Attribution — Noncommercial — Share Alike
EDIT: Přidal jsem verzi pro mini stěrač A1... Myslím, že je to lepší pro zamýšlené použití... G-code je však jiný, takže jej nezapomeňte změnit... Najdete ho na konci popisu tohoto modelu.
short video how it works:
First of all, it should be mentioned that this is a nice idea from the user @Quesabyte. His original model is designed for upgrading from MK3S and you can find it here:
https://www.printables.com/model/1197941-prusa-mk4-nozzle-wiper
I have MK4S so I needed to come up with a different mount because the bed on MK4/MK4S is different. I wanted to bring this model closer to more users…
PETG printing, 0.15 layer, 3 perimeters
Used parts: 4pcs magnet 6x3
1pc ISO 7380 M3x12
2pcs ISO 7380 M3x14(you can use longer)
(unnamed brand) A1 wiper
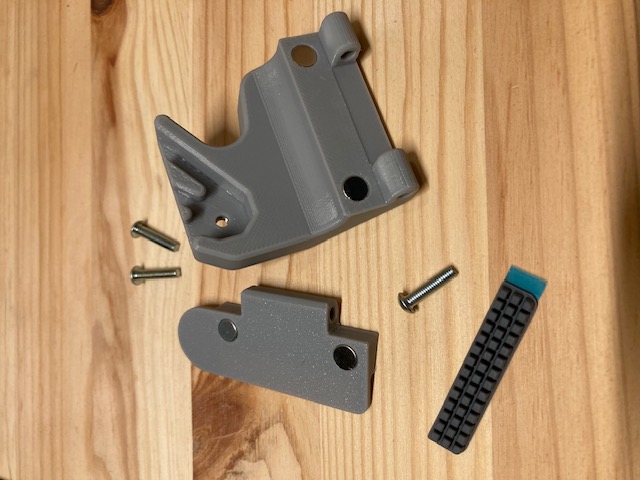
How to install it correctly:
Unfortunately, it is necessary to remove the heated part of the bed, so unscrew all 9 small torx screws and one m3x6 screw that holds the aluminum spacer.
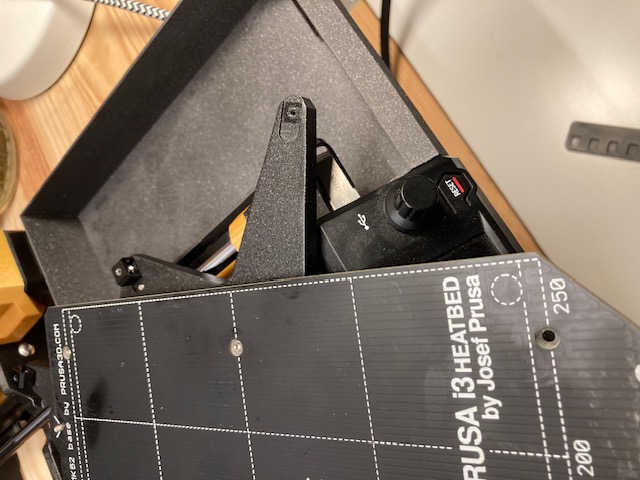
Insert the M3 nut with the magnets into the bottom part and slide the part in from below the bed. The part should fit nicely. Then you need to hold the part against the bed. The reason is to hold the part well. The bed has a thread so be careful and don't let go of the part until you have screwed in the M3x12 screw that will hold the bottom part in place. Don't tighten the screw completely yet!


Insert the aluminum spacer. Make sure it is oriented correctly! Then tighten the spacer together with the lower printed part.

Screw the thermal part of the bed back on. Proceed as if you were rebuilding the kit. Use a round spacer and a longer torx screw in the middle... Short torx screws in the remaining holes. Align the bed and then tighten lightly. After checking that everything fits as it should, tighten all torx screws in this order:
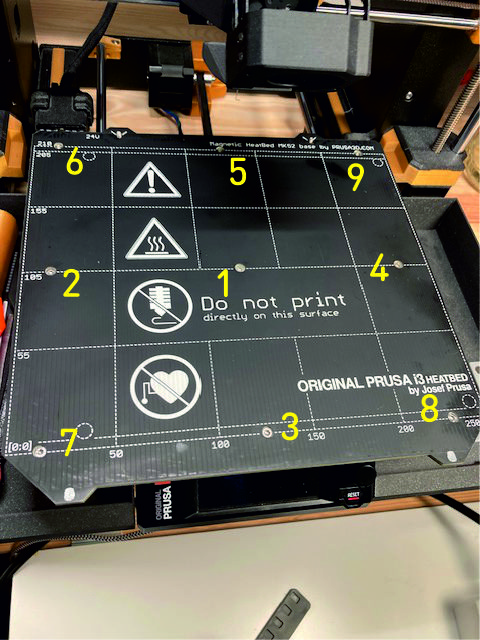
Put the PEI pad back on and just stick the A1 wiper on the top part and secure it with two m3x14 screws to the bottom part... The part can be tilted as needed and is secured with 6x3 magnets.


The last thing is to add the G code to your own g code in the slicer for your printer. I am using the same g-code as @Quesabyte.
G CODE:
; cleaning nozzle custom
G1 Z15
G1 X247 Y-4 F8000
G1 Z4
G1 Y25 F3000
G1 X249 F6000
G1 Y-4 F3000
G1 X251 F6000
G1 Y25 F3000
G1 Z10
G1 X220 F8000
; end cleaning nozzle custom
If you want to use the A1 mini wiper version, don't forget to use this G-CODE I modified below! Place it before MBL.
; start cleaning nozzle custom
G1 Z10
G1 X248 Y-4 F8000
G1 X248 Y33 F8000
G1 Z5,5
G1 X248 Y-4 F6000
G1 X246 Y33 F6000
G1 X246 Y-4 F6000
G1 X250 Y33 F6000
G1 X250 Y-4 F6000
G1 X248 Y33 F6000
G1 X248 Y-4 F6000
G1 X246 Y33 F6000
G1 X246 Y-4 F6000
G1 X250 Y33 F6000
G1 X250 Y-4 F6000
G1 X248 Y33 F6000
G1 X248 Y-4 F6000
G1 X246 Y33 F6000
G1 X246 Y-4 F6000
G1 X250 Y33 F6000
G1 X250 Y-4 F6000
G1 X248 Y33 F6000
G1 X248 Y-4 F6000
G1 X246 Y33 F6000
G1 X246 Y-4 F6000
G1 X250 Y33 F6000
G1 X250 Y-4 F6000
G1 X248 Y33 F6000
G1 Z10
G1 X220 F8000
; end cleaning nozzle custom
I'm not very good at creating g code so if you can help me improve this g code I'll be very grateful. So the door is open :-)
Happy Printing!
PEEVES