
Flsun v400 Universal turbo kit
Obliczymy ostateczną cenę na podstawie wybranego pliku. Sprawdzisz ją i zaakceptujesz przed płatnością.
Zapisane na tym urządzeniu.

low profile muffler & power board for universal turbo kit + awesome instruction guide w/ all parts needed
- Ocena
- 4 / 5
- Polubienia
- 30
- Pobrania
- 91
- Wydruki
- 1
- Wyświetlenia
- 1248
- Oceny
- 1
Aktualizacja u źródła:
Informacje o modelu
- Źródło
- Printables
- Kategoria
- Other Printer Parts & Upgrades
- Licencja
- Creative Commons — Attribution — Noncommercial
i assembled the “Universal turbo kit” and i must admit its amazing.
i was inspired by @twin.shepherd.printing tiktok of assembling something like this and went to “experiment” myself (thanks dude)
but everywhere i looked, i needed to dig up all the information instead of 1 place with everything to create a “s1 cooling” experience on my flsun v400.
so i documented everything i did for you to enjoy + my parts & references to all needed “stuff”
“invest” a LIKE if you like the instruction guide & the parts
bill of materials:
- BIQU universal turbo kit (you can by it from different sources, btt store ,ali ,amazon etc…)
- CPAP tube +/- 80cm with ending facing inside (see example here)
- 4 M3x30mm circuit board standoff - for the connector plate (see example here)
- M3 bolts (from the kit) & nuts
- cable ties
printed parts:
- for WS7040 blower:
- hose adapter - by @kiklhorn (https://www.printables.com/model/1130787-cpap-hose-adapter)
- CPAP fan mount generic m3 tap - by @Lepresean (https://www.printables.com/model/546952-flsun-v400-cpap-duct/files#preview.file.QqEHZ)
- blower muffler v8 - by me
- power
- blower power board v3 - by me
- Hotend Assembly
- CPAP Duct - by @Robert_Klotz_844898 (i liked this one better then the other options, i think its the “easier” to print, but there are others)
assembly instructions
- print all parts (5 items)
- open printer top cover
printhead assembly
- remove filament sensor clip
- disconnect all wire fins from printer top
- disconnect the connector panel (4 screws)
- remove 2 cooling fans from sides (4 screws)
- remove the fans wires from the wire bundle
- connect the CPAP duct to printhead assembly
- connect the hose + cable tie
- bundle all the wires + hose
- pass the tube to the printer top via the “connector panel” hole


circuit board
- connect circuit boards to “power board panel”
- connect with M3x4 hex screws + 4xM2 “wood” screws (from the kit)

wiring Instructions
from: “universal turbo kit” WIKI
- Insert the BLDC driver power cable into the adapter board.
- Plug the 3-pin XH2.54 connector into the adapter board.
- Cut the included power and signal cable to your preferred length.
- Insert the power and signal cable into the adapter board.
- Connect the power to 24V DC.
- Connect the signal cable to any fan port (3.3-24V full range compatibility).
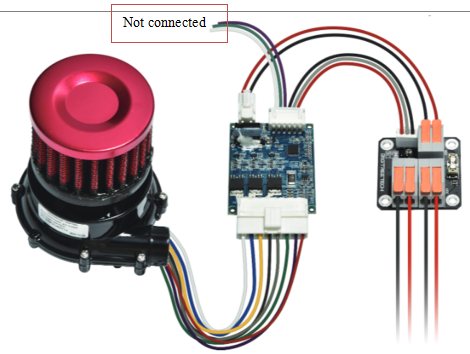
- raise the connector panel with M3x30mm circuit board standoff
- install the power mount to printer + connect cables
- i connected the fan port into the existing fan port panel (one of the 2 black ports of the existing 4010 blowers)
- connected the power to the robin nano v2.1 24v power input.


blower assembly
- connect blower with the hose adapter + open the blower screws and close them with the adapter
- connect blower to “generic mount” (use 3 small screws from the kit)
- connect muffler to blower + tight by (use 2 small screws from the kit + cable ties)
- connect filter to muffler + tight by ring
- connect mount to grill


firmware setup for klipper
Insert your fan port pin into the pin section below and copy it to your “printer.cfg” file:
########################################
# Fans Settings
########################################[fan]
pin: PB1
max_power: 0.8
shutdown_speed: 0
cycle_time: 0.005
hardware_pwm: False
kick_start_time: 0.100
off_below: 0.1
ENJOY