
Advanced Filtration for Prusa CORE One (Unofficial Printed Version)
Obliczymy ostateczną cenę na podstawie wybranego pliku. Sprawdzisz ją i zaakceptujesz przed płatnością.
Zapisane na tym urządzeniu.

Unofficial 3D-printed filtration system for Prusa CORE One with HEPA fan upgrade—cleaner prints, easy install.
- Ocena
- 5 / 5
- Polubienia
- 59
- Pobrania
- 216
- Wydruki
- 4
- Wyświetlenia
- 3140
- Oceny
- 4
Aktualizacja u źródła:
Informacje o modelu
- Źródło
- Printables
- Kategoria
- Prusa Parts & Upgrades
- Licencja
- Creative Commons — Attribution — Noncommercial — Share Alike
Take your Prusa CORE One to the next level with this unofficial, 3D-printed advanced filtration system, designed to enhance air purification performance while maintaining a clean, compact look.
This version is inspired by the original Prusa Advanced Filtration add-on (official product link) and Prusa Advanced Filtration - Core One Retrofit from EvoDesigns_1827197, but adapted the original design for Core One from Prusa.
My printed model integrates a high-efficiency fan and replaceable filter, modeled after the mini air purifier system available here from Blurolls. This ensures excellent particulate filtration for safer, cleaner operation during long prints — especially when working with materials like ABS, ASA, PC Blend, and other compounds that may release unwanted fumes.
Features
🔧 Fully 3D Printable Housing: Designed for easy printing. Prints in durable materials like PETG or ASA.
🌬 Efficient Filtration System: Utilizes an active fan and multi-layer filter cartridge to capture fine particulates and odors.
🧩 Compact Integration: Mounts cleanly to your Prusa CORE One without interfering with machine operation. Just like the original one!
♻ Easily Replaceable Filters: When it's time for a change, simply swap the filter cartridge — no special tools needed. Just like the original one!
Included in the Design
STL files for the filter housing and O ring Gasket.
Clearances optimized for fitting the 120mm fan + carbon HEPA filter combo sold on AliExpress.
Recommended Parts
Fan + Filter Combo: Mini Air Purifier Fan and HEPA Filter
O-Ring: 1x 92mm x 3mm O Ring ( https://a.co/d/4kOz9Bu ), However I've included O-ring you can print with TPU.
Screws:
- 4x Head Cap M3x8mm screws to mount the printed housing to Core one
- 2x Button Head Cap M4x8mm to mount fan to the printed housing
Installation Instructions
- Disassemble: DISCONNECT POWER, then remove the back panel and the PSU cover from the CORE One.
- Cable Routing: Feed the blower fan cable through the rubber grommet located above the Buddy Extension Board.
- Connect the Fan: Plug the blower fan into the FAN3 header on the Buddy Extension Board.
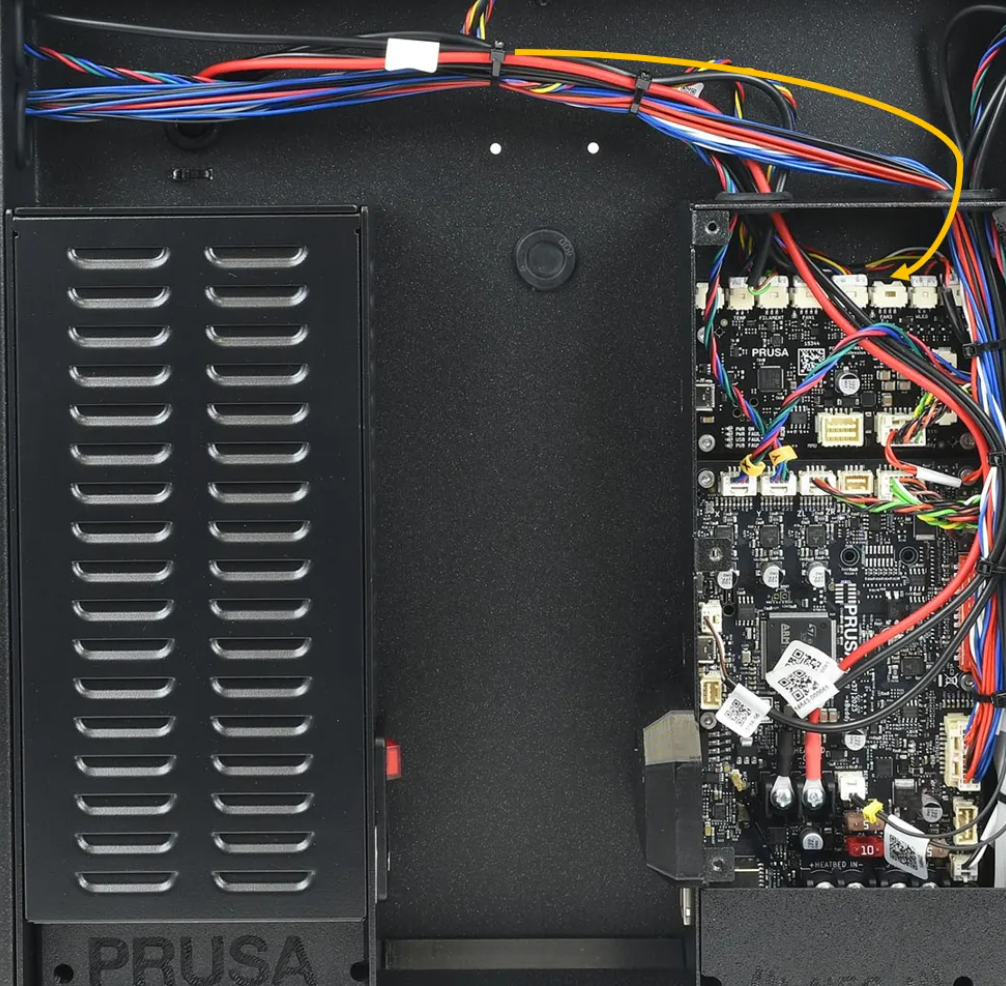
- Attach the Blower: Secure the blower to the 3D-printed bracket using the original hardware from the official Advanced Filtration System.
- Mount the Assembly: Use four M3x8mm bolts to fasten the fan and bracket assembly onto the frame of the CORE One.
- Enable Filtration: On the printer’s touchscreen, navigate to Settings > Hardware > Chamber Filtration, and toggle Advanced Filtration to Enable.
(If your getting warning message during printing “Chamber Filtration fan is not spinning. Check it for possible debris, then inspect the wiring”, simply disable “Fan Check” under Settings, currently this is only solution. I will update this part once I find better solution.)
Notes
This is an unofficial upgrade and is not endorsed by Prusa Research.
Designed for makers who enjoy modding and optimizing their printer setups.
Ensure you securely mount and start printing more!