
Pokedex Switch Game Cartridge Holder
Obliczymy ostateczną cenę na podstawie wybranego pliku. Sprawdzisz ją i zaakceptujesz przed płatnością.
Zapisane na tym urządzeniu.

A cute and practical way to store your game cartridges for the Nintendo Switch. The Kanto Pokedex!
- Ocena
- 0 / 5
- Polubienia
- 15
- Pobrania
- 59
- Wydruki
- 0
- Wyświetlenia
- 523
- Oceny
- 0
Aktualizacja u źródła:
Informacje o modelu
- Źródło
- Printables
- Kategoria
- Video Games
- Licencja
- Standard Digital File License
Pokedex Switch Game Cartridge Holder
Project Inspiration
This print was inspired by a childhood toy. I was eight years old when the Generation I Pokemon games were released, and I grew up playing with an electronic Pokedex toy. The Kanto region has always held a special place in my heart.
☑ No support needed
☑ Holds 24 Games!
☑ Meant for printing with material management system (CFS/AMS/MMU etc.)
☑ Only minimal assembly. Complete instructions with diagrams.
My son needed more space to store his Nintendo switch games, and he is also an avid Pokemon fan. I decided to create this for him, so he had someplace to store his games. This one holds 24 games.
👉 Don't forget to like, follow, boost!
I had a blast making it! This was such a nostalgic experience for me. I hope it can bring someone else the same kind of joy!
Recommended Settings

Use default settings for Generic PLA
I used a layer height of 0.2mm
Optional: Reduce the flushing volume to 0.7 to save some filament.
You will need to print 2 plates. Load the CFS with the following colors.
Note: You will need to print four (4) copies of the small light.
CFS Colors
1st Plate: Print by Layer
• Red
• Blue
• White
• Black
2nd Plate: Print by Object
• Red
• Blue
• Yellow
• Green
Rationale
I designed the model so that the four most prominent colors are printed with the CFS. The other
components are glued on for two reasons:
1. Not very many people I know have more than one CFS.
2. To avoid using supports, it worked out better to have the faces of the Pokedex lay flat against the
build plate.
Assembly
Glue each of the external pieces onto the cover.
The triangle and hemisphere-shaped “lights” should fit inside their respective indents, as shown below.

Also, glue the black “screen”, yellow “light” and green “screen” into the inside of the case.
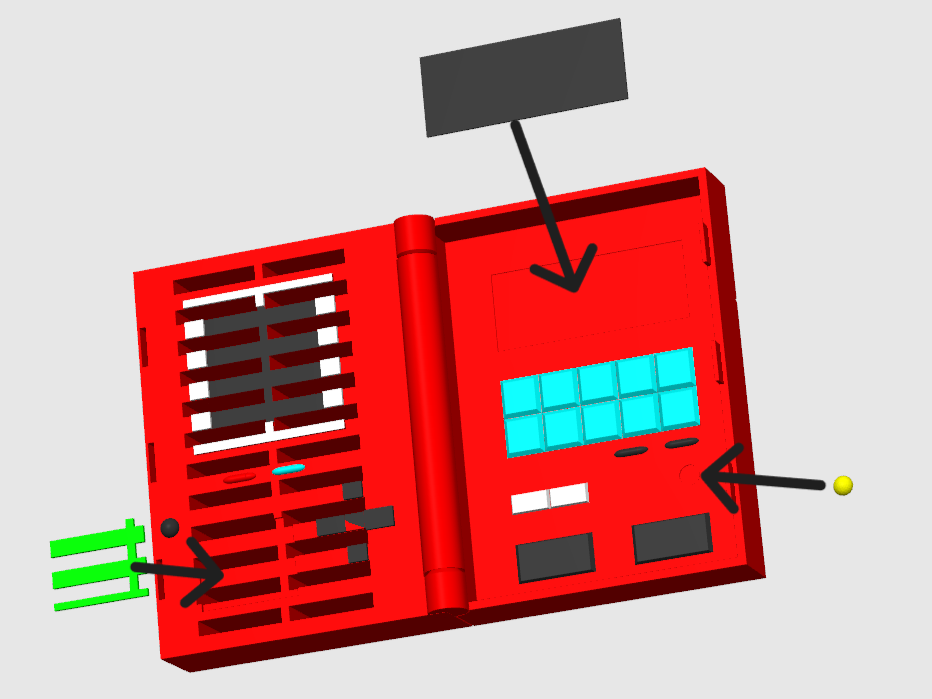
NOTE: When bending the hinge for the first time you may experience stiffness. After the hinge has moved a few times, it will loosen up. The same may be true of the latch pieces
Commercial Use:
This model is for PERSONAL USE ONLY.
💲💲💲
If you would like permission to SELL THIS MODEL please subscribe to my Patreon here: https://patreon.com/davidsitgarage
Happy Printing!
