
Advanced Flow Calibration Test - Kalibrierung des Flusses
Obliczymy ostateczną cenę na podstawie wybranego pliku. Sprawdzisz ją i zaakceptujesz przed płatnością.
Zapisane na tym urządzeniu.

If you like to have a very accurate Flow, try this sample. No measurements needed!
- Ocena
- 4,778 / 5
- Polubienia
- 188
- Pobrania
- 7234
- Wydruki
- 9
- Wyświetlenia
- 16 999
- Oceny
- 9
Aktualizacja u źródła:
Informacje o modelu
- Źródło
- Printables
- Kategoria
- Test Models
- Licencja
- Creative Commons — Attribution
English below!
Eine fortschrittliche Methode zur Überprüfung der Durchflussgenauigkeit
Hinweis: Es ist absolut richtig, dass die STL aus 2 Teilen besteht! Bitte einfach den Anweisungen folgen.
die Kurzanleitung zu dieser Vorgehensweise findest Du in diesem Video:
Wie du den Flow kalibrierst:
Step 1:
- aktiviere den Support
- Linienstärke = Düsendurchmesser
- Wandstärke: 0 (dies deaktiviert die variable Linienbreite)
- Anzahl der Wandlinien: 1
- Füllung: 100%
Step 2:
- Füge 2 weitere Teile zu deiner Bauplatte hinzu
- aktiviere "pro Modell Einstellung"
- wähle "Durchfluss" als Variable
- wähle für das 1. Modell 90%, für das zweite Modell 95%, und 100% für das letzte als Referenz
Beurteile nach dem Druck die oberste Schicht:
- Wenn Lücken zwischen den Linien auf der obersten Hautschicht sind, ist der Fluss zu gering.
- Wenn die Oberfläche rau ist, ist der Flow zu viel.
- Wenn die Oberfläche schön glatt ist, ist der richtige Fluss für das aktuelle Material gefunden.
Cura Settings:
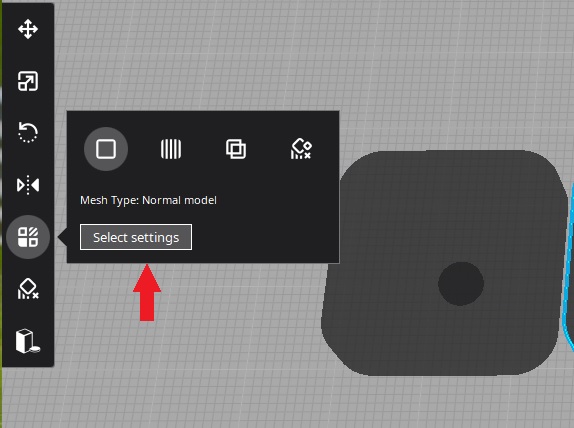
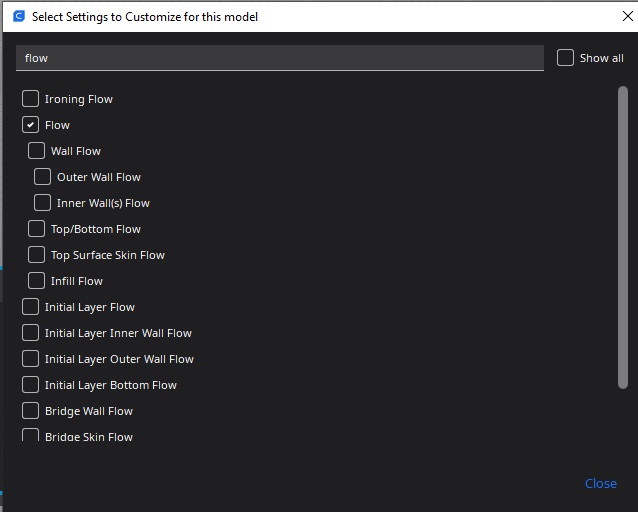
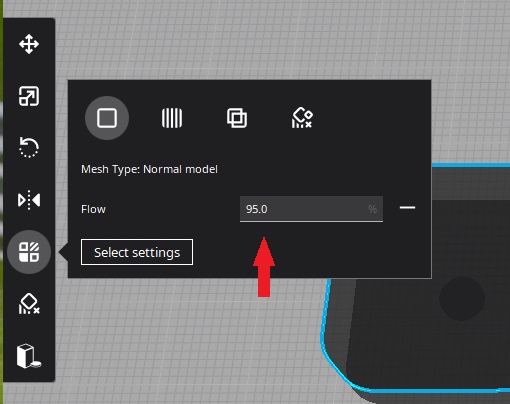
Wenn du mir eine kleine Spende zukommen lassen möchtest, dann kannst du das hier gerne tun, ohne einen Account zu erstellen: An CL Performance Spenden
English:
An Advanced way to check the flow accuracy
Note: it is absolutely correct, that both parts of this test has no connection! Please follow the instructions.
How to dail in your flow:
1st:
- enable Supports
- Linewidth = Nozzle diameter
- Wall Thickness 0 (this disables the variable line width)
- Wall Line Count: 1
- Infill: 100%
2nd:
- Add 2 more parts to your build plate
- activate “per model setting”
- choose “flow” as your variable
- for the first test, choose 90% for the 1st model, 95% for the 2nd and 100% for the last as reference
After printing judge the top-layer:
- if you have gaps between the lines at the top skin layer, your flow is too low
- if the surface is rough, your flow is too high
- if your skin is nice ans smooth, you found the correct flow for your material
This is a remix of CNC Kitchen's Extrusion test modle which can be found on thingiverse.