
The Revolutionary Musical Keyboard and Multi-Function Controller
Obliczymy ostateczną cenę na podstawie wybranego pliku. Sprawdzisz ją i zaakceptujesz przed płatnością.
Zapisane na tym urządzeniu.

Transform your smartphone into a musical powerhouse with this 3D printed keyboard! Simple assembly, endless fun!
- Ocena
- 0 / 5
- Polubienia
- 34
- Pobrania
- 33
- Wydruki
- 0
- Wyświetlenia
- 1931
- Oceny
- 0
Aktualizacja u źródła:
Informacje o modelu
- Źródło
- Printables
- Kategoria
- Music
- Licencja
- Creative Commons — Attribution — Noncommercial — Share Alike
The Revolutionary Musical Keyboard and Multi-Function Controller (RMKMC) is a versatile 3D printed model that showcases a unique blend of music, technology, and 3D printing at its finest. It houses 8 keys, each assignable to whatever tones you like, eg. from C4 to C5, and uses an innovative touch-detecting mechanism facilitated by 30 cm-long breadboard cables hidden beneath the keys.
At the heart of RMKMC is an ESP32 microcontroller, which communicates via Bluetooth with a smartphone or PC and acts as a standard keyboard. A character is sent over Bluetooth to the smartphone/PC by simply touching a key, detected by a website such as virtualpiano.net, which then plays the corresponding tone.
Not only is this an innovative musical instrument, but it also doubles as a multifunctional controller. The design includes a hidden smartphone mount with print-in-place hinges and a unique release mechanism, which is perfect for streamers who need to switch scenes in OBS or view their Twitch chat. Furthermore, the RMKMC can communicate with OctoPrint for basic 3D printer controls.
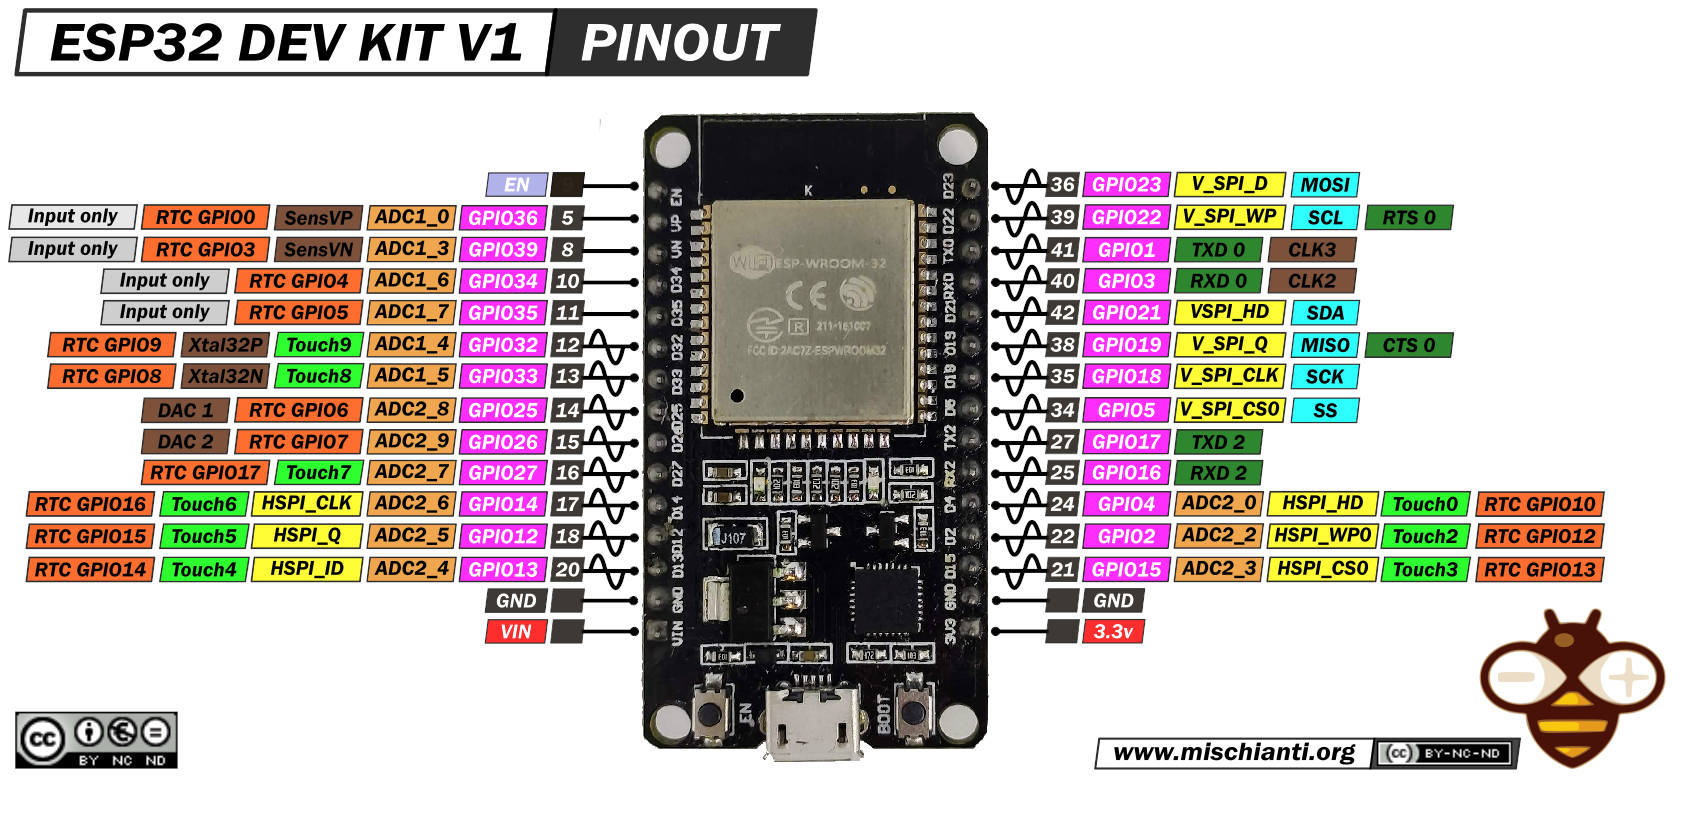
While the model was designed around an ESP32 DevKitV1, its versatile design allows for the accommodation of other ESP32 development modules, including those with Li-Po batteries.
The assembly is a breeze, requiring minimal hardware and no soldering. The design is also support-free, further emphasizing its user-friendly nature.
Print Details:
- Filament: It's PLA-compatible but PETG is recommended for the mechanical parts.
- Other Materials: ESP32 DevKitV1 (or another), breadboard cables (30 cm)
- Assembly: Easy, no soldering required, minimal hardware, support-free design.
Assembly instructions:
- Begin with the bottom part of the housing. Insert the slider with the smartphone mount attached into its central slot.
- Incorporate springs to allow the slider to function.
- Fasten the slider's handle underneath the housing.
- Snap the top cover onto the mount releasing mechanism. At this point, the slider with the smartphone mount should be operational.
- Next, insert the rolling lid into the entry port near the container. Slide it entirely in.
- Attach a 'Ribbon Grip', a part that fits between the ribbon pillars of the rolling lid. This will allow you to move the ribbon by holding this part.
- Subsequently, slide another part from the other side of the ribbon onto the 'Ribbon Grip' from step 5. This will ensure the 'Ribbon Grip' stays securely attached to the ribbon. Optionally, you can apply plastic grease to facilitate smoother ribbon movement, but this isn't mandatory.
- Once this is set up, insert cables into the eight keys. Note the end of the key where the narrowing is tighter. It's best to slightly tilt the key, insert the cable, then release the key to secure the cable.
- Following this, insert the keys into the keyframe.
- Place the frame with keys into the main housing. Run the cables through the holes in the main housing.
- Insert the ESP32 into the goldpin holders.
- Insert the goldpin holder with the ESP32 into the main housing.
- Connect the cables to the ESP32's GPIO pins: 4, 12, 13, 14, 15, 27, 32, and 33 starting from the left cable when you're looking at the keyboard from the above (C4 note). You can use this schematic.
- The keyboard assembly is now complete. The next step is to upload firmware to the microcontroller.
- Connect the microcontroller to your computer for this purpose.
- Download the zip file containing microcontroller firmware from the files available on printables.com, unzip it.
- Download ESP32 flasher for uploading the firmware to your ESP32 from here.
- Launch the ESP32 flasher, select the firmware to upload, the COM port of the connected ESP32, and upload the firmware.
- Your musical keyboard is now ready to play. Simply take your phone, find the right Bluetooth device ("MusicalKeyboard"), connect with the keyboard, go to virtualpiano.net, and place your phone on the mount (Note: The stand that is directly underneath your smartphone should be first unlocked by moving it to the left, then up, then to the right to lock it in again), and start playing.
- Optionally, search for the WiFi network broadcasted by the keyboard ("MusicalKeyboard"), go to 192.168.4.1, and configure the keyboard settings.
ESP32 firmware's code is open-source and it's available on GitHub here.
I also have plans for new capabilities and better instructions (including a better video).
Enjoying the 3D Printed Musical Keyboard? 🎹
Your feedback can help make it even better! 🌟
Take a few moments to share your thoughts in this quick survey: https://forms.gle/YMi1pJj4ycvQqLaq5
Your input is truly appreciated! 🙏💕