
Voron 2.4 Duct Brackets For External Recirculation/Filtration
Obliczymy ostateczną cenę na podstawie wybranego pliku. Sprawdzisz ją i zaakceptujesz przed płatnością.
Zapisane na tym urządzeniu.

Attach brackets to the outside of a Voron frame to connect external ducting/hoses for filtration or ventilation.
- Ocena
- 0 / 5
- Polubienia
- 9
- Pobrania
- 16
- Wydruki
- 1
- Wyświetlenia
- 625
- Oceny
- 0
Aktualizacja u źródła:
Informacje o modelu
- Źródło
- Printables
- Kategoria
- Voron Parts & Upgrades
- Licencja
- Creative Commons — Attribution — Noncommercial
Add external recirculation and filtration to your printer, and improve the uniform temperature distribution in your print chamber. This bracket set is designed for 50mm ID components such as the hoses that come with the Bofa 3D PrintPRO 3.

Additional parts required:
- (4) M3 T-nuts per bracket
- (8) M3 bolts per bracket - various lengths, size to fit for your installation
- Up to (4) M3 hex nuts per bracket - see notes below, you may not need any for the side entry.
- 1mm foam tape, or your preferred gasketing material of similar thickness
Installation:
- I recommend temporarily attaching each bracket to your frame, then tracing the location of all holes to be cut on your acrylic panels. The hole pattern template is below. Dimensions from the frame members are intentionally not shown - please confirm these measurements yourself.
IMPORTANT: the (4) bolt holes around the 50mm center hole should be undersized when you drill the acrylic, so that the M3 bolts will thread directly into the acrylic. See step 5 for more info.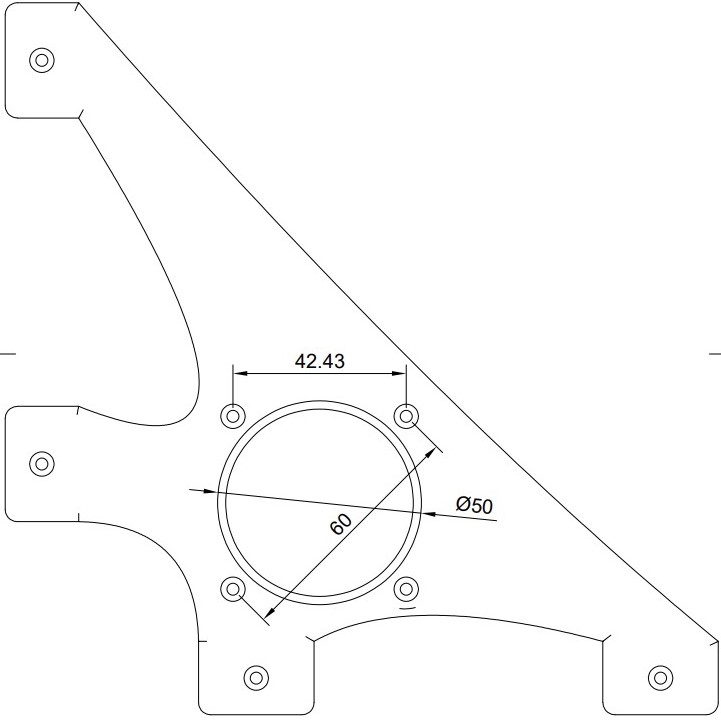
- Before permanently installing the bracket(s), install 1mm foam tape around the center hole between bracket and acrylic panel. Your choice whether to adhere to the bracket or the acrylic panel. This will prevent air leaks that reduce efficiency, affect chamber temps, or degrade air quality in your people space.
- Be gentle with the bolts attaching to t-nuts on the frame; I didn't add standoffs to account for the foam tape or the acrylic height above the aluminum extension, so the bracket will flex slightly since it's hanging over free air. A remix would be okay here, but it will introduce the need for supports, so I opted to leave them off. Installation tightness has been acceptable without them but just be aware the bracket will flex slightly.

- For the top bracket, install (4) M3 hex nuts into the Inside Ring part, and attach with M3 bolts from the outside. (Longer ones in this pic because it's what I had on hand)

- For the side bracket, there's not enough room for an Inside Ring. Anything thicker than an M3 hex nut will interfere with gantry movement. For my installation, (3) of the bolts threaded directly into the acrylic, but I needed a hex nut for the fourth.

- Once bracket(s) installed, attach external ventilation/filtration equipment (Bofa 3D PrintPRO 3 used in this installation).
IMPORTANT THERMODYNAMIC TIP: Recirculation can help with uniform chamber temps, but you should be aware that your bed heater now has to preheat your external equipment as well. Allow for additional preheat time. It takes roughly 1 hour for my toolhead thermistor to read 50C at z=100. Consideration should be given to fire risk if you decide to install additional enclosure heater elements.
I'm no Fusion 360 pro, but I'm also uploading the Fusion files which are modeled parametrically, so you can easily resize the bracket relative to the frame.
Future opportunities:
- Create interior diffusion manifolds to better distribute airflow around print bed
- Add an exterior slip-on 90-degree elbow model
Hope this helps. Thanks for all the interest. Share your makes!