
Pi camera servo arm for octoprint
Obliczymy ostateczną cenę na podstawie wybranego pliku. Sprawdzisz ją i zaakceptujesz przed płatnością.
Orientacyjna cena wydruku pliku
2,06 € – 2,52 € netto (bez VAT)
Dla pliku: 2.42_31-03_19g,_Arm_aluminum_extrusion_rail_mount_12cm.gcode
To wstępna wycena jednego pliku. Dokładną cenę poznasz przed zamówieniem.
Plik i założenia wyceny
Plik użyty do wyceny
Średnia wycena orientacyjna: 2,29 € netto (środek widełek).
- Masa podana przez autora
- 19 g
- Czas druku podany przez autora
- 2,75 godz.
- Materiał u źródła
- PLA
- Materiał wyceny
- PLA
- Drukarka wyceny
- Bambu Lab P1S - 0.4 nozzle
- Proces wyceny
- 0.20mm Standard
Orientacyjna wycena wyłącznie wybranego pliku, oparta na masie i czasie druku podanych przez autora. Warianty plików nie są sumowane. Ostateczna cena zostanie obliczona po analizie pliku.
Zapisane na tym urządzeniu.
A robot arm with pi cam, multiple attachments. Some things for ender 3 v2
- Ocena
- 0 / 5
- Polubienia
- 50
- Pobrania
- 314
- Wydruki
- 1
- Wyświetlenia
- 1642
- Oceny
- 0
Aktualizacja u źródła:
Informacje o modelu
- Źródło
- Printables
- Kategoria
- Accessories
- Licencja
- Creative Commons — Attribution — Noncommercial — Share Alike
Notice: it's not only for the ender 3 v2
Model descriptions:
- arm rail mount for a aluminum extrusion (tested on ender 3 v2 extrusion) this one the just tall enough to peak over the ender 3 v2 bed height, this is around 10 cm and 12 cm including the camera hight. the rail is from @ryanba “MODEL LINK”
- smaller rail mount (tested on ender 3 v2 extrusion) the rail is from @ryanba “MODEL LINK”
- arm mount for on QR code, so it moves with the Z arm. (double sided tape is recommended) remixed from @3ddruckmarc “MODEL LINK”
- mount made for the QR Ball joint Arm (I recommend not using joint in-between)
- the mount point for model 5, this model is designed by @Anders “MODEL LINK”, which is a remix from @3ddruckmarc “MODEL LINK”
Credit for all the models used in the renders:
- picture 1, 2, 5, 6, 7 and 8: ender 3 v2 model used is from: @pakkko_354438 “MODEL LINK”
- Servo reference model used is from: @demetrius_393003 “MODEL LINK”
- Servo Arm/Horn used is from: @Cohenco “MODEL LINK”
- Ball joint QR mount used is from @Anders “MODEL LINK” that is a remix the qr cover of @3ddruckmarc “MODEL LINK"
- the models for the arm joints used are all from @Erer “MODEL LINK”
I use:
a Modular Snap Together Raspberry Pi @Sneaks with a Ender 3 V2 Mounts rail @ryanba, with the model 1 Arm rail mount for a aluminum extrusion. and I use a raspberry pi with octoprint. And for the servos I use the Micro servo 3.9g. with the Easy servos plugin on octoprint. And on the pi i connecter the gpio 22 for the x and 27 for the y
IMPORTANT for octoprint
You can use a octoprint plugin to control the servos. the plugin called easy servos made by mledan, iFrostizz and jneilliii.
In the image below, you can see the controls and my settings.
how to set-up is described on the Plugin Repo “LINK”

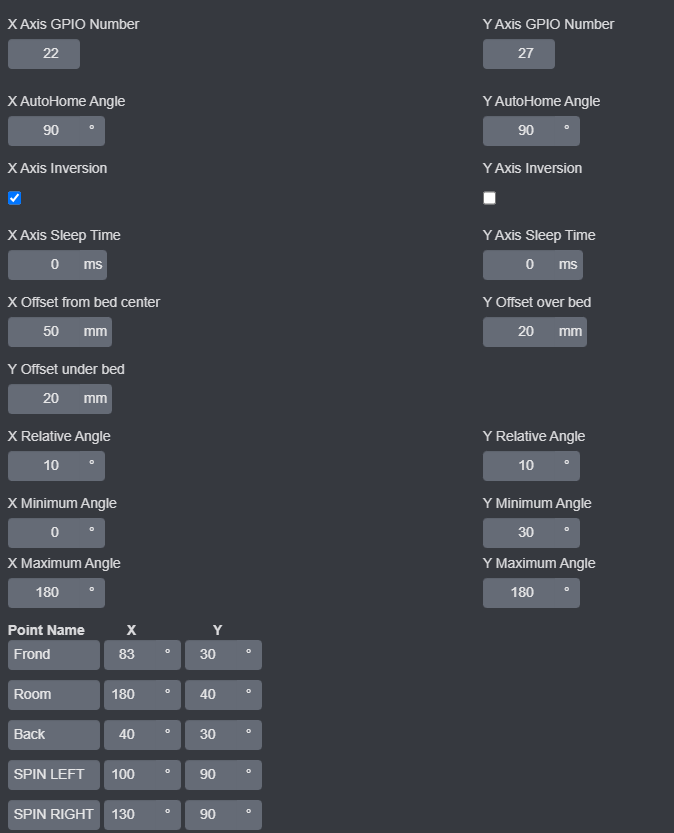
^^ these are my settings for easy servo
Thanks to @Erer for the original model.