
EVENmore - Bed Fans with Style
Obliczymy ostateczną cenę na podstawie wybranego pliku. Sprawdzisz ją i zaakceptujesz przed płatnością.
Zapisane na tym urządzeniu.

This is a stylish bed fan solution for your Voron printer which perfectly fits the Nevermore air filtration system.
- Ocena
- 5 / 5
- Polubienia
- 572
- Pobrania
- 14 924
- Wydruki
- 9
- Wyświetlenia
- 34 545
- Oceny
- 6
Aktualizacja u źródła:
Informacje o modelu
- Źródło
- Printables
- Kategoria
- Voron Parts & Upgrades
- Licencja
- GNU General Public License v3.0
When building my Voron I was looking for a nice bed fan solution 🤔 that would fit my Nevermore and help to bring the chamber temperature Even More up🔥 to where it belongs. Since I couldn't find anything that I really liked, I decided to go to the drawing board. And here they are: bed fans that match the Nevermore Micro perfectly 🥰 (not only the Micro V6 and of course they work standalone as well 😉)…
Support me : Please leave a ❤ Like if you actually like and use this model. It does help a lot to get some of the filament that is needed for all the test prints while creating models to share with you! And check out my other models if you're building a Voron!

Modular Cable Management Clips for 2020 Extrusions This is a complete set of cable management clips for 2020 extrusion profiles as used for many Voron and other printers.
|
 JST Hub for 2020 Extrusions - Wiring Bed Fans, LEDs and more! This is a JST-Hub with different configuration options to optimize the cable management of your printer. Designed for connecting the EVENmore bed fans! |

Better Dock and Mount for the PCB Klicky Probe Optimized probe dock and mount adapter for your PCB Klicky probe. |

Stylish BTT Octopus Pro Fancase A DIN rail mountable case for your BTT Octopus Pro which allows to mount two fans ... and is just looking cool :-) |

BTT HDMI 5 Display Voron Mount (Works with Clicky Clacky Door) A Voron display mount for BTT HDMI5 compatible with Clicky Clacky Door (and standard doors). |

Modular Mesh Inserts for the Voron Fan Grille This is a set of mesh inserts and retainers to add some protection and (of course) a nicer look to your Voron printer. |

Plug-In Mesh Mesh Inserts for the Voron 2.4 and Trident Skirts Mesh inserts that can be clipped into your standard Voron 2.4 and Trident skirts - now in 250, 300 and 350 versions :-) |
Model Details
Essentially, this is a single fan version of the Nevermore Micro V6 with a modified cartridge that only acts as an air duct. Everything is designed to keep the width of the case as small as possible. It fits perfectly under the 300 bed version (see images below), but also works for the 250/350 beds.
 |  |  |
I chose to leave the magnetic cartridge at the front (although that requires an investment in some magnets 💰): Not only does it allow for easy access to the M3 screws for attaching the case to the frame, but the two-piece design also allows for attaching custom designs tailored specifically to your needs, e.g. air outlets at the front or side.
…and Some Smaller Details
 |  |  |
It features a second attachment point in the back (M3 heat set insert) and there is a little mount bracket for 2020 extrusions that attaches right there to keep the babes wiggle-free under the bed. And if you like, you can easily design and attach any other bracket or part that you need for your specific setup.
If you don't want to to a JST plug there is also a little generic cable plug: Guide the cable through the outlet and the plug will keep it in place - solderless!
In the original Nevemore design, the lid had a small notch that snapped into the case. However, this mechanism was far too cramped in this smaller package in my test prints, especially when printed in PCCF. Therefore, the lid only has a minimal notch. If for some reason you want this full notch, it is also in the files section.
Build Guide
Take some time⏱ get a drink 🥤and build it with love 🥰. There are some steps that require some patience, it's not designed for mass production 😉. No worries you will manage it!
BOM

Fan
2 pcs 5015 Blower Fan 24V
Heat Set Insets
4 pcs M3x5x6mm ( "standard" Voron)
BHC
2 pcs M3 (min length 4mm, max lenght 10mm)
SHC
4 pcs M3x8mm
1 pcs M3x 10mm
1 pcs M3x 20mm
Magnets
16 pcs 6x3mm (high temp, e.g. NdSH-Ni))
T-Nut
4 pcs M3
Printing
Filament Type: These babes go under your bed where it is warm and cozy. So use some heat resistant filament. The absolute lower end of the line is ABS / ASA and I highly recommend to use PCCF or similar
Settings: User your standard Voron settings.
Orientation and Support: The parts are already oriented for printing. But you will need to set support for the following parts
Case: It needs quite a bit of support on the top area, specifically where the cable channels are, and also along the air path. Use paint-on supports (tested automatic support generation in Prusa Slicer and it was also fine… so if you are lazy, just give it a shot), set supports to organic and check the slicing results.
Lid: Just for the recess for the screw
Mount Bracket: Support the part that goes into the 2020 extrusions
Fan Preparation
You need to carefully cut off the top mounting notch of the two fans.
With a rotary tool, the work only takes 5 minutes.
Make sure it perfectly fits into the EVENmore case
… and check that the fan is aligned centered to the air inlet.
 |  |  |  |  |
Heat Set Insets
 |  |  |
Magnet Installation
Use some Super Glue to install the magnets… and of course check for the correct orientation/polarity.
Caution! The recesses for the magnets in the printed parts are quite loose (as they are in the Nevermore design). This is because these 6x3mm magnets come with quite a big variance in size. So chances are high that also your magnets will be quite loose. |
 |  |
Wiring and JST Connectors
Now we come to the steps that require some patience. But you have your drink🥤 ready, so don't worry, and you should be able to get this done in 15 min ⏱. |
In the following I will show you the nice way to manage your cables, which requires you to cut the cables to the exact and correct length.  There is also a second option which I added later to make it a bit easier:
Of course, for everything else,follow the steps described below. |
Cut the fan's cable to the correct length.

If you don't want to use a JST connector: Do not cut the cable! You can just skip these steps completely. |
Insert the fan into the housing and guide the wires though the cutout in the printed part. It will help to pre-bent the wires as shown in the first picture.
Make sure the fan still gets flush into the EVENmore.
When everything is in place perfectly, cut the wires flush with the housing (do not pull on the cable but let it just hang loosely out of the case!). This gives you the perfect length to wire it up and have some slack to get the fan in and out.
In the pictures the steps are shown for the right fan case. Of course, do the same for the left one.
 |  |  |  |  |
Solder the JST Connector (or use the Cable Plug)

You can simply guide the cable out of the housing and use the cable plug to fix it in place. Do not cut the cable in this case but follow the steps below for guiding the cable inside the housing. |
Raise the fan to be able to pull some cable out for soldering
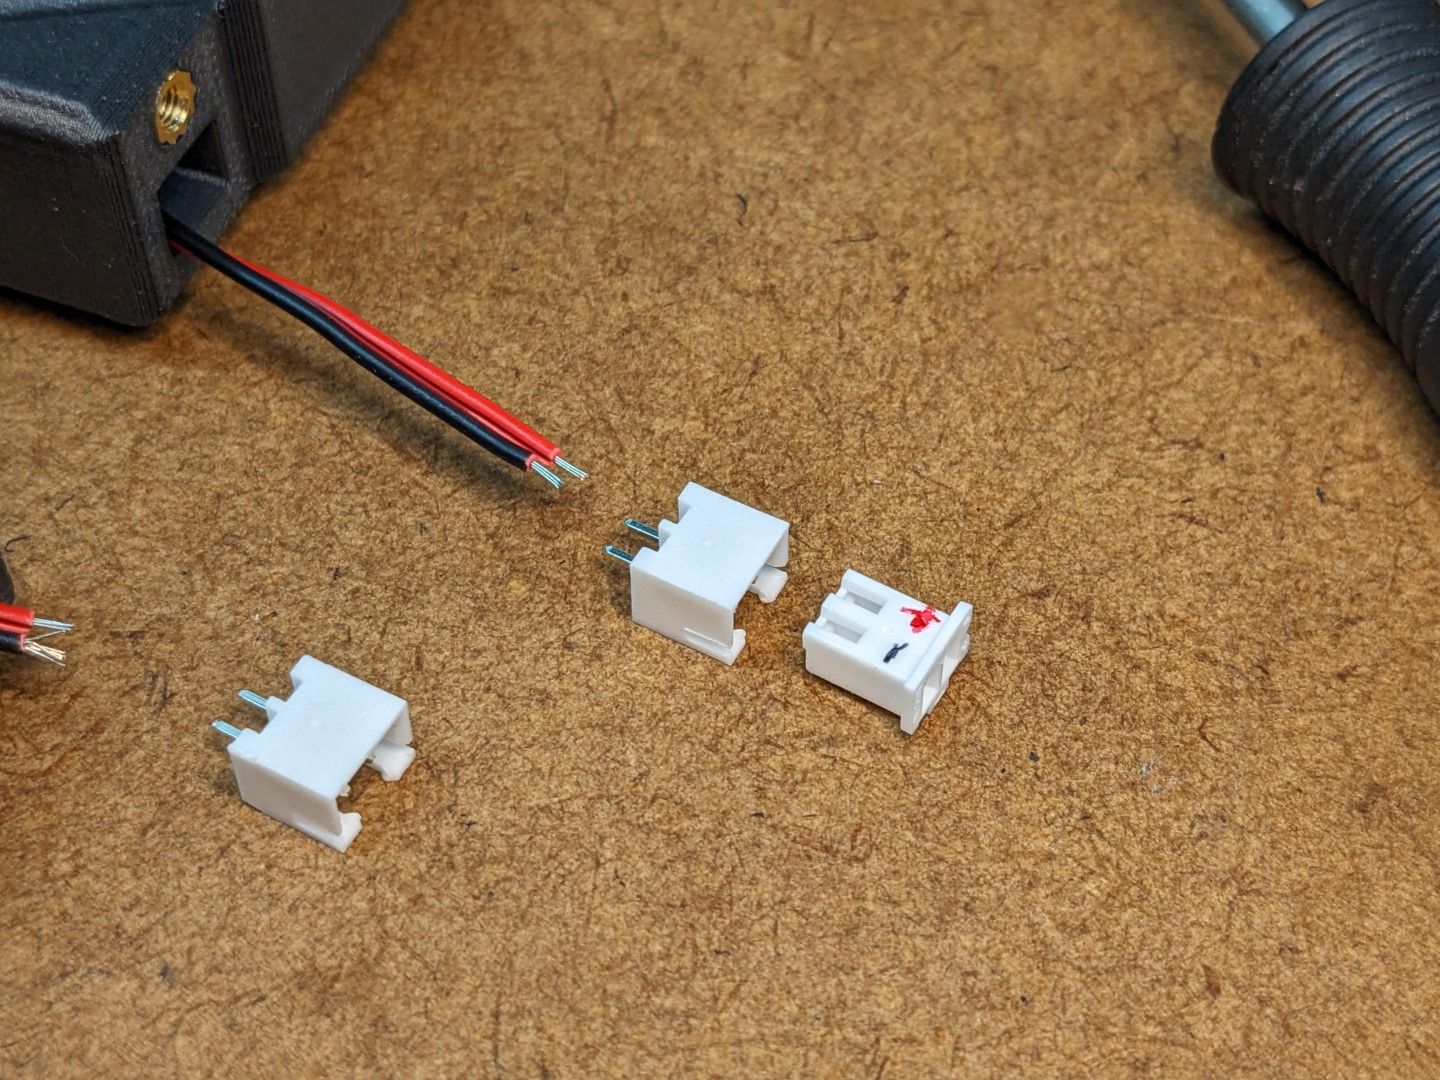
Solder on the JST connectors
Carefully press in the JSTs, e.g. use a vice or other tool that allows parallel pressing
 |  |  |  |  |
Final Fan Assembly
Start from the pressed in JST Connector an work your way along the cable channel. Use tweezers to push the cable where it needs to stay.
You can also use tweezers to keep the cable in place while you slide the fan into the housing
Check that everything fits perfectly
Insert the fan clamp….
…. and close the door 🤠
 |  |  |  |  |  |  |
Mount the babes
Install the mount brackets if you want
Mount the EVENmore to your frame
… and attach the magnetic front parts.
 |  |  |  |  |
Finish-up the installation
Checkout the JST-Hub and Cable Clips to for your cable management.
Install your print bed,
… grab a drink 🍹 and enjoy your work 😎 !
 |  |  |  |