
Over Engineered Magnetic Dry Erase (expo) Marker Holder (works on flat AND curved surfaces)
We calculate the final price from your selected file. You review and accept it before payment.
Saved on this device.

"Print in place", "living hinge", "captive magnets", oh my! This is a true buzzword-driven-design 😀
- Rating
- 5 / 5
- Likes
- 14
- Downloads
- 41
- Makes
- 1
- Views
- 1,234
- Reviews
- 1
Updated at source:
Model information
- Source
- Printables
- Category
- Organizers
- License
- Creative Commons — Attribution — Noncommercial
Works on Curved Surfaces
Print In Place living hinge magnets will “conform” to curved surfaces of many different diameters.
Required hardware
3 magnets - The model has holes for 3/8in x 1/8in magnets which you can get from the link below for account 77 cents US, each.
https://www.kjmagnetics.com/proddetail.asp?prod=D62-N52&cat=2
I am including the F360 model with params for the magnet sizes if you want to use a different size.
Over-engineered? Why?
It started simply enough. We have a small magnetic whiteboard on our fridge for grocery lists and such and we needed a way to have a dry-erase marker close by. I thought this would be a great excuse to try my hand at designing something with captive magnets.
So I naively modeled up a simple holder with a straight back and three captive magnets. One in the center, and 2 at either end. I printed it and proudly admired my work, only to realize seconds later, that our fridge has a slight curve to it. So only 2 of the magnets were ever in contact with the fridge so it didn't have enough “stick” to be reliable.
Back to the drawing board. I made a new version where I (once again naively) moved all the magnets close to the center. I figured since the curve was so slight that it would be good enough. And it was. It stuck on there nicely. However, when I added and retrieved the marker a few times, I quickly realized that the magnets in the center were acting like an axel, so the thing just kept spinning around 😀
So after about 3 showers (this is where all my great ideas hit me), I settled on the idea of encapsulating the outer magnets in a living hinge so they have to move forward and backward to match the radius of whatever it was stuck to. And I have to say, it was a joy to model and I think it works really nicely.
Adding the magnets
If you use the gcode provided here, the printer should pause at a z height of 3.6mm, approximately 25 minutes after the print starts.
If you are slicing it yourself, you can add a color change at 3.6mm, right before the bridges are added above the magnet compartments. This will add an M600 command to the gcode, which is a Filament Change command.
That will work just fine, but if you want to avoid the hassle of unloading and reloading the filament, you can:
- Open the gcode up in a text editor,
- Search for
M600(there may be more than one instance, but find the one on its own line without a semicolon in front). - Add a semicolon character (
;) in front to “comment out” this line - Right below this line, add the following 3 lines:
G1 X10.000 Y200.000 E0; move the printer bed forwardM1; pauseM105; continue
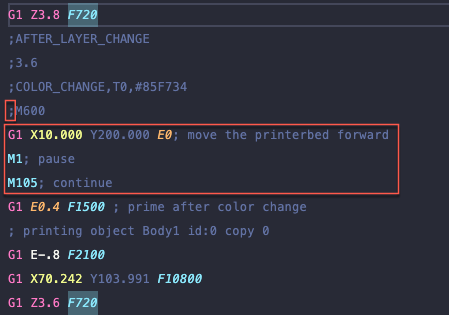
This should work on most printers
Also, I found that changing the bridging angle to 45 degrees will keep the underside a little neater.
Optional - there is a bit of tolerance around the magnets. You may hear a slight “rattle” in the finished print. If this sort of thing bothers you, just add a tiny drop of superglue into the three magnet compartments before dropping in the magnets.
Happy printing and please share your makes, feedback, and remixes!