
Creality K1 270° Corner Mounted Removable Door Hinges w/ Air Gap Filler
We calculate the final price from your selected file. You review and accept it before payment.
Saved on this device.

270° Removable Door Hinges for Creality K1. Engineered to be physically unable to warp, sag, or deform over time.
- Rating
- 4.688 / 5
- Likes
- 218
- Downloads
- 1,154
- Makes
- 19
- Views
- 8,016
- Reviews
- 16
Updated at source:
Model information
- Source
- Printables
- Category
- Creality Parts & Upgrades
- License
- Creative Commons — Attribution — Noncommercial — Share Alike
Note: Does NOT work on the K1 Max.
Design Summary:
The Creality K1 is an excellent printer, but Creality's choice of door hinges is questionable. A partially opened glass door simply seems like an accident waiting to happen. I looked at other available door hinge designs, but they had a common trait of mounting the frame hinge solely on the right side panel. While it works, side mounted hinges will always have a risk of warp and deformation over time. Or deflection if swinging the door hard. I wanted my hinges to keep the door perfectly aligned and centered, with no risk of deflection.
The solution was to have the hinges corner mounted. The solution I eventually went with was to grip the frame from the front, and have it wrap around the side.

Due to Creality's Door design, the door also left an air gap on the left side, which served no purpose, and can be detrimental when trying to keep a higher chamber temperature for printing certain materials. So I removed the decorative glossy plastic strip, and replace it with an air gap filler. Since there was now an available gap on the front door, it was a prefect way to solve the two problems together.

The result is a gap filler that is used as additional support for the door hinges. Because the gap filler extends to the bottom of the frame, there is no way for it to move up or down, and as a result the door can no longer sag over time.

Lastly, I needed the door to be removable, so I added covers for the exposed screws when the door is not in place. The covers also prevent accidentally lifting the door when the door is installed.

I've used various prototypes of these hinges (printed in ASA) for hundreds of hours so far, and even with aggressive acceleration values, and sometimes even with chamber heating up to 60°C, the hinges show no signs of any deflection, with the door siting completely centered on the frame.
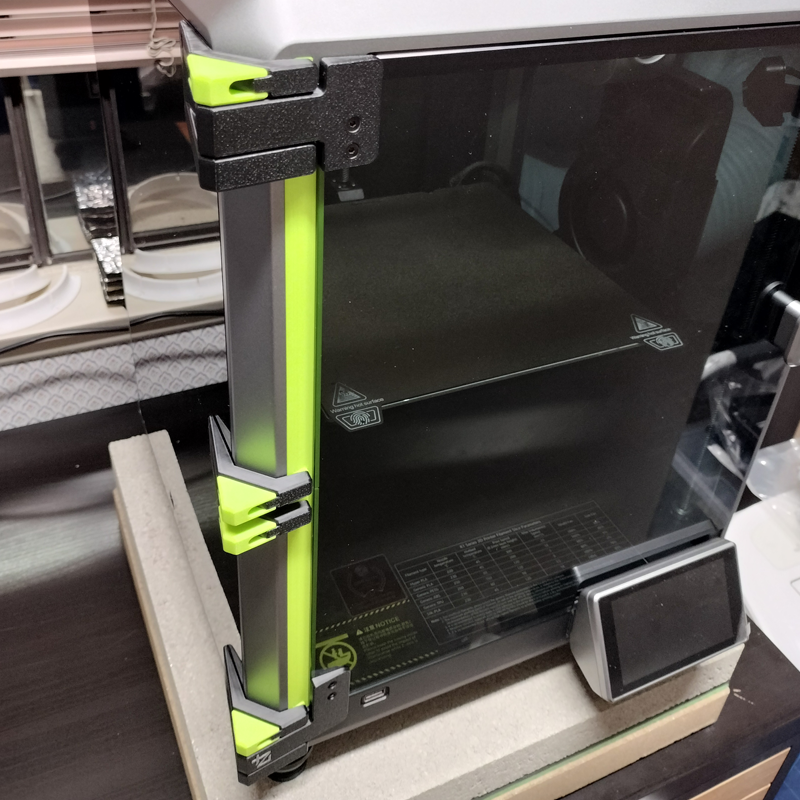
Additional Notes: The middle “fake” hinge is there to hold the gap filler in place. Due to occasionally removing the bed, it may at some point hit and damage the gap filler. Removing the middle fake hinge lets you take off the 2 middle sections of the gap filler to replace them, so you don't need to take the actual hinges off.
Materials Required:
- (5) M3x8 Flat Head Screws (for screwing hinges into frame)
- (4) M3x10 Flat Head Screws (for door)
- (4) M3 Nuts (for door)
- (2) M4x30 Flat Head Screws (for connecting frame hinge to door hinge)
- (2) M4 Nuts (for connecting frame hinge to door hinge)

Print Orientation:
The STL files of the parts should be in the correct print orientation. The parts should look something like this if you were to print them all on one plate:

Additional notes:
Join the D3vil Design Discord for more fun projects to do with your 3D printers!