
Ender 3 V3 KE and SE automatic nozzle cleaning brush.
We calculate the final price from your selected file. You review and accept it before payment.
Saved on this device.

With this mod for your Ender 3 V3 KE, you will be able to automatically clean the nozzle before each print.
- Rating
- 4.85 / 5
- Likes
- 846
- Downloads
- 2,424
- Makes
- 21
- Views
- 28,150
- Reviews
- 20
Updated at source:
Model information
- Source
- Printables
- Category
- Creality Parts & Upgrades
- License
- Creative Commons — Attribution — Noncommercial — Share Alike
With this holder for a cleaning brush, you can automate the cleaning system of the Ender 3 V3 KE and Ender 3 V3 SE before each print, achieving a perfect first layer.
It's important to modify the startup GCODE according to the brush's requirements. In my case, I had to modify both the Z value (brush separation) and the X value (extruder travel for cleaning), so you will need to consider these values depending on the brush you use.
In my case, the brush head was larger than the opening, so I decided to remove the inner edge with pliers to make it fit seamlessly. I could have designed it longer, but this works well, and it is securely fixed with hot glue.
It seems that the Ender 3 V3 SE has also been upgraded with the same bed support used by the Ender 3 V3 KE, so this mod should work if the original to which this Remix belongs doesn't fit well.
INSTALLATION INSTRUCTIONS
PREPARATION
You can download either of the two formats I provide in the mod. On one hand, you'll have the STL that you can import into your preferred slicing software, or on the other hand, the 3MF.
The 3MF file will come already prepared with the necessary supports for printing, as they are required to create the piece correctly. If you use the STL and not the 3MF, you can refer to the attached image to know exactly where to place the supports.

Once printed, you'll need to cut the brush handle to the appropriate height. Depending on the length of the brush head, it may or may not fit inside the holder. To secure it better, you can use any type of glue; in my case, I used hot glue for easy removal if necessary (it can be easily removed with alcohol).
ASSEMBLING THE PARTS
- Turn off the printer and make sure the bed is cool; you could burn yourself if you've just finished a print.
- Place the holder along with the brush right in front, on the X-axis.

Tolerances are adjusted for a perfect fit. If this is not the case, make sure to configure them correctly in your slicing software.
MODIFICATION OF THE INITIAL GCODE
It is important to modify the Z value to prevent the fans from touching the metal bristles; otherwise, it could damage the plastic.
It is important to modify the X value so that the travel is complete. Additionally, depending on the position of the mod, the extruder and nozzle may not reach or may overshoot.
The GCODE lines that have been included and optimized are marked in red, as shown in the attached image. Below, you can find the GCODE for you to copy and paste into your startup GCODE. However, remember to calculate the values for Z and X to ensure optimal cleaning.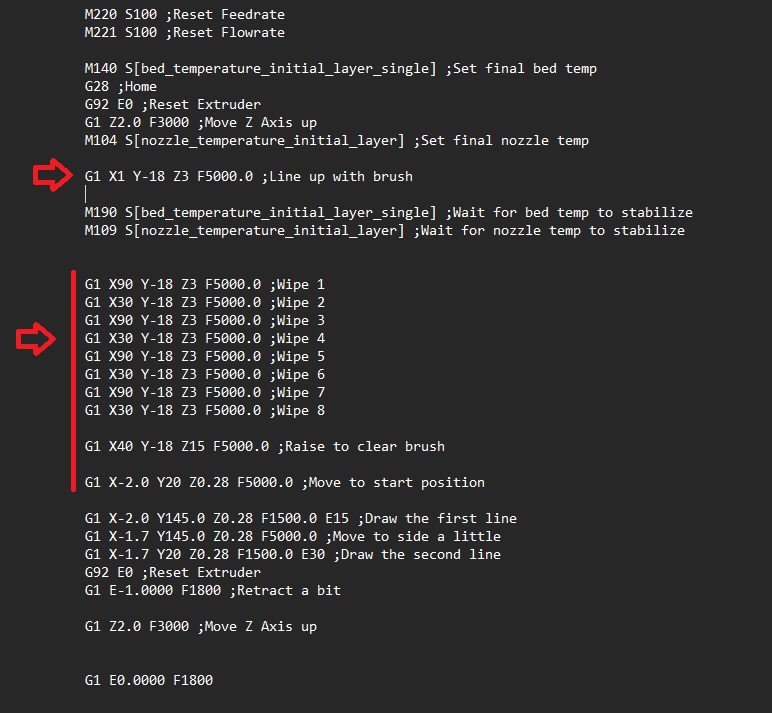
M220 S100 ;Reset Feedrate
M221 S100 ;Reset Flowrate M140 S[bed_temperature_initial_layer_single] ;Set final bed temp
G28 ;Home
G92 E0 ;Reset Extruder
G1 Z2.0 F3000 ;Move Z Axis up
M104 S[nozzle_temperature_initial_layer] ;Set final nozzle temp
G1 X1 Y-18 Z3 F5000.0 ;Line up with brush
M190 S[bed_temperature_initial_layer_single] ;Wait for bed temp to stabilize
M109 S[nozzle_temperature_initial_layer] ;Wait for nozzle temp to stabilize
G1 X90 Y-18 Z3 F5000.0 ;Wipe 1
G1 X30 Y-18 Z3 F5000.0 ;Wipe 2
G1 X90 Y-18 Z3 F5000.0 ;Wipe 3
G1 X30 Y-18 Z3 F5000.0 ;Wipe 4
G1 X90 Y-18 Z3 F5000.0 ;Wipe 5
G1 X30 Y-18 Z3 F5000.0 ;Wipe 6
G1 X90 Y-18 Z3 F5000.0 ;Wipe 7
G1 X30 Y-18 Z3 F5000.0 ;Wipe 8
G1 X40 Y-18 Z15 F5000.0 ;Raise to clear brush
G1 X-2.0 Y20 Z0.28 F5000.0 ;Move to start position
G1 X-2.0 Y145.0 Z0.28 F1500.0 E15 ;Draw the first line
G1 X-1.7 Y145.0 Z0.28 F5000.0 ;Move to side a little
G1 X-1.7 Y20 Z0.28 F1500.0 E30 ;Draw the second line
G92 E0 ;Reset Extruder
G1 E-1.0000 F1800 ;Retract a bit
G1 Z2.0 F3000 ;Move Z Axis up
G1 E0.0000 F1800
Run a test with the new startup GCODE to see how it works. If you have Klipper with Fluidd or Mainsail, you can add the GCODE commands directly to the console to visualize the movements and check that they are well adjusted.