
1 / 3
CR Touch Zero Y Offset with Inserts and more screw space.
Order a print of this model
We calculate the final price from your selected file. You review and accept it before payment.
Saved on this device.

The original model does not use inserts, which is why I created this model.
- Rating
- 0 / 5
- Likes
- 1
- Downloads
- 60
- Makes
- 0
- Views
- 395
- Reviews
- 0
Updated at source:
Model information
- Source
- Printables
- Category
- Creality Parts & Upgrades
- License
- Creative Commons — Attribution — Noncommercial
Most of the information about the printer setup can be found on the original model page:
https://www.printables.com/model/438224-x45-sprite-cr-touch-probe-zero-y-offset-mount-v11-
Not every hole should have a threaded insert. Only the CR Touch holder and the ribbon holder have the correct sizes. I included the step file, so feel free to adjust it to your liking.
What you need for this model:
- M3 inserts, 5.7mm x 4.6mm, mine look like this:
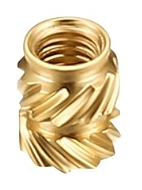
- A new holder for the ribbon where M3 screws fit through. I do not have M2 inserts, so I used M3 ones for the ribbon holder. The original creality holder uses M2 screws/inserts, but they will not hold. This ribbon holder works: https://www.printables.com/model/449608-sleek-sprite-extruder-ribbon-cable-strain-relief
Some Recommendations:
- First prepare the inserts, before disassembling the extruder, and check that everything works as expected.
- I had quite a bit of problems designing the holes/inserting the threaded inserts correctly, this guide might be helpful: https://hackaday.com/2019/02/28/threading-3d-printed-parts-how-to-use-heat-set-inserts/
- You can print the entire model without supports, orientation should be correct.