1 / 2
one key keyboard
Zamów wydruk tego modelu
Obliczymy ostateczną cenę na podstawie wybranego pliku. Sprawdzisz ją i zaakceptujesz przed płatnością.
Zapisane na tym urządzeniu.

turn your esp32 s3 into a singe key keyboard
- Ocena
- 0 / 5
- Polubienia
- 9
- Pobrania
- 42
- Wydruki
- 0
- Wyświetlenia
- 580
- Oceny
- 0
Aktualizacja u źródła:
Informacje o modelu
- Źródło
- Printables
- Kategoria
- Computers
- Licencja
- Creative Commons — Attribution — Noncommercial — Share Alike
SzczegółyPliki (2)Wydruki i komentarze (Wydruki: 0) (Komentarze: 0)Remiksy (0)Kolekcje (11)Powiązane
Have you ever wanted a single key to fill all of your computing needs?
Well look no future with out innovative one key design .
have unmatched efficiency in your office job.
why press hundreds of keys when you could just press one.
Installation Instructions
- Install Arduino IDE if you haven't already
- Add ESP32 board support to Arduino IDE:
- Go to File > Preferences
- Add this URL to the "Additional Boards Manager URLs" field: https://raw.githubusercontent.com/espressif/arduino-esp32/gh-pages/package_esp32_index.json
- Go to Tools > Board > Boards Manager and install “ESP32”
- Select the correct board: Tools > Board > ESP32 Arduino > ESP32S3 Dev Module
- Set USB Mode to "USB-OTG" or "Hardware CDC and JTAG"
- Upload the sketch
Required libraries
- USB
- USBHIDKeyboard
Essential Hardware:
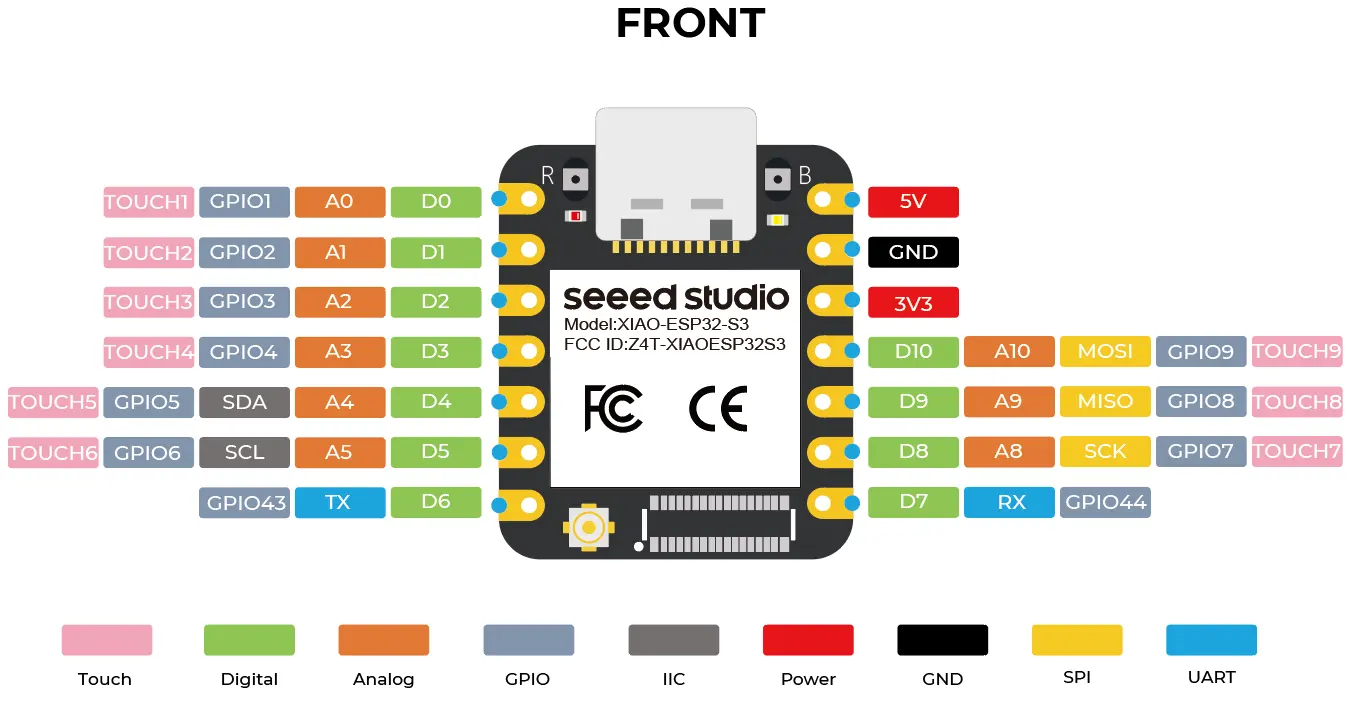
Seeed Studio XIAO ESP32-S3 board
- The specific microcontroller we've been working with
Keyboard switch
- Any momentary push button or mechanical keyboard switch
- Cherry MX, Kailh, or similar keyboard switches work well
USB-C cable
- Data-capable (not just charging) cable to connect the ESP32-S3 to your computer
Wire
- 2 pieces of wire to connect the switch to the board
- Solid core or stranded wire, 22-28 AWG recommended
Soldering equipment (for permanent installation)
- Soldering iron
- Solder
- Flux (optional but helpful)
- Helping hands or PCB holder (optional)
Hardware Setup
- Connect your keyboard switch to the ESP32-S3:
- Connect one terminal of the switch to gpio5
- Connect the other terminal to GND (ground)