
Creality Falcon2 Pro - Laser Head Alignment Tilt Fix (make it cut perpendicular!)
Obliczymy ostateczną cenę na podstawie wybranego pliku. Sprawdzisz ją i zaakceptujesz przed płatnością.
Zapisane na tym urządzeniu.

Creality Falcon2 Pro - Laser Head Alignment Tilt Fix (make it cut perpendicular!)
- Ocena
- 0 / 5
- Polubienia
- 5
- Pobrania
- 34
- Wydruki
- 0
- Wyświetlenia
- 578
- Oceny
- 0
Aktualizacja u źródła:
Informacje o modelu
- Źródło
- Printables
- Kategoria
- Tools
- Licencja
- Creative Commons — Attribution — Noncommercial — Share Alike
These are instructions as part of my Falcon2 collection. The model is just a placeholder.
I needed to ensure my laser head is perpendicular to the surface where my material will sit since I plan to cut pieces of wood to inset in a design in the future and cutting non-square edges would be an issue with a tight fit, minimal seam. You can see below how much tilt there was which was removed with added shims to the lower carriage bolt to shift the laser head.
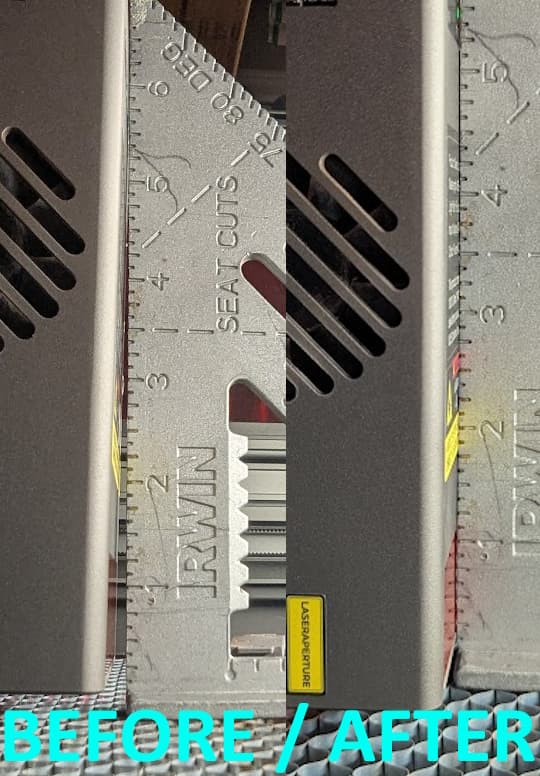
If you have this tilt like I do in the above image, you will be adding shims to the right of the red washer on the bolt to push the bottom out once secure. You would need to alter the top bolt if your tilt was out instead of in.

Below is the bolt removed from the back bottom of the carriage using a 3mm allen wrench. In the end, I added (7) 5mm x 8mm x 0.1mm shims(also called thin washers) between the bearing and the stock washer. Your adjustment may be different. I guessed and started with .6mm of shims and had to add one more .1mm shim for (7) .1mm shims total to bring the laser head perpendicular to the bed.

Ordered this shim set: https://www.aliexpress.us/item/3256807619219859.html
You can get .1mm, .2mm, .3mm shims, etc. I opted for 0.1mm shims to best dial in my situation.
This is the pack I bought:
https://www.aliexpress.us/item/3256807619219859.html
While working on this, if your carriage is loose on the gantry(try moving it forward and back), you’ll need to also need to rotate the eccentric nut slightly to tighten up the pulley against the rail to remove slop before tightening the bolt. https://www.youtube.com/watch?v=ZuwIxI3129Q The eccentric nut is a tight fit in the carriage. Excess rotation may back this out of it’s hole so when you tighten your bolt, eyeball that nut to ensure it’s flush with the carriage plate before putting your laser unit back in place.


Hope this helps!