
Rowenta Va200 fan oscillation axis replacement
Obliczymy ostateczną cenę na podstawie wybranego pliku. Sprawdzisz ją i zaakceptujesz przed płatnością.
Zapisane na tym urządzeniu.

A replacement for a Rowenta fan Oscillation axis.
- Ocena
- 0 / 5
- Polubienia
- 7
- Pobrania
- 38
- Wydruki
- 0
- Wyświetlenia
- 564
- Oceny
- 0
Aktualizacja u źródła:
Informacje o modelu
- Źródło
- Printables
- Kategoria
- Other House Equipment
- Licencja
- Creative Commons — Attribution — Noncommercial — Share Alike
We have a fan which oscillation axis broke. I think that is because of fatigue https://en.wikipedia.org/wiki/Fatigue_(material). The place where it broke does have has a change of section, which is prone to fatigue breaks. Another reason could be mechanical blockage, so It broke in the weaker part. A kind of mechanical fuse should be added to avoid uncontrolled damage.
This model is made in china, and probably is rebranded, so is possible that your model has the same axle or very similar.
See that it broke where the inner diameter, changes for the screw.

Dimensions
The dimensions are the ones in the table, for ease of printing, and make more robust, we have changed axleInDiam, to be the same diameter along the part, and pulleys outer diameters to be the same as the main axle, to reduce the need of supports.
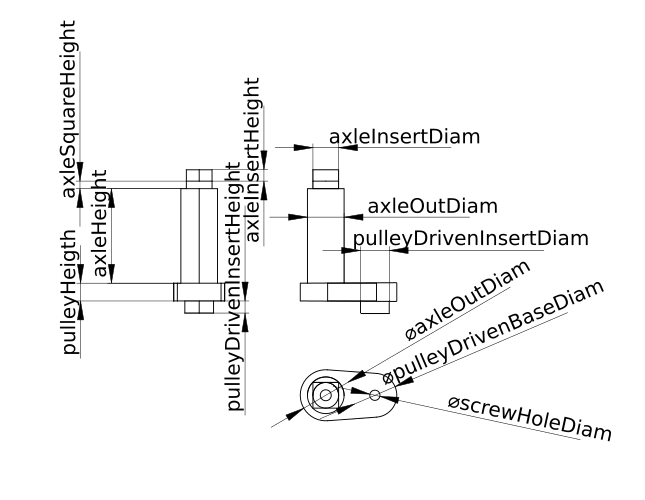
| parameter | description | original | printing |
|---|---|---|---|
| tol | Tolerance | 0,1 | 0,1 |
| screwHoleDiam | Diameter for screws | 2,8 | 2,8 |
| axleOutDiam | Outer diameter | 9,8 | 9,8 |
| axleInDiam | Inner diameter | 5,3 | 2,8 |
| axleHeight | Axle height | 25 | 25 |
| axleInsertDiam | Insert in wheel diameter | 6,9 | 6,9 |
| axleSquareHeight | Height of square section | 2 | 2 |
| axleInsertHeight | Height of insert in wheel | 3 | 3 |
| pulleyCentersDst | Dist between center in pulley | 13 | 13 |
| pulleyHeigth | Pulley height | 4,7 | 4,7 |
| pulleyAxleDiam | Pulley diameter at Axle | 13,8 | 9,8 |
| pulleyDrivenBaseDiam | Pulley diameter at driven axis | 11,7 | 9,8 |
| pulleyDrivenInsertDiam | Pulley diameter in driven insert | 7,7 | 7,7 |
| pulleyDrivenInsertHeight | Pulley height of insert | 3,2 | 3,2 |
Original part modifications
We modify inner hole, to avoid section changes, and pulley diameters to be the same of the axle for ease of printing.

How to print
Since it has radial forces it is better print as in the last picture, so the layers are not in the axial direction. Use a wall thickness about 2 or 3 mm to give the part robustness, Apply a high infill density about 50% and ensure that the shell and infill are glued with a high infill overlap percentage
Result
And here is the result in action
Annex
Here is an explanation of how this oscillation mechanism works.
About the material to print I have printed in PLA, and works pretty well. This guy has made some tests with different materials
Acknowledge
Cover photo based in Jared Owen simulations