
Bosch IXO Bit Holder
Obliczymy ostateczną cenę na podstawie wybranego pliku. Sprawdzisz ją i zaakceptujesz przed płatnością.
Zapisane na tym urządzeniu.

An alternative nose cap for the Bosh IXO that allows easy storage and access to 8 screwdriver bits.
- Ocena
- 5 / 5
- Polubienia
- 18
- Pobrania
- 73
- Wydruki
- 2
- Wyświetlenia
- 762
- Oceny
- 2
Aktualizacja u źródła:
Informacje o modelu
- Źródło
- Printables
- Kategoria
- Tools
- Licencja
- Creative Commons — Attribution — Share Alike
An alternative nose cap for the Bosh IXO that allows easy storage and access to 8 screwdriver bits.
I really find this little electric screwdriver useful, but wished it had some built in bit storage. This part replaces the detachable nose and adds screwdriver bit storage.
TLDR
Print with supports > Remove supports > Cut tabs (pink below) > Fit magnets > Fit to you IXO
Printing & Assembly
This did end up a bit more of a tricky print than I expected- there are a lot of short retractions for small towers. Watch out for this.
You will also need 8x off 3mm diameter by 2mm deep magnets.
Add supports to the green surfaces below. I used organic supports, the regular kind were difficult to remove and produced tall thin towers.
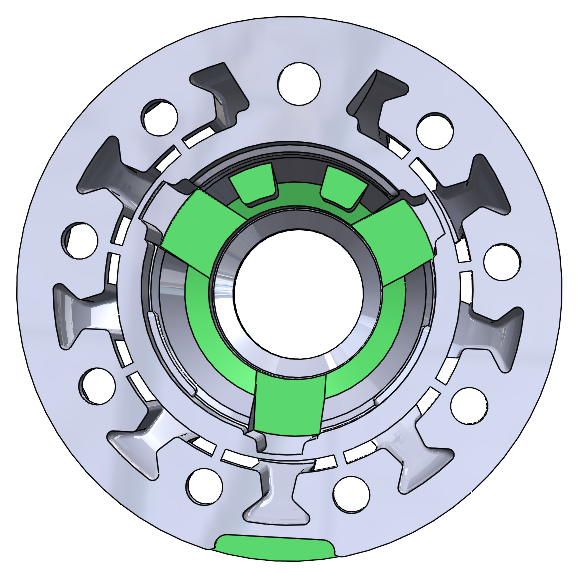
Once printed, you need to snip the little tags securing the small bottom surfaces together (highlighted below), or you will struggle to fit it onto the screwdriver.

I printed mine with the wide face on the print bed, and did a colour change after 1.8mm to add a silver stripe to match the IXO. It looks like it will print the other way up with no supports, but I imagine surface finish will take a hit. I've not tried though.
I've uploaded my print file for PLA including colour change and supports (in the 3MF file). I suggest you use this as a starting point andmodify to suit your preferred filament. My hot end runs a little hotter than the standard Prusa MK3.
Fitting the magnets - very tight fit. I found the best way was to push two magnets all the way into each hole from the back, then insert a screwdriver bit to push them level from the inside of the hex hole, then remove the second magnet from the back.
It's a very tight ‘click’ fit onto the IXO, but I have included a small screwdriver lip to make removal a bit easier if you want to swap back.
Happy Printing!
You can check out my other models here: https://www.printables.com/social/194731-docweebl/models