
Rack Environment Monitoring Bracket
Obliczymy ostateczną cenę na podstawie wybranego pliku. Sprawdzisz ją i zaakceptujesz przed płatnością.
Zapisane na tym urządzeniu.

That holds 16x2 LCD, HTU21 (Temp&Hum) and ESP32-POE from Olimex.
- Ocena
- 0 / 5
- Polubienia
- 5
- Pobrania
- 19
- Wydruki
- 1
- Wyświetlenia
- 454
- Oceny
- 0
Aktualizacja u źródła:
Informacje o modelu
- Źródło
- Printables
- Kategoria
- Electronics
- Licencja
- Creative Commons — Attribution — Share Alike
TMEP
I have installed TMEP to our local web server as a super simple frontend for monitoring.
https://github.com/MultiTricker/TMEP/releases
But you can also use (more polished and developed) web version at: https://tmep.cz/.
This manual is also available there: https://wiki.tmep.cz/doku.php?id=zarizeni:olimex_esp32-poe
Hardware
Olimex ESP32-POE
https://www.olimex.com/Products/IoT/ESP32/ESP32-POE/open-source-hardware
Wi-Fi is always meh, so I really like this with POE functionality!

HTU21D
Temperature and humidity at one small I2C board.

Build
3D printed bracket and a few computer screws (use brown paper insulated washers for ESP board!)
<img src="https://media.printables.com/media/prints/414827/rich_content/5f817c1e-a4d3-4a06-9f8b-65659169d985/image.png#%7B%22uuid%22%3A%22de41921f-d37a-42fa-abda-2a9b35af9be7%22%2C%22w%22%3A1069%2C%22h%22%3A594%7D" alt="A picture containing electronics

Description automatically generated">
Schematic
<img src="https://media.printables.com/media/prints/414827/rich_content/2585f2b6-4f65-482b-b866-ffff50f16f76/image.png#%7B%22uuid%22%3A%22910cd6db-c6f1-411a-a0d9-b29ac1ae5370%22%2C%22w%22%3A666%2C%22h%22%3A607%7D" alt="A close-up of a circuit board

Description automatically generated with medium confidence">
ESPEasy
https://github.com/letscontrolit/ESPEasy/releases
Just download and flash the correct BIN file via micro-USB and do the initial setup via the serial console
ESP_Easy_mega_20221224_display_ESP32_4M316k_ETH.bin
Note:
ESP_Easy_mega_20221224_display_ESP32_4M316k_ETH – works fine
ESP_Easy_mega_20230304_display_ESP32_4M316k_ETH – shows "nan" instead of temp/hum
ESP_Easy_mega_20230306_display_ESP32_4M316k_ETH – shows "nan" instead of temp/hum
Useful links:
- https://www.letscontrolit.com/wiki/index.php/Tutorial_Rules
- https://espeasy.readthedocs.io/en/latest/Rules/Rules.html
- https://espeasy.readthedocs.io/en/latest/Reference/Command.html
- https://www.letscontrolit.com/wiki/index.php/EasyNotifications
Setup commands
Send those via serial console.
# Factory reset
Reset
Wifi (powered via USB it will connect to the wifi)
WifiSSID [YOUR_WIFI_NAME]
WifiKey [YOUR_WIFI_PASSWORD]
WifiConnect
Now you should be able to connect vias the Wi-Fi and do the rest of the setup.
Controllers
Set Generic HTTP controller where data will be sent

For tmep.cz set the parameters like this:
Hostname: [DomainForSendingValues].tmep.cz
Controller Publish: ?temp=[HTU#Temperature]&humV=[HTU#Humidity]
Hardware
Set the correct GPIO for I2C and Ethernet.


Devices
Add two devices. Environment sensor, and LCD2004 display. (You can use I2C Scanner under the Tools tab to get the correct addresses).
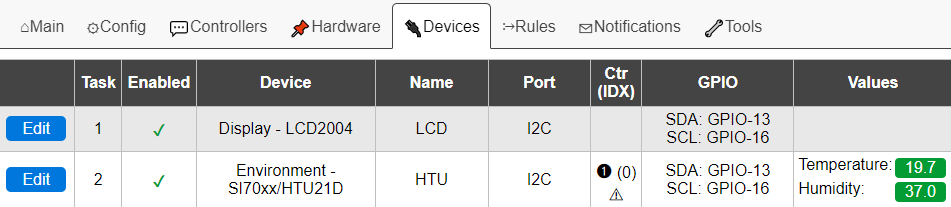
LCD
Only the correct I2C address is needed here as we will control what is shown later in the Rules.

HTU
Select the correct I2C address, output data „Temp / Hum“,
Interval is essential – how often data will be measured (send to the controller, rules triggered)

With Formula, you can do a basic calibration.

Tools → Advanced
(Only needed if you want e-mail notifications. I believe this can be set on https://tmep.cz also)
Enable Rules here
You can set up an NTP server also.

Notifications
Set up e-mail notifications

Just use standard values as for any SMTP

Rules
Here some magic s done.
The timer is used just for looping two screens on the display (Datetime, Temp, Hum / IP, MAC).
The last two functions are for triggering notifications.
The code is pretty self-explanatory.
// https://www.letscontrolit.com/wiki/index.php/Tutorial_Rules
// https://espeasy.readthedocs.io/en/latest/Rules/Rules.html
// https://espeasy.readthedocs.io/en/latest/Reference/Command.html
// http://<espeasyip>/control?cmd=<command>
On System#Boot Do
LoopTimerSet,1,10 // LoopTimerSet,<timernr>,<timeInSeconds>
Endon
On Rules#Timer=1 Do // When Timer1 expires, do... => every 10s
If [int#1]=0
Let,1,1
LCDCmd,clear
LCD,1,1,"{substring:0:10:%lcltime%} %systm_hm%"
LCD,2,1,"T:[HTU#Temperature]{D}C H:[HTU#Humidity]%"
Else
Let,1,0
LCDCmd,clear
LCD,1,1,"IP:%ip%"
// Shorter the MAC address A8:03:2A:F8:AB:EC -> A8032AF8ABEC
LCD,2,1,"MAC:{substring:0:2:"%mac%"}{substring:3:5:"%mac%"}{substring:6:8:"%mac%"}{substring:9:11:"%mac%"}{substring:12:14:"%mac%"}{substring:15:17:"%mac%"}"
Endif
Endon
On [HTU#Temperature]>25 Do
Notify,1
Endon
On [HTU#Humidity]>40 Do
Notify,1
Endon