
Nextruder & MMU MULTI-MATERIAL GAMECHANGER IAF-Idler
We calculate the final price from your selected file. You review and accept it before payment.
Saved on this device.
IAF-Idler and Mainplate (Install And Forget). Works with ANY Filament (stiff and flex) WITHOUT re-adjustment
- Rating
- 5 / 5
- Likes
- 102
- Downloads
- 307
- Makes
- 6
- Views
- 2,622
- Reviews
- 4
Updated at source:
Model information
- Source
- Printables
- Category
- Prusa Parts & Upgrades
- License
- GNU General Public License v2.0
ULTIMATE GAMECHANGER FOR MULTIMATERIAL PRINTING!!
- After initial install and adjustment, the idler tension is now suitable to works with a extended range of filaments without any idler adjustment!
- Easy to print, 0.4mm nozzle, 0.15mm layer, no support needed. (0.15mm STRUCTURAL Preset)
- works with printer equipped hardware (idler springs and idler bearing). No special hardware or modifications needed. (e.g. Idler bearing, modified screws or different springs)
- Dont care about filament tips anymore
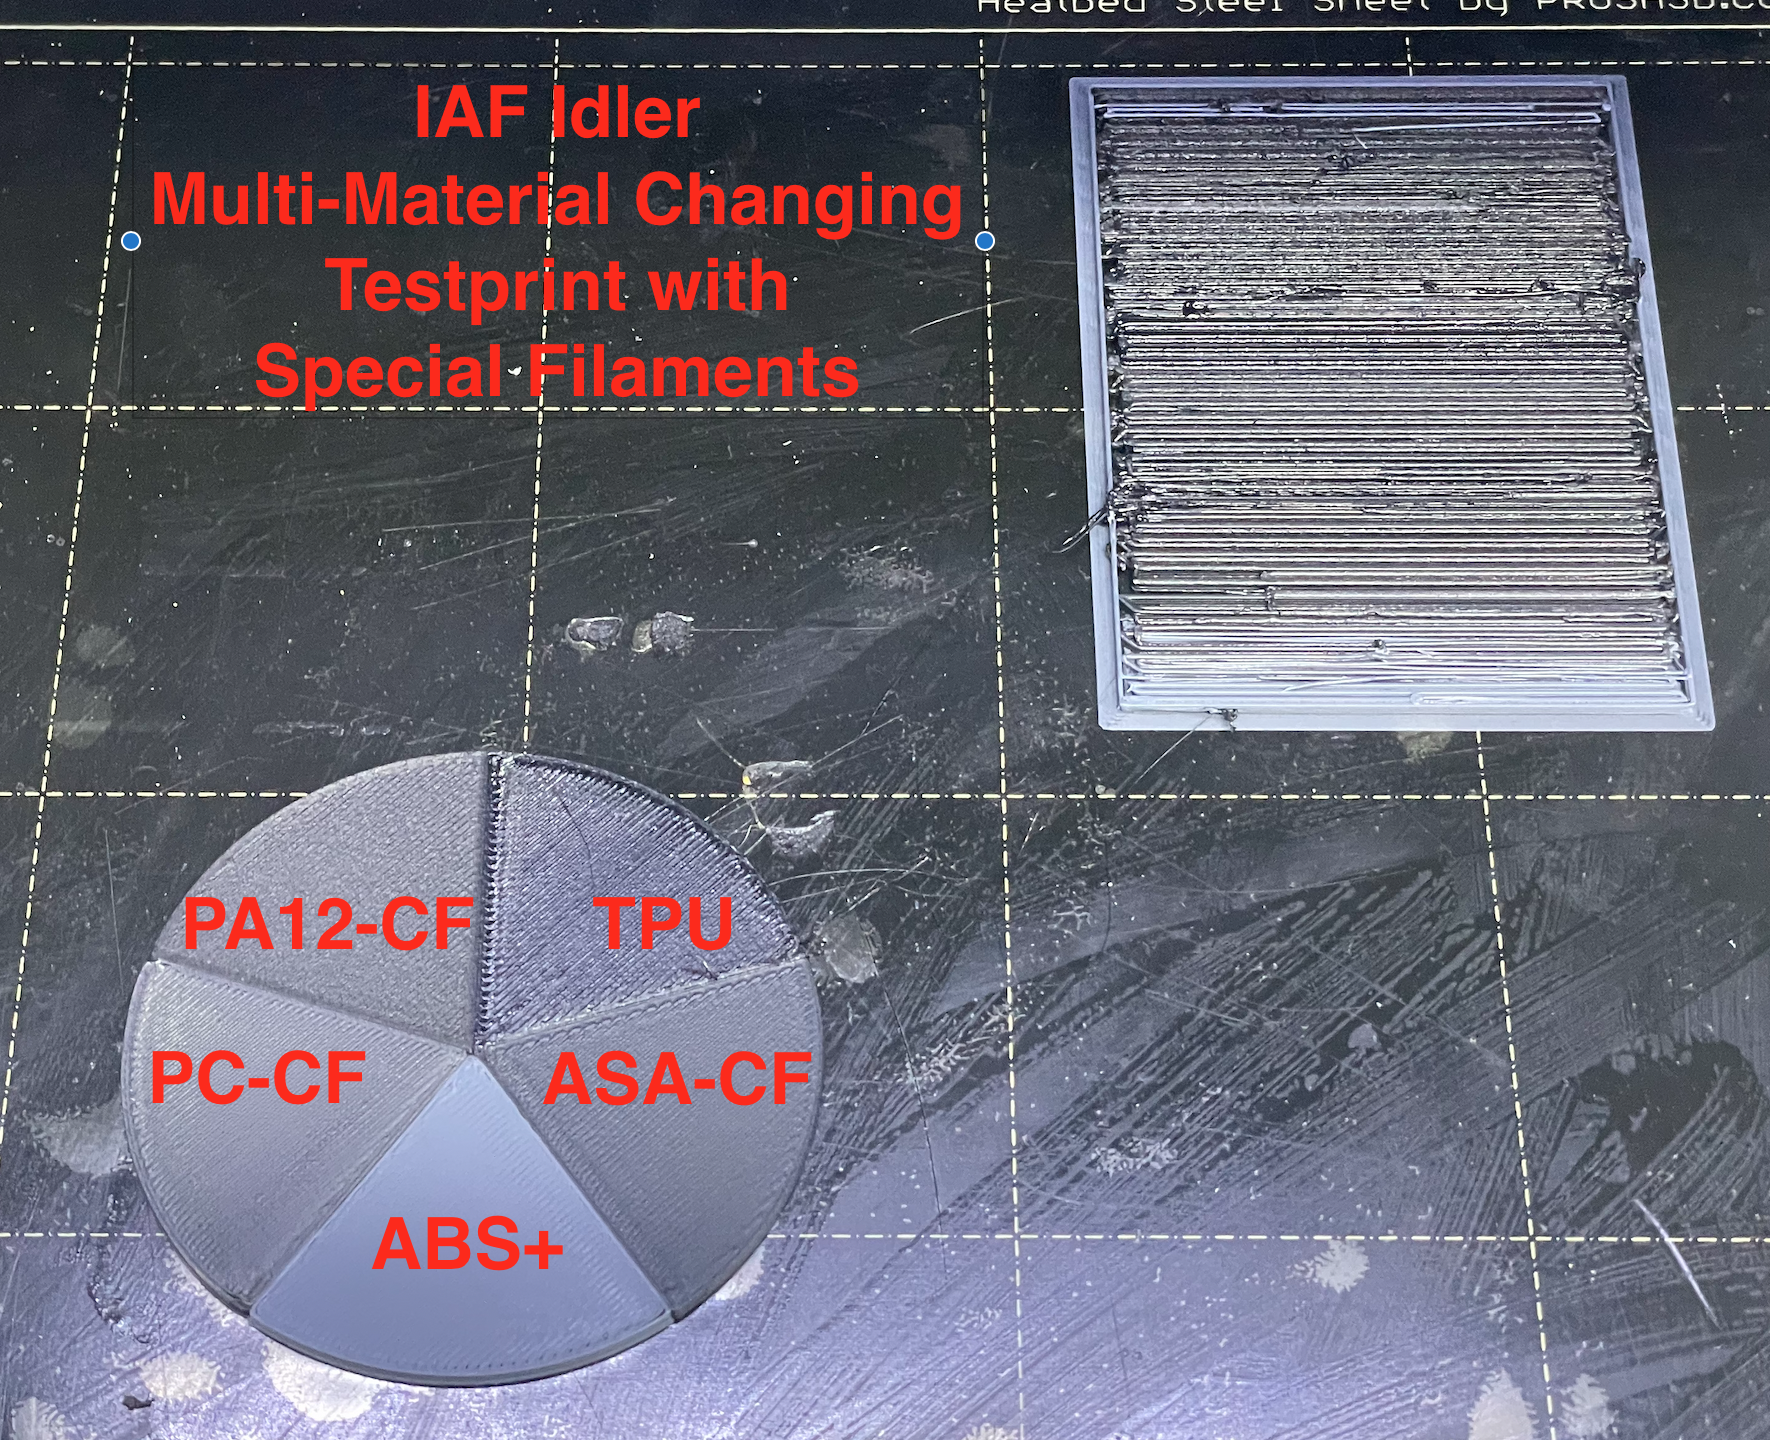
Multi-Material Testprint:
2-staged functionality:
The idlernut was added with a printed spring and also the shape is changed. This enalbles the idlernut to act as a separte lever, when the idler lever moves only a small way (like at flex filament).
1st Idler tension stage: (flex, compressable, weak or thin filament)
In 1st stage the idler nut is moving radial, so the idler tension by the two idler springs is only a fragment of the set idler tension. In this stage the idler screws itself acting as a lever and bends the idler springs.
Important: Screwguide of tis model needs to be used! (smaller outer dimensions)
2nd Idler tension stage: (normal, stiff and strong filaments)
If the idler is moving more than in the first stage, the idler nut changeing the movement from radial to axial to the idler screws. This applies the full idler spring tension to the Idler lever.
See the Idler function in action here:
Features:
- IAF (Install and forget) after initial installation, the extruder can safely handle stiff and thick filament as well as flexible resp. compressable material (tested with 1.1mm to 1.9mm)
- filament sensor calibration feature can be used with any material too (no hack or fix for sensor calibration needed, to get flexible material working)
- Decoupled Idler spring tension setting from filament sensor detection, which enables to increase idler tension to avoid extrution fail midprint.
- Easier filamentsenor magnet application and non-destructive magnet removing.
- Options for 3x1mm and 3x3mm available
- different Mainplate options
improved issue & failure behaviors:
- failed filament detection while loading to nozzle, espacially if diameter is slightly thinner, flexible or compressable material
- failed filament off-detection while unloading the filament to MMU (if idler tension is set too strong)
- Extrution stopping midprints, while filament was detected correctly. (idler tension too low)
- Grinded filement by the Pulley wheel due to too less idler tension.
- No extrution, when nozzle temperature is too low or if the previous filament used with the nozzle has higher value than the currently filament. For example, if previously PC or PA filament was used with 260°C+ and now trying to load PLA with 195°C nozzle temp or FLEX filament.
Auto Rewinder Spool support:
- Thanks to the possible higher tension settings, Auto-Rewinder Spools works now better with Nextruder without having filament grinding by the Nextruder Pully wheel.
- Remark: make your clutch as smooth as possible, remove any scars on the clutch and avoid that the rewinder release the tension suddenly with fewer revolutions.
The idler was even works safely to load/unload in mixed order of PC-CF Blend, ASA-CF, PA-CF, ABS and TPU with only 230°C nozzle temperature
The Idler even can deal with nozzle cleaning filament, which in my case was from Ziro and is very flexible and has only 1.62mm (+/- 0.4mm)
Aside a lot of standard filaments like PLA (normal/matte/silk) PETG, ABS/ASA and also a very bridle ASA with metallic silk effect, also I could also positively tested BVOH, PP, PC, PC-ABS, HIPS, PA12-CF and PA12 filaments.
Assembly & remarks: (in Progress)
You can follow the Prusa assembly guide together with the assembly remarks below.
https://help.prusa3d.com/guide/9a-mk4-s-mk3-9-s-nextruder-mod_683106#684159
Optional, but suggested: CA-glue for Mainplate assembly and swivel assembly for better stability.
INITIAL IDLER SETTINGS AND CALIBRATION:
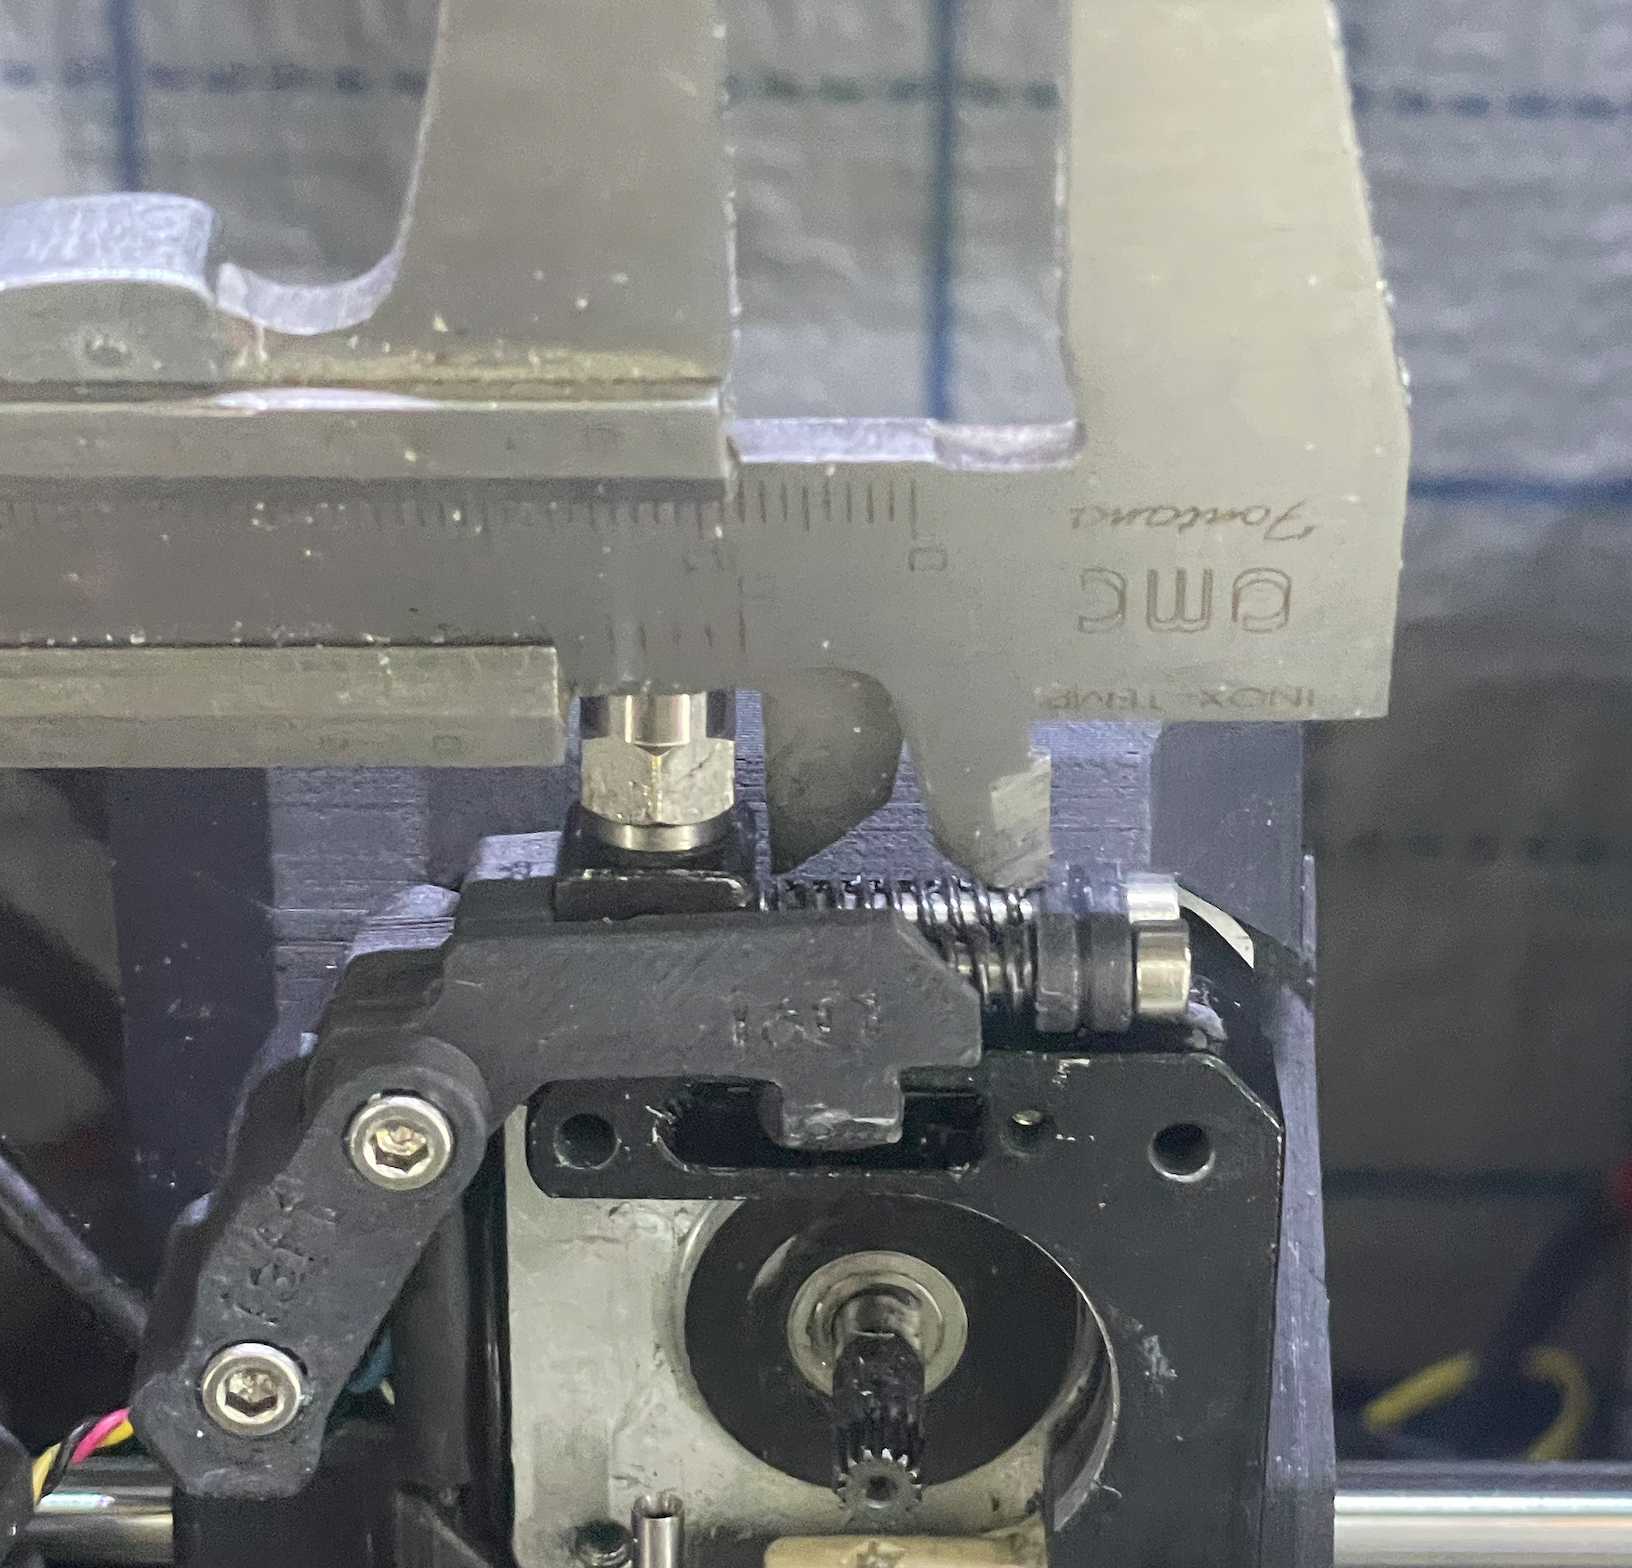
Measure the distance between PTFE tube mount and the screwguide (length of the spring) the idler works if set between 13.0mm and 14.8mm, if printed in PC-CF (recommended). If printed in other materials, the value can vary. My expierience if printed in PA12-CF was, that setting the inital value was not so comfortable than with PC-CF and due to different material, the value range seems to be smaller.
TIPPS for the first Idler Nut assembly:
- Use some lubrication (PTFE/Siliconeoil/or others) for screwing the idler spring screws into the idler nut.
- Take care on perpendicularity while screwing in the idler screws
- screw in both screws alternately after each revolution
So I would suggest to print at least the Idler-nut-B in PC-CF.
Start your installation with 14.0mm, with that value I got the best results. only change the tension slightly by 0.1mm steps
For the first Filament sensor calibration use a normal filament (PLA/PETG/ABS) It is helpful if the Idler was moved some times to get it working as intended.
Normally, once normal filament was calibrated, loading and detection of special filaments like flex is also working.
Optional: After normal filament detection is working, you can continue checking the idler function by calibration of special filaments.
Known Issues:
- Nozzles 0.25mm and smaller might be buggy for filament transportation, upcoming Version 1.1 will be fixed to that. Version 1.1 will support also nozzles 0.25 to 0.8mm without idler screw adjustmuents.
Im currently in testing on version 1.1 and might be released approx. Mid of May. Version 1.1 is then capable to produce more than 20Nm of torque (23,4Nm tested with PA Filament until the idler slips)
Background & Motivation:
After getting annoyed by filament loading and unloading issues or extrution stopping while printing, I redesigned the Idler and mainplate for Nextruder with MMU option.
In my previous Idler mod I used special hardware and even the function did not satisfy me.
It was always hard to get the correct idler tension for the used filement, which still often resulted into failed prints. https://www.printables.com/model/1059347-mk4mk4s-with-mmu-main-plate-with-improovement-step
This what I wanted to get improove with this model now.
I decided to designed the model without using special modifications or hardware, just only using printer equipped hardware, to make it easier for anyone who wants to have a fully function 3d printer.
My personal request:

To achieve the quality of this model, I have invested countless hours over the past few months in development and testing, not to mention the cost of all the printed idlers and mainplates.
After dozens of different idler designs and constructions (some very different to the original design), this model was tested with the highest relibality and filament range I ever had.
It would therefore be very grateful if you would or can express your satisfaction by a small donation, Thanks in advance!
paypal.me/ThorstenLachmann79